
Installation

Installation Instructions
S-5!® Warning! Please use these products responsibly! Visit our website or
contact your S-5! distributor for available load test results. The user and/or
installer of these parts is responsible for all necessary engineering and design
to ensure the CorruBracket™ 100T or 100T Mini has been properly spaced and
configured. Notice to S-5! users: Due to the many variables involved with
specific panel products, climates, snow melt phenomena, and job particulars,
the manufacturer cannot and doe
s not express any opinions as to the
suitability of any S-5! assembly for any specific application and assumes no
liability with respect thereto. S-5! products are tested for ultimate holding
strength on various profile types and materials. This information is available
from the S-5! website: www.S-5.com. This document is an installation guide
only and the photographs and drawings herein are for the purpose of
illustrating installation, tools and
techniques, not system de
signs. Information
contained within is intended to apply to the document as a whole.
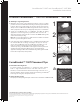
CorruBracket 100T or 100T mini is mounted directly into the crest of the
corrugation with the recommended sheet metal screws or bulb rivets, or can
be mounted directly over and into the supporting structure of the roof, i.e.
wood decking, wood or steel purlins, or trus
ses.
Tools Needed
• Screw Gun* or Bulb Rivet Gun • String Line
• Rag • Tape Measure
Use Proper Hardware
Only use appropriate screws and hardware when attaching this product to
the roof sheeting or directly into the supporting structure.
To Install CorruBracket™ 100T or CorruBracket™ 100T Mini
A) Attaching to roof sheeting
1. The only surface preparation necessary is to simply wipe away excess oil and debris.
2. Secure the CorruBracket™ 100T or CorruBracket™ 100T Mini directly into the crown of the roof profile with the
recommended screws via the p
re-punched holes, or by pre-drilling the proper-sized hole in the sheeting through the
pre-punched holes and riveting with bulb-type rivets (as per rivet manufacturers installation instructions). To achieve
tested holding strength, secure the CorruBracket 100T or CorruBracket 100T Mini by using all of the pre-punched hole
locations. Drive fasteners until washers are adequately seated and sealed.
Note: Do not over-drive fasteners; a slight extrusion of rubber around the washer is a good visual-
tightness check. If a fastener has been stripped due to ove
r-driving, it is important to remove the fastener and
replace it with a bulb rivet or larger diameter fastener. To avoid stripping, use screw gun with depth-sensing
nose piece or adjustable torque clutch.
3.
From either
end of the CorruBracket 100T or CorruBracket 100T Mini, slide
the included M8-1.25 hex flange nut
(flange side up) into the top groove. The CorruBracket 100T and CorruBracket 100T Mini are now ready to install the
S-5-PV Kit by insertion of the the PV stud, or other ancillaries by using a standard M8 bolt through the slotted top
thru-hole and the previously inserted hex flange nut. For critical attachment applications utilizing an M8-1.25 X 16
mm Hex Flange Bolt, tighten the M8 bolt to 160 inch pounds (13 foot pounds).
1
2
3
CorruBracket
™
100T and Mini Install
888-825-3432 | www.S-5.com
The right way to attach almost anything to metal roofs!
These instructions are for use by those experienced in the trade. Always follow appropriate safety precautions and use appropriate tools.
Sheeting Only
Head Bulb-Tite Rivet with 5/8" (16mm) EPDM Washer
Grip: 0.032" - 0.375" / 0.8mm - 9.5mm
Length - Stainless Steel Self Tapping Screw with Hardened
Steel Piercing Point - 5/16" (8mm) Hex Head - 5/8" (16mm)
Stainless Steel / EPDM Sealing Washer
Supporting Structure
Screw - 2" Length - 3/8" Hex Washer Head - Zinc/
Aluminum Cap
Milled Point - 2-1/2” Length - 3/8” Hex Washer Head -
Zinc/Aluminum Cap
Not Provided
Not Provided
Not Provided
Included
Step 2-b shows the CorruBracket™
100T Mini
*For time saving tool recommendations contact S-5!