
Install Manual

Installation Instructions
S-5!® Warning! Please use these products responsibly! Visit our website or
contact your S-5! distributor for available load test results. The user and/or
installer of these parts is responsible for all necessary engineering and design
Notice to S-5! users: Due to the many variables involved with specific panel
products, climates, snow melt phenomena, and job particulars, the
manufacturer cannot and does not express any opinions as to the suitability
of any S-5! assembly for any specific application and assumes no liability
with respect thereto. S-5! products are tested for ultimate holding strength
on various profile types and materials. This information is available from the
S-5! website: www.S-5.com. This document is an installation guide only and
the photographs and drawings herein are for the purpose of illustrating
installation, tools and techniques, not system designs. Information contained
within is intended to apply to the document as a whole.
The VersaBracket is made for trapezoidal exposed-fastened profiles.
Tools Needed
• Electric Screw Gun*
• Rag
• String Line
must be mounted directly over and into the supporting structure of the roof,
i.e. wood decking, wood or steel purlins or trusses, NEVER into the metal
To ensure brackets are installed in a straight line when desired, install a
single VersaBracket on each end of the roof at a measured, consistent
distance from the bottom edge of the roof. Use a string line between the
two brackets. Mount the remaining VersaBracket along the string line,
directly into the supporting structure of the roof.
To Install VersaBracket
™
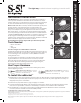
1. Determine the location of the supporting structure of the roof. When possible, secure the VersaBracket using all hole
locations; when not possible, always use the two upslope hole locations. The only surface preparation necessary is to
simply wipe away excess oil and debris.
2. Peel the release paper from the base, align, and apply to roof surface.
3. Secure the VersaBracket by drilling screws through pre-punched holes, directly into the supporting structure of the
roof (3 holes are provided for convenience and versatility). Consult the S-5! Load Table for more information.
1
2
3
VersaBracket
™
Install
888-825-3432 | www.S-5.com
The right way to attach almost anything to metal roofs!
S-5!® Warning! Please use this product responsibly!
S-5!® Warning! Please use this product responsibly! Products are protected by multiple U.S. and foreign patents. For published data regarding holding strength, fastener torque, patents, and trademarks,
visit the S-5! website at www.S-5.com.
Copyright 2013, Metal Roof Innovations, Ltd. S-5! products are patent protected.
S-5! aggressively protects its patents, trademarks, and copyrights. Version 112513.
These instructions are for use by those experienced in the trade. Always follow appropriate safety precautions and use appropriate tools.
Only use appropriate screws, and hardware when attaching this product
into the supporting structure.
Use Proper Hardware
Metal to Metal Screw Specifications: 1/4-14 Self
Drilling Screw - 1-1/2" to 2-1/2" Length - 3/8" Hex
Washer Head - Zinc/Aluminum Cap
Metal to Wood Screw Specifications: 1/4-14 Type 17-
AB Milled Point - 1-1/2" to 2-1/2" Length - 3/8" Hex
Washer Head - Zinc/Aluminum Cap
Not Provided
Not Provided
*For time saving tool recommendations contact S-5!
VB4767I-V1.0-0915
4.
The VersaBracket is now ready to install ancillaries. VersaBracket-47™ & VersaBracket-67™ utilize a nut and bolt
connection (stainless steel M8-1.25 nut and bolt not provided).
to ensure the VersaBracket™ has been properly spaced and configured.
VersaBracket should be placed in the flat of the panel, between the ribs, and
roofing material alone.