
User's Manual
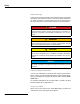
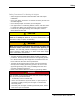


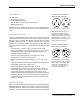

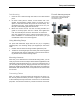
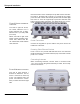
Table Of Contents

S&C Instruction Sheet 1069-500 9
Pole Mounting
1. Insert the two U-bolts through the holes in the claw-toothed
piece.
2. On each U-bolt, place a washer, a lock washer, and a nut.
Smaller pole diameters usually require a second nut as a
spacer to hold the bracket away from the U-bolt clamp. Fin-
ger-tighten the nuts. There should be about 12-15 mm (1/2-
5/8”) of U-bolt sticking past the second nut.
3. Mount the second U-bolt. Use the mounting bracket as a
guide to correctly space the two U-bolts, then tighten the
nuts. A horizontal pole-mount is also shown for reference.
Use lock washers and nuts to secure the bracket to the U-
bolts. Installation on a horizontal pole is the same, you just
use different holes in the mounting plate.
Using Mounting Straps
For poles with diameters larger than 50 mm (2”) or irregularly
shaped poles, use mounting straps (not supplied) to mount the
radio.
1. Position the universal mounting bracket against the pole.
2. Thread two mounting straps around the pole and through the
slots located near the top and bottom of the universal mount-
ing bracket. Secure the mounting straps.
Mounting Antennas
Now that you’ve attached the Universal Mounting Plate, you are
ready to proceed to the next steps. Most outdoor applications use
separately-mounted antennas, if so, mount your antennas now. If
you are using the temporary staging antennas, the next step is to
attach the IntelliCom WAN Mesh 1720 radio itself. The IntelliCom
WAN Mesh radio slides onto the mount plate and is secured with
four screws.
Connecting Cables
After your radio is mounted, attach the antennas, the power ca-
ble, and any Ethernet cables you need. In Figure 3.3, note that all
of the weatherproof caps have been removed from for illustrative
purposes. You should not leave any unused connector uncovered.
Setup and Installation
Figure 3.4 Mounting Examples
Vertical pole and horizontal pole
mounts; the universal bracket
mounted to a pole.