
Operation Manual


180 Starting and driving
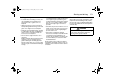
4 Close the doors on the left-hand side of
the car gently, to hold the carrier feet in
place.
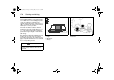
5 Now go around to the other side of the
car and remove the plastic cover from
the carrier’s adjustable foot. Fold back
the rubber strip and insert the pins on
the foot into the fixing holes. Do the
same with the other carrier and close the
doors gently.
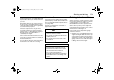
6 Tighten each carrier by turning the knob
clockwise (by hand). Tighten just
enough to bring the foot up against the
edges of the fixing holes.
Remove the carriers when not in use, as
they increase fuel consumption.
The instructions that accompany the carri-
ers also include advice on driving with a roof
load – we strongly recommend that you
read them carefully.
Fitting the roof carriers 3
33
3,
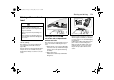
9-5 SportCombi with roof rails
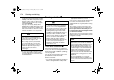
1 Clean the car’s roof rails.
2 Check the markings on the cross
members to see which is the front and
which is the rear roof carrier.
3 Place the cross members on the roof
rails, on their respective sides of the
center supports. The cross members
must not be placed beyond the front or
rear joint on the rail. Ensure that the
distance between the cross members is
at least 28 inches (700 mm).
If a roof box is to be fitted, the cross
members must be positioned so that the
tailgate can be opened fully without
hitting the roof box.
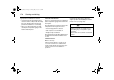
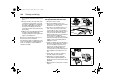
4 Using your thumb, press the bracket so
that it lies snugly against the outside of
the roof rail. Make sure that the roof
carriers are seated centrally on the
rubber spacers and that these sit
correctly on the roof rail. Pull the spacers
down slightly on the inside of the roof
rail.
5 Center the roof carriers so that they
protrude equally on both sides.
6 Tighten the roof carriers by hand.
Ensure that the tightening knobs are
upright once the roof carriers have been
tightened.
7 Make sure the roof carriers are securely
in place.
IB1294IB1295
95_US_M08.book Page 180 Friday, May 11, 2007 1:06 PM