
Quick Start Guide


Digital Wireless Microphone Systems
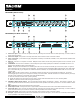
Transmiers:
1. Heads: Five (5) microphone elements are available, both condenser and dynamic, depending on the applicaon of the microphone
user (including Audix OM3 and OM5 dynamic heads). In general, condenser heads are more “transparent” and do not require the
microphone to be held as close to the mouth. On the other hand, dynamic heads are oen preferred for live performance because
they tend to accent the bass tones and they do not distort with very loud singing.
2. Display: OLED display is used to program and display the current status of the transmier funcons.
3. Switch: User programmable to toggle on/o, on/mute/ or on/on.
4. Baery and Control Cover: Unscrew counter-clockwise and gently slide open.
5. Antenna Cover: Do not hold the antenna cover. Your hand will shield the RF signal and cause poor audio performance.
6. IR Sensor Port: The IR sensor is used to transfer channel sengs and a random encrypon key from the receiver to the transmier.
7. Select buon: Press this buon to select a funcon. The rst press acvates the rst edit able funcon in the tree. Press again to move
to the next edit able funcon.
8. Parameter Up: Press this buon to increase the value of the selected funcon.
9. Parameter Down: Press this buon to decrease the value for the selected funcon.
10. USB Port: Plug a micro USB cable into the USB port to charge the baeries or upgrade the rmware.
11. Baeries: (not shown) AA NiMH, 2200 to 2500-mAHr recommended.
12. Baery Door: Open posion.
7
10
6
9
12
8
11
2
3
1
4
5
7
6
8
9
5
6
7
s
8
2
3
1
4
9
10
12
11
13
10
13
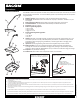
1. Antenna: Length and style varies with the transmiers model number. Antennas are eld replaceable to improve reliability and
redundancy.
2. Programmable Switch: Toggle on/o, on/mute/ or on/on.
3. Microphone Connector: TA4 mini XLR style: SACOM
™
oers a full range of lavaliere and headset microphones for opmal performance
of your SACOM
™
transmier. Works with both snap in and screw-in microphones.
4. Display: OLED display is used to program and display the current status of the transmier funcons.
5. IR Sensor Port: The IR sensor is used to transfer channel sengs and a random encrypon key from the receiver to the transmier.
6. Select: Press this buon to select a funcon. The rst press acvates the rst edit able funcon in the tree. Press again to move to
the next edit able funcon.
7. Parameter Down: Press this buon to decrease the value for the selected funcon.
8. Parameter Up: Press this buon to increase the value of the selected funcon.
9. Baeries: AA NiMH, 2200 to 2500-mAHr recommended.
10. Baery Door Locks: To open, press both at the same me and li the door open. To close, snap the door closed.
11. USB Port: Plug a micro USB cable into the USB port to charge the baeries or upgrade the rmware.
12. Belt-Clip: Spring-loaded clip for aaching the transmier to a belt or similar object. Spring pressure presses the clip into two holes in
the transmier body. Pull them out to remove or reverse the clip. Exercise cauon to prevent injury or scratching the case.
13. Contacts: Charging contact points for the docking staon.
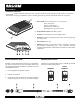
HAND-HELD:
BELT PACK:
SABINE INC.
l
13301 NW US Highway 441
l
Alachua, Florida 32615-8544 USA
l
Phone: +USA (386) 418-2000
l
Fax:
+USA (386) 418-2001
l
www.SacomUSA.com