Operation and maintenance manual Before using the machine, please read the attached operating instructions. Carefully read the safety rules Mode d'emploi Veuillez lire attentivement le mode d'emploi (notamment les consignes de sécurité) avant d'utiliser l'appareil.
IMPORTANT SAFEGUARDS When using electrical appliances, basic safety precautions should always be followed, including the following: 1. Read all instructions. 2. Do not touch hot surfaces. Use handles or knobs. 3. To protect against fire, electric shock and injury to persons do not immerse cord, plugs, or appliance in water or other liquid. 4. Close supervision is necessary when the appliance is used by or near children. 5. Unplug from outlet when not in use and before cleaning.
IMPORTANT Lors de l’utilisation d’appareils électriques, il est indispensable de respecter toujours les précautions de sécurité principales, y compris les suivantes : 1. Lire toutes les instructions. 2. Ne pas toucher de surfaces chaudes. Utiliser les poignées ou les boutons. 3. Afin d’éviter tout incendie, choc électrique et blessure, ne pas plonger le cordon, la fiche ou l’appareil dans l’eau ou dans n’importe quel liquide. 4.
CAUTION This appliance is for household use only. Any servicing, other than cleaning and user maintenance, should be performed by an authorized service centre. Do not immerse machine in water. To reduce the risk of fire or electric shock, do not disassemble the machine. There are no parts inside the machine serviceable by the user. Repair should be done by authorized service personnel only. 1 Check voltage to be sure that the voltage indicated on the nameplate corresponds with your voltage.
PRÉCAUTIONS Machine est réservée à un usage domestique. Tout entretien, en dehors du nettoyage et de l’entretien usuel par l’usager, doit être fait par un service aprèsvente autorisé. Ne pas plonger la base dans l’eau. Pour éviter les courts-circuits et les décharges électriques, ne pas démonter la base. Elle ne contient aucune pièce qui demande un entretien de la part de l’usager. Toute réparation doit être effectuée par le personnel d’un service après-vente autorisé.
CONTENTS - TABLE DES MATIÈRES GENERAL INFORMATION ................................................................................................................7 APPLIANCE .......................................................................................................................................8 ACCESSORIES ...................................................................................................................................................................... 8 INSTALLATION ...
GENERAL INFORMATION This coffee machine is suitable for preparing espresso coffee using coffee beans and it is equipped with a device to dispense steam and hot water. The machine is designed for domestic use and is not suitable for heavy or professional use.
APPLIANCE - APPAREIL Cup warming surface Plaque pour poser les tasses Coffee bean hopper Réservoir à café en grains Coffee bean hopper lid Couvercle du réservoir à café en grains Power button Interrupteur général Control panel Tableau de commande Service door Porte de service Dispensing head Distributeur Dregdrawer Tiroir à marc Drip tray + grill Bac d’égouttement + grille Brew group Groupe de distribution Hot water / steam knob Bouton robinet eau-chaude/vapeur Hot water / steam wand Tuyau de d
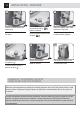
INSTALLATION - MONTAGE 9 STARTING THE MACHINE - MISE EN MARCHE DE LA MACHINE Make sure the power button is not pressed and that the machine is turned off. Check the machine features on the label on the bottom of the appliance. S’assurer que l’interrupteur général ne soit pas actionné. Vérifier les caractéristiques de la machine reportées sur la plaque signalétique située sur la partie inférieure. 1 Lift the cover off the coffee bean hopper. Soulever le couvercle du réservoir à café en grains.
INSTALLATION - MONTAGE 8 7 9 Place a container beneath the steam spout. Turn the knob until the position is reached. Wait until a steady flow of water comes out of the wand. Placer un récipient sous la buse de vapeur. Tourner le bouton jusqu’au point de repère . Attendre jusqu’à ce que l’eau coule de manière régulière. 10 11 Turn the knob until it is in the rest position ( ). 12 Remove the container. The machine is ready for use. Retirer le récipient. La machine est prête.
INTENZA WATER FILTER (OPTIONAL) FILTRE À EAU INTENZA (EN OPTION) 11 WATER FILTER (OPTIONAL) - FILTRE A EAU INTENZA (EN OPTION) To improve the quality of the water used, it is recommended to install the water filter. Remove the water filter from its packaging, immerse it vertically (with the opening facing upwards) in cold water and gently press the sides so as to let the air bubbles out. Afin d’améliorer la qualité de l’eau utilisée, il est conseillé d’ installer le filtre à eau.
CONTROL PANEL - TABLEAU DE COMMANDE LED Light - Touche / DEL Description - Description Coffee button: • the button has been pushed once: 1 coffee has been selected. • the button has been pushed twice: 2 coffees have been selected. Bouton de distribution du café : • touche appuyée une fois : 1 café sélectionné. • touche appuyée deux fois : 2 cafés sélectionnés.
LED Light - Touche / DEL Description - Description Alarm light: • permanently on : signals the machine is out of coffee, the water tank is empty, the drip tray is full or the dregdrawer is full (in this case, also empty the coffee grounds drawer in order to prevent failures).
ADJUSTMENTS - RÉGLAGES COFFEE VOLUME ADJUSTMENT PER CUP QUANTITE DU CAFÉ EN TASSE The coffee volume knob adjusts the amount of coffee brewed per cup. This adjustment has an immediate effect on the selected type of brewing. Pour régler la quantité de café distribuée dans une tasse. Ce réglage a un effet immédiat sur la distribution sélectionnée.
STAND-BY - STAND-BY The machine is designed for energy saving. After 60 minutes of inactivity, the machine goes into stand-by mode, the boiler is no longer heated and all the lights turn off with the exception of the temperature light which will blink slowly. Power consumption is reduced to a minimum. To turn the machine on again simply press the brew button. The machine will go through the rinse cycle if the circuit is cold. La machine a été conçue pour l'économie d'énergie.
ADJUSTMENTS - RÉGLAGES SAECO ADAPTING SYSTEM SAECO ADAPTING SYSTEM Coffee is a natural product and its characteristics may change according to its origin, blend and roast. The Saeco coffee machine is equipped with a self-adjusting system that allows the use of all types of coffee beans available on the market (not including flavored or carmelized).
COFFEE GRINDER ADJUSTMENT - RÉGLAGE DU MOULIN The machine enables a slight adjustment of the coffee grinder. Coffee may be ground according to your own tastes. The adjustment must be performed using the small pin located inside the coffee bean hopper. This must be pressed and turned using the supplied grinder adjustment key only. Press and turn the pin one notch at a time and brew 2-3 cups of coffee; the variation in grind may only be noticed in this way.
COFFEE BREWING AND HOT WATER DISPENSING DISTRIBUTION DE CAFÉ ET D’EAU CHAUDE COFFEE BREWING - DISTRIBUTION DE CAFÉ The coffee brewing cycle can be interrupted at any moment by pushing the button. To brew 2 cups, the machine dispenses half of the entered quantity and briefly interrupts dispensing in order to grind the second serving of coffee. Coffee dispensing is then restarted and completed. .
HOT WATER DISPENSING - DISTRIBUTION D’EAU CHAUDE Dispensing may be preceded by short sprays of hot water, and scalding is possible. The hot water/steam wand may reach high temperatures: do not touch it with bare hands. Use the appropriate handle only. Au début de la distribution, faire attention au risque de brûlures car il peut y avoir des éclaboussures d’eau chaude.
CAPPUCCINO CAPPUCCINO Dispensing may be preceded by short sprays of hot water, and scalding is possible. The hot water/steam spout may reach high temperatures: do not touch it with bare hands. Use the appropriate handle only. Au début de la distribution, faire attention au risque de brûlures car il peut y avoir des éclaboussures d’eau chaude.
7 8 9 Drain any residual water and wait until the spout ejects steam only. Turn the knob until it is in the rest position ( ). Immerse the steam spout in the milk. Évacuer l’eau de condensation éventuelle et attendre jusqu’à ce qu’il n’y ait que de la vapeur qui sorte. Tourner le bouton jusqu’à la position de repos ( ). Plonger la buse de vapeur dans le lait. 10 11 12 Turn the knob until the position is reached. Froth the milk by gently swirling the container.
CAPPUCCINO 16 17 After frothing the milk, brew coffee into the cup for a creamy cappuccino. When the machine ready indicator is permanently on, turn the knob until it is in the rest position. Remove the container. When the wand is cold, disassemble it and wash it carefully. Retirer le récipient. Quand le voyant est allumé fixement, tourner le bouton pour le mettre dans la position de repos. Lorsque la buse est froide, la démonter et la laver avec soin.
DESCALING - DÉTARTRAGE 23 DESCALING - DÉTARTRAGE When performing a descaling cycle, it is necessary to be present during the entire process (about 40 minutes). Caution! Do not use vinegar as a descaler. Descaling should be performed every 3 months, or when indicated by the machine. Use a non-toxic, nonharmful descaling solution. Saeco descaling solution is recommended. The used solution should be disposed according to the manufacturer instructions and/or regulations in the country of use.
DESCALING 4 Turn the knob until the position is reached. Dispense the descaling solution into the container for 15 seconds. 5 6 Turn the knob until it is in the rest position ( ). Empty the container with the used descaling solution. Tourner le bouton jusqu’à la position de repos ( ). Vider le récipient de la solution détartrante. Tourner le bouton jusqu’au point . Distribuer de repère la solution détartrante dans le récipient pendant 15 secondes.
10 Place a large container beneath the steam spout. Placer un récipient aux capacités adéquates sous la buse de vapeur. 11 Turn the knob until the position is reached to empty the water tank. When this operation is completed, turn the knob until it is in the rest position ( ). 12 Press the hot water button for 6 seconds to disable the descaling alarm. Appuyer sur le bouton pendant 6 secondes pour désactiver l’alarme du détartrage.
CLEANING AND MAINTENANCE NETTOYAGE ET ENTRETIEN MAINTENANCE DURING OPERATION ENTRETIEN PENDANT LE FONCTIONNEMENT During normal operation, the message for emptying the coffee grounds may appear on the display (see page 12). This operation must be performed when the machine is on. Le message qui indique de vider le marc peut apparaître pendant le fonctionnement normal (voir page 12). Cette opération doit être effectuée lorsque la machine est allumée. 1 Remove the dregdrawer. Retirer le tiroir à marc.
HOW TO CLEAN THE MACHINE - NETTOYAGE DE LA MACHINE The machine must be cleaned at least once a week. Do not immerse the machine in water or place any of its parts in a dishwasher. Do not use alcohol, solvents, benzene and/or abrasive objects to clean the machine. The water left in the tank for several days must be disposed of. Do not dry the machine and/or its components using a microwave and/or conventional oven. Le nettoyage de la machine doit être effectué au moins une fois par semaine.
CLEANING AND MAINTENANCE NETTOYAGE ET ENTRETIEN CLEANING THE BREW GROUP NETTOYER LE GROUPE DE DISTRIBUTION The brew group must be cleaned at least once a week. Before removing the brew group, remove the dregdrawer as shown in fig. 1 on page 26. Once you have washed and inserted the brew group, insert the dregdrawer and close the service door. Lubricate the brew group after approximately 500 brewing cycles. The grease for the lubrication of the brew group may be purchased from authorized service centres.
4 Apply the grease evenly on both side guides. Distribuer la graisse de façon uniforme sur les des convoyeurs latéraux. 7 The lever on the rear part of the group must be in contact with the Brew Group base. Le levier placé sur la partie arrière du groupe doit être en contact avec la base. 5 Make sure the brew group is in rest position; the two references must match. S’assurer que le groupe de distribution est en position de repos ; les deux références doivent coïncider.
TROUBLESHOOTING PROBLEMS The machine does not turn on. CAUSES SOLUTIONS The machine is not connected to the power source. Connect the machine to the power source. The plug has not been plugged into the back of the machine. Insert the plug into the machine’s power socket. Machine in stand-by. Press the brew button to start the machine. Coffee is not hot enough. The cups are cold. Warm the cups with hot water. Hot water or steam is not dispensed. The hole of the steam wand is clogged.
PROBLÈMES - CAUSES - REMÈDES PROBLÈMES La machine ne s’allume pas CAUSES La machine n’est pas branchée sur le réseau électrique. La fiche n’est pas branchée sur la prise située au dos de la machine. Machine en attente (Stand-by). Le café n'est pas assez chaud. Les tasses sont froides. La machine ne distribue ni eau chaude ni vapeur. Le café ne mousse pas. Le trou de la buse de vapeur est obturé. La machine se réchauffe trop lentement ou la quantité d’eau qui sort du bec est insuffisante.
SAFETY RULES IN CASE OF EMERGENCY Immediately unplug the cable from the outlet. USE THE APPLIANCE ONLY - Indoors. - To prepare coffee, dispense hot water, froth milk or heat beverages using steam. - For domestic use only. NEVER USE THE APPLIANCE For purposes other than those indicated above, in order to avoid danger. Do not introduce any substances other than those indicated in the instruction manual. During the normal filling of any reservoirs, all nearby reservoirs must be closed.
CONSIGNES DE SÉCURITÉ 33 EN CAS D’URGENCE Débrancher immédiatement la fiche de la prise murale. UTILISER EXCLUSIVEMENT L’APPAREIL - Dans un lieu fermé. - Pour la préparation de café, d’eau chaude, pour faire monter le lait ou pour réchauffer des boissons avec la vapeur. - Pour l’utilisation domestique. NE JAMAIS UTILISER L’APPAREIL pour des buts différents de ceux qui ont été susmentionnés, pour éviter tout danger.
SAFETY RULES FAILURES - Do not use the appliance in case of sure or suspected faults such as after falls. - Any repairs must be performed by an authorized customer service center. - Do not use the appliance with a defective power cable. If damaged, the power cable must be replaced by the manufacturer or authorized service centre. (Caution! Electrical current). - Turn off the appliance before opening the service door.
CONSIGNES DE SÉCURITÉ 35 tirant par le câble. - Attention ! Risque de brûlures au contact de l’eau chaude, de la vapeur et de la buse d’eau chaude/vapeur. PANNES - Ne pas utiliser l’appareil en cas de panne identifiée ou suspecte, par ex. après une chute. - Les éventuelles réparations doivent être effectuées par un service d’assistance agréé. - Ne pas utiliser un appareil présentant un câble d’alimentation défectueux.
TECHNICAL DATA - DONNÉES TECHNIQUES TECHNICAL DATA • Nominal voltage • Power rating • Power supply • Shell material • Size (w x h x d) • Weight • Cable length • Control panel • Water tank • Pump pressure (bars) • Boiler • Coffee bean hopper capacity • Quantity of ground coffee • Grounds drawer capacity • Safety devices See label on the appliance See label on the appliance See label on the appliance ABS - Thermoplastic 313 x 372 x 408 mm - 11.41 x 14.57 x 15.18 in 8 Kg - 17.63 lbs 1200 mm - 47.
EC DECLARATION OF CONFORMITY EC 2006/95, EC 2004/118, EC 1992/31, EC 1993/68 SAECO INTERNATIONAL GROUP S.P.
DECLARATION DE CONFORMITÉ CE EC 2006/95, EC 2004/118, EC 1992/31, EC 1993/68 SAECO INTERNATIONAL GROUP S.P.
Cod. 15001562 Rev.00 del 15-05-08 Type SUP031O Saeco International Group S.p.A. Via Torretta, 240 I-40041 Gaggio Montano, Bologna Tel: + 39 0534 771111 Fax: + 39 0534 31025 www.saeco.com The manufacturer reserves the right to change the features of the product without prior notice. Le producteur se réserve le droit d“apporter toutes modifications sans préavis. © Saeco International Group S.p.A.