del 15-05-10 EN Type HD8854 / HD8856 - Cod.15001999 Rev.01 The manufacturer reserves the right to change the features of the product without prior notice. www.philips.
www.philips.com/welcome Type HD8854 / HD8856 EN OPERATING INSTRUCTIONS READ THESE OPERATING INSTRUCTIONS CAREFULLY BEFORE USING THE MACHINE.
IMPORTANT SAFEGUARDS When using electrical appliances, basic safety precautions should always be followed, including the following: 1. Read all instructions. 2. Do not touch hot surfaces. Use handles or knobs. 3. To protect against fire, electric shock and injury to persons do not immerse cord, plugs, or appliance in water or other liquid. 4. Close supervision is necessary when the appliance is used by or near children. 5. Unplug from outlet when not in use and before cleaning.
Caution This appliance is for household use only. Any servicing, other than cleaning and user maintenance, should be performed by an authorized service center. Do not immerse machine in water. To reduce the risk of fire or electric shock, do not disassemble the machine. There are no parts inside the machine serviceable by the user. Repair should be done by authorized service personnel only. 1. Check voltage to be sure that the voltage indicated on the nameplate corresponds with your voltage. 2.
VI Carafe aSSemBlY ProCeDUre For correct use of the carafe, refer to the instructions on page 12. A The maintenance instructions for the carafe circuits are described on page 34. The disassembly and cleaning instructions for the components are described on page 39. 1 2 3 4 5 6 C A D B 7 B 8 E THOROUGHLY CLEAN THE CARAFE AT FIRST USE AND AFTER A LONG PERIOD OF INACTIVITY.
InDeX 1 GENERAL INFORMATION . . . . . . . . . . . . . . . . . . . . . . . . . . . . . . . . . . . . . . . . . . . . . . . . . . . . . . . . . . . . . . . 2 MACHINE COMPONENTS & ACCESSORIES CONTROL PANEL . . . . . . . . . . . . . . . . . . . . . . . . . . . . . . . . . 3 INSTALLATION . . . . . . . . . . . . . . . . . . . . . . . . . . . . . . . . . . . . . . . . . . . . . . . . . . . . . . . . . . . . . . . . . . . . . . . . 4 STARTING THE MACHINE . . . . . . . . . . . . . . . . . . . . . . . . . . . . .
2 General Information - TECHNICAL DATA General Information HOW TO USE THESE INSTRUCTIONS This coffee machine is suitable for preparing espresso coffee using coffee beans and is equipped with a device to dispense steam and hot water. The machine is designed for domestic use and not suitable for heavy or professional use. Keep these operating instructions in a safe place and make them available to anyone else who would use the coffee machine.
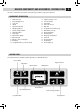
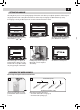
MACHINE COMPONENTS AND ACCESSORIES - CONTROL PANEL The references of this table are reported in the attached carton paper, in which the components are illustrated.
4 InStallatIon StartInG tHe maCHIne Before turning on the machine, make sure that the power button is set to "0". 1 Lift the right outer lid and remove the inner lid. 4 Remove the water tank using the handle. 7 Press the power button to the "I" position to turn the machine on. 2 Slowly pour coffee beans into the hopper. Replace the inner lid and close the outer lid. 5 Fill the tank with fresh drinking water. Do not exceed the "max" level indicated on the water tank.
5 SettInG tHe lanGUaGe This setting allows you to choose the operating language of the machine. It also allows you to adjust the parameters of the beverages to the typical parameters of the country where the machine is used. This is why some languages are differentiated also by country. If no language is selected, you will be requested to select it the next time the machine is started. 1 2 3 LINGUA ITALIANO ENGLISH DEUTSCH Select the desired language by pressing the arrow buttons ( ) or ( ).
6 InStallatIon fIrSt USe - USe after a PerIoD of InaCtIVItY To improve the product quality, carry out this procedure at first use of the machine and after long periods of inactivity. A few simple operations are needed to ensure the quality of your favourite beverages over time. 1 2 Place a container of large size under the coffee dispensing spout. 3 Press the button once or more until the icon is displayed. 5 4 Select the product by pressing the button shown.
7 IntenZa Water fIlter To improve the quality of the water you use and extend the life of your machine at the same time, it is recommended that you install the water filter. After installation, go to the water filter initialization programme (see the "MACHINE MENU", page 25). In this way, the machine informs the user when the water filter must be replaced.
8 aDJUStmentS Coffee StrenGtH (SBS) The SBS dial has been carefully designed to give your coffee the fullness and intensity you desire. Simply turn the dial and set the coffee from mild intensity to strong intensity, according to your own taste. SBS – SAECO BREWING SYSTEM The Saeco Brewing System (SBS) adjusts the fullness of the brewed coffee. The coffee may even be adjusted while brewing. This adjustment has an immediate effect on the selected type of brewing.
9 SaeCo aDaPtInG SYStem Coffee is a natural product and its characteristics may change according to its origin, blend and roast. The Saeco coffee machine is equipped with a self-adjusting system that allows the use of all types of coffee beans available on the market (not including flavored or carmelized).
10 aDJUStmentS DISPenSInG SPoUt HeIGHt aDJUStment Before brewing a product, and according to the kind of cup, adjust the height of the dispensing spout. To adjust, manually move the dispensing spout as shown in the picture. 1 2 3 4 Note: In some cases the dispensing spout can be removed to allow the use of very large containers.
11 StanD-BY moDe The machine is designed for energy saving. After 60 minutes of inactivity, the machine goes into stand-by mode, the boiler is no longer heated and all the devices turn off. Power consumption is reduced to a minimum. Press any button to turn the machine on again. The machine status can be manually changed to stand-by mode by holding the stand-by button pressed for 3 seconds. Note: 1 The stand-by mode cannot be activated if the service door is left open.
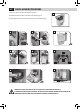
12 mIlK Carafe USe The machine is equipped with a carafe allowing for optimal milk frothing for the brewing of tasty cappuccinos, latte macchiatos and any milk-based beverage. I A B Note: Before using the carafe, make sure it is thoroughly clean and sanitary. If milk is left in the carafe, make sure it is still suitable for food consumption before using it. The container allows for an easy and practical steaming and frothing of milk.
13 7 8 C B A D B At this stage the carafe holes (A) are lower than the couplings (C). The carafe pins (B) are located at the same height of the guides (D). Insert the carafe by turning it towards the base through a round movement (as shown in the figure), until it is hooked to the hole (E) located in the drip tray. 9 DO NOT FORCE THE INCLINATION OF THE CARAFE. E The carafe will be naturally back in place.
14 Coffee BreWInG eSPreSSo / Coffee / lonG Coffee This procedure shows how to brew an espresso. To brew another type of coffee, press the appropriate button. Use proper coffee cups to prevent coffee from spilling. To brew 2 cups, press the button twice; the machine brews half of the entered quantity and briefly interrupts dispensing in order to grind the second coffee dose. Coffee brewing is then restarted and completed. 1 2 Position 1 or 2 cups to brew one or two espresso coffees.
15 BeVeraGe BreWInG WItH Pre-GroUnD Coffee The machine allows you to use pre-ground and decaffeinated coffee. Pre-ground coffee must be poured into the bypass doser positioned on the top of the machine. Only use ground coffee for espresso machines and never coffee beans or instant coffee (see the "beverage programming" section on page 22). This example shows how to brew an espresso by using pre-ground coffee. 1 2 Place 1 cup under the dispensing spout.
16 CaPPUCCIno ProDUCt BreWInG AT THE BEGINNING OF THE DISPENSING PHASE, THE MACHINE MAY PRODUCE SOME SPURTS OF MILK AND STEAM: RISK OF SCALDING! ALWAYS WAIT FOR THE CYCLE TO END BEFORE REMOVING THE CONTAINER. REFER TO THE SECTION "MILK CARAFE USE" (SEE PAGE 12). When brewing milk products, the machine dispenses the milk first and then brews the coffee. In this case, simultaneously brewing a double product is not possible. 1 2 Place the cup or the container where the milk-based product will be prepared.
CIClo PUlIZIa: Clean 7 17 8 Wait a few seconds. The machine starts the automatic cleaning process (if enabled - see page 29). At the end remove the cup with the cappuccino and place the handle back to the initial position. Upon completion of the cleaning cycle remove the milk carafe and put it in the refrigerator.
18 SPeCIal BeVeraGeS SPeCIal BeVeraGeS The machine is designed to brew other beverages not displayed on the main menu. Note: If no product is selected, the machine goes back to the main menu. WARNING: DISPENSING MAY BE PRECEDED BY SHORT SPURTS OF HOT WATER AND SCALDING IS POSSIBLE. THE STEAM/HOT WATER WAND MAY REACH HIGH TEMPERATURES: DO NOT TOUCH WITH BARE HANDS. USE THE APPROPRIATE HANDLE ONLY. 1 2 3 SPECIAL BEVERAGES LATTE MACCHIATO HOT MILK HOT WATER Press the button to access the menu.
19 latte maCCHIato This specific programme allows brewing a latte macchiato. 1 2 3 SPECIAL BEVERAGES LATTE MACCHIATO HOT MILK HOT WATER Place the cup. Rotate the upper part of the container handle on the cup. After selecting "LATTE MACCHIATO" press (OK). At the end of the brewing procedure, take the cup with the latte macchiato. Hot mIlK This specific programme allows brewing hot milk. 1 2 3 SPECIAL BEVERAGES LATTE MACCHIATO HOT MILK HOT WATER Place the cup.
20 SPeCIal BeVeraGeS Hot Water DISPenSInG WARNING: DISPENSING MAY BE PRECEDED BY SHORT SPURTS OF HOT WATER AND SCALDING IS POSSIBLE. THE STEAM/HOT WATER WAND MAY REACH HIGH TEMPERATURES: DO NOT TOUCH WITH BARE HANDS. USE THE APPROPRIATE HANDLE ONLY. 1 2 3 SPECIAL BEVERAGES HOT MILK HOT WATER STEAM Place a container beneath the hot water / steam wand. After selecting the "HOT WATER" option, press (OK) and wait for the programmed quantity to be dispensed.
BeVeraGe lenGtH QUICK ProGrammInG 21 BREWING MAY BE PRECEDED BY SHORT SPURTS OF MILK AND STEAM: RISK OF SCALDING! REFER TO THE SECTION "MILK CONTAINER USE". This section shows the programming procedure for the Cappuccino. This is meant as an example to introduce you to the steps necessary for a quick and easy programming of all the beverages. After a quick programming of the beverage, it is possible to carry out a finer and more detailed adjustment by means of the "BEVERAGE MENU" (see page 22).
22 BEVERAGE MENU All beverage settings can be customized. 1 2 MENU BEVERAGE MENU MACHINE MENU Press the MENU button to access the machine main menu. Press the OK button to access the BEVERAGE MENU. BEVERAGE MENU ESPRESSO CAFFE’ CAFFE’ LUNGO Scrolling/Selection button Scrolling/Selection button Selection/confirmation button Exit button DEFAULT For each beverage it is possible to reset the original factory settings. After selection of this function, the customized settings are deleted.
23 In this case we look at how to programme a customized cappuccino. The milk managing options are not shown when a coffee brewing (espresso or long coffee) is being programmed. CAPPUCCINO COFFEE QUANTITY PREBREWING COFFEE TEMPERATURE COFFEE QUANTITY PREBREWING COFFEE TEMPERATURE COFFEE LENGTH This section allows you to program the quantity of coffee to grind for the beverage brewing: this setting will affect the coffee aroma.
24 BEVERAGE MENU CAPPUCCINO COFFEE QUANTITY PREBREWING COFFEE TEMPERATURE MILK QUANTITY This section allows you to program the quantity of milk for each selected beverage. The strip allows you to determine exactly the quantity of milk to be dispensed. HOT WATER WATER QUANTITY DEFAULT WATER QUANTITY This section allows you to program the quantity of water to be dispensed when pressing the hot water button. The strip allows you to determine exactly the quantity of water to be dispensed.
MACHINE MENU The machine allows you to customize the operation settings. 1 2 MENU BEVERAGE MENU MACHINE MENU 1 Press the MENU button to access the machine main menu. 2 Select the menu by pressing the ( ) button. Press the OK button to access the MACHINE MENU.
26 MACHINE MENU GENERAL MENU GENERAL MENU To change the machine operation settings. TONE This function activates/deactivates the acoustic alarms. OFF To deactivate the acoustic alarms ON To activate the acoustic alarms This function enables allows you to choose how the boilers on the machine are activated, to promote energy saving. ecomode OFF This function activates all the boilers each time the machine starts up to be immediately able to dispense all kinds of beverages.
27 MENU display display menu This menu allows you to set the menu language and the display brightness. This setting is of fundamental importance for correctly adjusting the parameters of the machine according to the country where the machine is used. language english BRIGHTNESS The currently selected language is displayed. To set the correct display brightness according to the room illumination.
28 MACHINE MENU water menu This menu allows setting correct water parameters for coffee brewing. water menu hardness enable filter activate filter To change the machine water hardness setting. The "Hardness" function allows adjusting the machine to the level of hardness of the water used. The machine will then request descaling at the right moment. Measure water hardness as shown on page 5. To activate/deactivate the warning signal to replace the water filter.
29 maintenance This menu allows setting all the functions for correct machine maintenance MAINTENANCE This function shows how many products have been brewed for every single type of coffee since the last reset. COUNTERS This function enables the wash cycle for the brew group (See page 30). brew group This function enables the wash cycle for the carafe used for preparing milk beverages (See page 34). Note: This wash cycle is fundamental for a correct maintenance of the carafe.
30 maIntenanCe BREW GROUP CLEANING CYCLE To rinse the brew group, simply clean with water as shown on page 38. This wash cycle completes the maintenance process of the brew group. We recommend carrying out this cycle on a monthly basis or every 500 coffees using the Saeco brew group cleaning tablets, which can be purchased from Saeco Customer Service or an authorized retailer. WASH CYCLES CANNOT BE STOPPED. DO NOT LEAVE THE MACHINE UNATTENDED DURING THIS OPERATION.
31 BOILER DESCALING CYCLE MENU Descaling should be performed every 1-2 months or when the machine displays the relevant message. The machine must be on to perform this cycle; it automatically controls the distribution of the descaling solution. In case of conflict, priority must be given to what is indicated in the operation and maintenance manual over the instructions provided on separately sold accessories and materials. DO NOT LEAVE THE MACHINE UNATTENDED DURING THIS OPERATION.
32 MAINTENANCE 4 5 6 FILL HALF CARAFE WITH WATER. INSERT IN BREW. POSITION EMPTY TRAY UNDER BREW GROUP PLACE A CONTAINER UNDER HOT WATER & CARAFE DISP SPOUT OK OK Empty the drip tray placed under the dispensing spout (page 36 - fig. 2) and then replace it on the machine. Then, press the "OK" button. 7 OK Fill half the carafe with fresh water (page 34 - fig. 7). Insert the carafe and place it in the brewing position. Then, press the "OK" button.
33 13 14 PLACE A CONTAINER UNDER HOT WATER & CARAFE DISP SPOUT 15 STEP 2/2 RINSING STEP 2/2 RINSING OK PAUSE PAUSE Place a container under the dispensing spout and a container under the hot water wand. Then, press the "OK" button. The rinse cycle is activated. The bar shows the cycle progress. If the containers need to be emptied, press the "Pause" button Then, press the "START" button when the container has been emptied and replaced.
34 maIntenanCe MILK CIRCUIT MAINTENANCE It is possible to sanitize the milk circuits by carrying out a simple and quick cycle allowing for a thorough cleaning. This wash completes the maintenance process of the milk carafe. We recommend carrying out this cycle on a monthly basis using Saeco cleaning solution, which can be purchased from Saeco Customer Service or an authorized dealer. WASH CYCLES CANNOT BE STOPPED. DO NOT LEAVE THE MACHINE UNATTENDED DURING THIS OPERATION.
35 10 B 11 C A D B At this stage the carafe holes (A) are lower than the couplings (C). The carafe pins (B) are located at the same height of the guides (D). Insert the carafe by turning it towards the base through a round movement (as shown in the figure), until it is hooked to the hole (E) located in the drip tray. 12 13 14 POUR DETERGENT INTO CARAFE & FILL WITH WATER OK E The carafe will be naturally back in place. Place a large empty container under the dispensing spout.
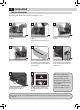
36 CleanInG maIntenanCe DUrInG oPeratIon During normal operation, the following messages may appear: "Empty coffee grounds drawer" and/or "Empty drip tray". This operation must be performed when the machine is on. 1 Press the button and open the service door. 4 Empty and wash the drip tray and the cover with fresh water. 2 Remove the drip tray and used grounds drawer. 5 Correctly reinstall all the components. 3 Empty the used grounds drawer and wash it with fresh water.
37 General maCHIne CleanInG The cleaning procedure described below must be carried out at least once a week. Note: If water remains in the tank for several days, do not use it. WARNING! Never immerse the machine in water. 1 Turn off the machine and unplug it. 4 Remove the grill and wash it thoroughly. 7 Remove the dispensing spout and wash it with water. 2 Take out the water tank and wash it with fresh water. 5 Remove the support under the grill. Wash it taking care of the seal area.
38 CleanInG BreW GroUP CleanInG Wash the brew group at least once a week. Before removing the group, remove the used grounds drawer as shown in fig. 2 on page 36. Wash the brew group with lukewarm water. Lubricate the brew group after approximately 500 brewing cycles. The brew group lubricant may be purchased from an authorized service center. WARNING! Do not wash the brew group with detergents that may compromise its correct operation. Do not wash it in the dishwasher.
39 mIlK Carafe CleanInG The carafe must be removed and properly washed at least once a week. This procedure guarantees the perfect sanitation of all components. Note: Pay attention to how the components are assembled. This little shrewdness will facilitate the subsequent reassembling. 1 2 The carafe must be removed from the machine and emptied for its cleaning. 4 Disengage the handle by rotating it clockwise. 5 Rotate the handle counter-clockwise to the unlock position.
40 CleanInG mIlK Carafe aSSemBlY Pay attention during the assembly phase. In case the components do not smoothly enter in their positions, read the instructions more carefully and repeat the assembly procedure. Note: The inner side of the service door shows a quick guide on how to reassemble the carafe. 1 Insert the inner fitting in the hose and press until fully inserting it. 4 Insert the unit previously assembled in the cover base. Pay attention to the reference. 7 Fit the cover on the carafe.
maCHIne WarnInGS Help Message Displayed CLOSE HOPPER DOOR 41 How to Reset the Message Close or correctly place the coffee bean hopper inner cover to be able to prepare a beverage. Fill the coffee bean hopper with coffee beans. ADD COFFEE Insert the brew group back in place. INSERT BREW GROUP Insert the coffee grounds drawer and the drip tray. INSERT COFFEE GROUNDS DRAWER EMPTY COFFEE GROUNDS DRAWER Remove the used grounds drawer and empty the coffee grounds into a suitable container.
42 MACHINE WARNINGS Help Message Displayed TURN CARAFE INTO BREWING POSITION ESC How to Reset the Message A beverage with milk has been selected. The machine requires the carafe handle spout to be placed into dispensing position. Press the button "ESC" to cancel the selection. The carafe rinse function has been selected. TURN CARAFE INTO RINSING POSITION Press the button "ESC" to cancel the selection. ESC INSERT CARAFE ESC The selected operation requires the milk container for brewing.
SAFETY RULES SOS 43 IN CASE OF EMERGENCY IMMEDIATELY UNPLUG THE CORD FROM THE OUTLET. ONLY USE THE APPLIANCE • • • • Indoors. For preparing coffee, hot water and for frothing milk. For domestic use. This appliance is not intended for use by persons (including children) with reduced physical, sensory or mental capabilities, or lack of experience and knowledge, unless they have been given supervision or instruction concerning use of the appliance by a person responsible for their safety.
44 SAFETY RULES DANGERS • • • • • • • The appliance must not be used by children and persons who have not been informed of its operation. The appliance is dangerous to children. When left unattended, unplug from the electrical outlet. Keep the coffee machine packaging out of the reach of children. Never direct the jet of hot water and/or steam towards yourself or others. Danger of scalding. Do not insert objects through the appliance’s openings. (Danger! Electrical Current!).
45 EC DECLARATION OF CONFORMITY YEAR 09 EC 2006/95, EC 2004/108. Saeco International Group S.p.
46
47