
Operation Manual


MACHINE CONTROLS AND PARTS
INSTALLATION
85 86
............................
............................
............................
ESC
............................
ENT
WARMING UP......
Unpacking/installation
Standard packing is strong enough to protect the
machine during mail shipping. Keep this package
to return the machine to the manufacturer,
whenever necessary.
Before installing the machine, keep to the safety
indications at page 83.
Whenever possible, use the machine with swivel
(24). When installing the machine, make sure
the swivel is always fitted in the provided area on
the lower side of the machine.
Power supply connection
Warning: electric current may causedeath!
Always keep to safety rules.
The coffee machine must be connected to an
adequate socket. Voltage must suit to the voltage
specified on the appliance rating plate.
Never use defective power cords! Defective
power cords and plugs must be replaced by an
authorised personnel.
Should an extension cord be used, check its
perfect conditions. The extension cord must have
a minimum section of 1 mm
2
and must be
supplied with a three-pole plug/socket.
Starting and use
Parts under current shall never be in
contact with water: danger of short-
circuit! Overheated steam and hot
water may cause burns. Do not direct
steam or water jet towards the body;
furthermore, great attention must be
given when touching either the steam/
hot water spout or the heating plate:
danger of burns!
Never use the machine without wateror coffee
beans.
Remove measuring spoon, brush and the central
unit key from the coffee grounds container (1)
and keep them within reach.
Unwind the power cord (5) from the rear side of
the machine.
30
Remove the cover (15) and fill the container with
coffee beans (300 g approx.), then, replace the
cover. Adjust grinding by means of the grind
adjustment lever (17), positioning it on point “5”
of the scale.
Never fill the coffee bean container with other
products since they might damage the machine!
Before filling the container with coffeebeans,
make sure the pre-ground coffee container (14)
is closed to prevent coffee beans from falling into
it. They might damage the machine!
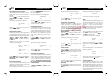
1 Coffee grounds container
2 Drip tray
3 Cup holder surface
4 Main switch
5 Power cord
6 Coffee dispensing unit
7 Steam/hot water spout with
burn-protection
8 Control panel
9 Steam knob
10 Cup heating plate
11 Water tank
12 Water tank cover
13 Water level
14 Pre-ground coffee container with cover
15 Coffee bean container cover
16 Coffee bean container
17 Grind adjustment lever
18 Coffee dosage adjustment lever
19 Service door
20 Filling funnel
21 Handle for assembling and disassembling
of central unit
22 Central unit
23 Coffee rest drawer
24 Swivel
25 Cappuccinatore
26 Suction pipe
27 Dispenser
28 Cappuccinatore adjusting valve
29 Cappuccinatore cover
Description of the control panel
Digital display
Standby switch:
energy saving function on/off
Selection key for 1 or 2 cups of tall coffee or key
“
” in the programming mode
Selection key for 1 or 2 cups of regular coffee
or key “
” in the programming mode
Selection key for 1 or 2 cups of espresso coffee
or “ESC” in the programming mode
Pre-ground coffee selection button or “ENT” in the programming mode
Cappuccino selection key
Hot water on/off key
courtesy of