
Installation Instructions


PI-EZINS 12/16/14
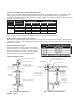
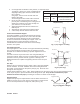
2” Clearance Horizontal Support
The 2” Clearance Horizontal Support provides horizontal support for the vent
and maintains a minimum of 2” of clearance to the wall. To install: Secure the
mounting plate to the wall by installing fasteners through the pilot holes in the
mounting plate, and into the wall. Install a pair of Support Clamps around the
vent, and secure the Support Clamp to the Horizontal support by installing a
bolt through the mounting tabs on the Support Clamps and through the pilot
hole in the 2” Horizontal Support (See Fig. 12).
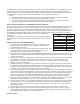
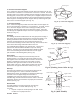
1” Clearance Support
The 1” Clearance Support provides horizontal and/or vertical support for
the vent and maintains a minimum of 1” air clearance. To Install: Secure
the 1” Clearance Support to the wall or ceiling by installing screws
through the mounting plate and into the mounting surface. Route the
vent through the adjustable clamps and secure by tightening the Worm
Gears (See Fig. 13).
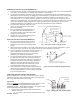
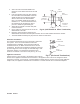
Flashings
The flashing should be installed where the vent pipe passes through a
roof and is used to seal the opening in the roof from the outside. The
flashing should be located so that the vent is vertical and proper
clearance is maintained as the vent passes through the roof.
The Tall Cone Flashing is used on flat roofs only. Once located, each
corner of the base flange should be nailed to the roof.
The Adjustable Roof Flashing is for pitched roofs. The low end
portion of the base should be installed on top of the roofing
material. The upper end of the flashing base should be nailed
to the roof and roofing material should cover over the upper
part and sides of the flashing base (See Fig. 14).
Storm Collar
The Storm Collar is designed to shed rain away from the
flashing opening. To install, place the Storm Collar over the
last segment of vent and slide it down to where it contacts the
flashing. Depending on the type of storm collar you have,
tighten the worm gear or the bolts on the tab to secure the
Storm Collar to the vent. Apply silicone sealant over the joint
between the vent pipe and the Storm Collar (see Fig. 14).
Rain Cap
The Rain Cap terminates the vent system and prevents rain
from entering the vent. Refer to Vertical Termination
Requirements section for guidelines for locating the Rain Cap.
To Install: Once the proper height and clearance is
established, the Rain Cap connects to the vent pipe via
standard Ring and Tab connection method. Refer to Joint and
Connection Section for instructions on proper joint connection
method (See Fig. 14).
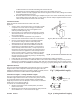
Wall Thimble
The Wall Thimble is used for passing the vent through
combustible interior or exterior walls (See Fig. 15).
To Install:
1. Prepare a square or round opening in the wall. Refer
to Table 2 to for proper hole size.
Fig 14. (Flashing, Storm Collar & Cap)
Storm
Collar
Adjustable
Flashing
Apply Sealant
Rain Cap
Pitched
Roof
Framing
Dimension
(See Table 2)
Fig 15. (Wall Thimble)
Apply Sealant
Vent
1" Min. Overlap
Wall Section
Wall Thimble
Fi
g
12. (2" Clearance Support)
Mounting Plate
Support Clamps
Worm Gears
Mounting Plate
Fi
g
13. (1" Clearance Support)