
Installation Instructions


PI-EZINS 12/16/14
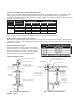
2. Select one half of the Wall Thimble and
position it so the shield extends into the wall
section.
3. From the opposite side of the wall, position
the other half of the wall thimble so that the
shield extends into the wall and engages
with the other half of the Wall Thimble.
Note: The thimble shields must overlap a
minimum of 1”. If the wall is thicker than 6”,
the shields may be extended by using a
piece of 6” Diameter galvanized pipe.
4. Apply silicone sealant to seal the trim plate
to the wall surface.
5. Use 4 #10x1-1/4” wood screws to secure the
Wall Thimble to the wall.
6. Route the vent through the opening in the
Wall Thimble and seal the annular space between the vent and Thimble with silicone sealant.
7. The Wall Thimble Assembly may be painted to match the wall décor.
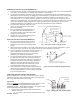
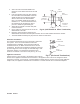
Horizontal Termination
The Horizontal Termination is used to terminate a horizontal
vent system. There are several different Horizontal
Termination styles available. These include the Mitered
Termination Screen, an Elbow Termination and a Screen
Termination. All Horizontal Terminations install the same way
by connecting them to the vent pipe via standard Ring & Tab
Connection method. The Horizontal Termination must
terminate a minimum of 6” from the wall (See Fig. 16 & 17).
Appliance Connectors
Connect the Saf-T Vent system to the appliance flue collar as
directed in the appliance manufacturer’s instructions. If the appliance flue collar is not designed for direct
connection to the Saf-T Vent system, a special appliance adapter may be required. See Heat-Fab appliance
adapter chart, the appliance manufacturer’s instructions or contact Heat-fab for recommended adapters.
Mitered
Termination
Tee
Termination
Screen
Termination
Fig 17. (Horizontal Terminations)
Elbow
Termination
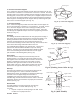
6" Minimum
Extension
from wall
Wall
Thimble
Fi
g
16. (Wall Thimble & Elbow Termination
)
Framing
Dimension
(See Table 2)