
User's Manual


The CFIP Series Full Outdoor Unit Installation Manual • Rev. 1.3 • Software version 1.42b
© SAF Tehnika JSC 2010
8
5
6
7
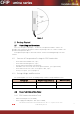
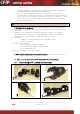
Figure 2.1. Assembling DC power weatherproof connector
1. You will need: (1-6) DC connector components and (7) ready 2-wire DC power cable.
2. Wider sealing rubber ring should be fitted inside from the front end of (6).
3. Narrower sealing rubber ring should be fitted inside from the rear end of (6).
4. Parts of the DC connector should be put on the cable in the sequence as shown
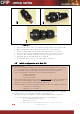
5. DC power cable should be soldered in any layout – any polarity can be used.
6. Afterwards, part (6) should be tightened on to part (5).
7. Assembled DC power connector after tightening the last part (1)
4.2 Initial configuration with Web GUI
(!) Before you start
• Your connected laptop should be in the same subnet with manageable CFIP, so you can
“see” them; that is why, the laptop Ethernet port settings should be set as follows: (in
‘Microsoft Windows’ go to
Control panel Æ Network Connections Æ Local Area
Connection Æ Properties Æ Internet Protocol (TCP/IP) Æ Properties
):
– IP address 192.168.205.1;
– netmask 255.255.255.0;
– everything else is blank.
• CFIP Lumina requires power source with the minimum of 35W to connect the laptop to the
CFIP Lumina. Dedicated power supply can be purchased from SAF Tehnika JSC as
optional accessory. Any power source polarity can be used.
• To know IP address, side value should be read from the label. See Chapter 2.3 for details.
– If Low Side -> IP: 192.168.205.10
– If High Side -> IP: 192.168.205.11
Connect to CFIP Lumina by entering IP address in the browser address line - by default
192.168.205.10 for the low side and 192.168.205.11 for the high side.
When asked to log in, the default user name is
admin
and password is
changeme
.
It is recommended to use the following or later versions of web-browsers:
– IE v. 6.0 (SVG plugin must be installed)
– Mozilla Firefox v. 2.0.0.11