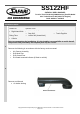
SS122HF SAFARI V-SPEC SNORKEL To Suit: TOYOTA HILUX (KUN26 Series) Facelift Model 3.0L Turbo Diesel D-4D (1KD-FTV Engine) Built: 08/2011 – 06/2015 01/02/2014 Parts List ITEM PART NO. DESCRIPTION 1 320-133-400 BODY - SNORKEL (SS122HF) 1 2 000-135-800 3 ½" AIR RAM ASSEMBLY 1 3 320-032-400 BRACKET - UPPER MOUNTING 1 4 000-002-100 BOLT - HEX - 6mm x 1.0 x 14mm (SEMS) 2 5 000-951-300 SCREW - S/T - 4.2mm x 16mm - S/S 3 6 000-960 INSERT - PLASTIC 3 7 000-110 STUD - 8mm x 1.
SS122HF SAFARI V-SPEC SNORKEL To Suit: TOYOTA HILUX (KUN26 Series) Facelift Model 3.0L Turbo Diesel D-4D (1KD-FTV Engine) Built: 08/2011 – 06/2015 Installation Guide Fitment to: Special Tools: • • • • Right Hand Side Fitting Time: • 111mm Hole Saw Step Drill Loctite 243 (thread lock) • • Masking Tape Touch-up paint 120min Prior to commencing the installation, it is the installer's responsibility to verify that all components and particularly the template (Item 14) are correct.
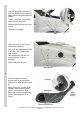
Align the guard panel template (Item 14) with the upper and rear edges of the RHS guard panel as shown. Tape the template to the guard panel with masking tape. Mark all hole positions with a felt tip pen. Remove the template. 4 Drill a pilot hole for each of the marked hole positions. Use a 111mm diameter hole saw to drill the snorkel body outlet hole position. Use a step drill to drill the six mounting holes to 16mm diameter. Deburr and paint all holes.
NEW ZEALAND INSTALLATIONS ONLY : Safari have developed 2 methods of Snorkel A pillar attachment, for the conventional method please proceed with the current document alternatively please see the link below for further instructions. www.safari4x4.co.nz/apillarmounting 6 Place a strip of masking tape along the A-pillar panel. Carefully install the snorkel body (Item 1) to the guard panel.
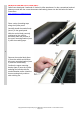
8 Drill a pilot hole at each of the three marked hole positions. Drill each hole position to 8mm diameter with a step drill or 8mm drill bit. Deburr and paint holes. 9 Install the plastic inserts (Item 6) into the 8mm diameter holes in the A-pillar. Secure the upper mounting bracket (Item 3) to the A-pillar with three self-tapping screws (Item 5). 10 INSTALLER OPTION : The air cleaner housing base contains a drain valve as shown. The drain valve can permit water to enter the air intake.
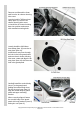
11 Remove and discard the foam seal from the air cleaner housing inlet snout. Loosely install a 70/90mm hose clamp (item 11) onto the air cleaner housing inlet snout, re-install the air cleaner housing base into position and secure with standard mounting bolts. 12 Loosely install the 90/110mm hose clamp (Item 12) onto the air entry hose (item 10).
Fasten the snorkel body to the upper mounting bracket with hex bolts (Item 4). 14 Align the air entry hose for best fitment (Ensure the air entry hose is installed hard up against the shoulder of the snorkel body outlet), correctly position the 70/90mm and 90/110mm hose clamps at either end of the air entry hose and tighten the hose clamps. 15 Install the black hose clamp (Item 13) loosely over the base of the air ram assembly (Item 2). Install the air ram assembly onto the snorkel body.