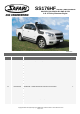
SS176HF SAFARI V-SPEC SNORKEL HOLDEN COLORADO RG 4WD & SUV 2.8L CTDI 4cyl Duramax Engine 01/04/2013 Parts List ITEM PART NO. DESCRIPTION 1 745-133-000 BODY - SNORKEL (SS176HF) 1 2 000-135-800 3 ½" AIR RAM ASSEMBLY 1 3 745-032-000 BRACKET - UPPER MOUNTING 1 4 000-002-100 BOLT - HEX - 6mm x 1.0 x 14mm (SEMS) 2 5 000-951-300 SCREW - S/T - 4.2mm x 16mm - S/S 3 6 000-960 INSERT - PLASTIC 3 7 000-110 STUD - 8mm x 1.
SS176HF SAFARI V-SPEC SNORKEL HOLDEN COLORADO RG 4WD & SUV 2.8L CTDI 4cyl Duramax Engine Installation Guide Fitment to: Special Tools: • • • • • • Right Hand Side Fitting Time: • 180min 111mm Hole Saw Step Drill 4.
Align the guard panel template (Item 17) with the upper and rear edges of the RHS guard panel as shown. Tape the template to the guard panel with masking tape. Mark all hole positions with a felt tip pen. Remove the template. 4 Drill a pilot hole for each of the marked hole positions. Use a 111mm diameter hole saw to drill the snorkel body outlet hole position, ensure the hole saw marks the air intake baffle as shown. Use a step drill to drill the six mounting holes to 16mm diameter.
NEW ZEALAND INSTALLATIONS ONLY : Safari have developed 2 methods of Snorkel A pillar attachment, for the conventional method please proceed with the current document alternatively please see the link below for further instructions. www.safari4x4.co.nz/apillarmounting 6 Install the upper mounting bracket (Item 3) to the snorkel body (Item 1) with hex bolts (Item 4).
8 Remove the snorkel body (Item 1) from the vehicle and remove the upper mounting bracket (Item 3) from the snorkel body. Position the upper mounting bracket (Item 3) onto the A-pillar and align the bracket with the marked bracket outline. Mark the three mounting hole positions with a felt tip pen. 9 Drill a pilot hole at each of the three marked hole positions. Drill each hole position to 8mm diameter with a step drill or 8mm drill bit. Deburr and paint holes.
11 Carefully install the snorkel body (Item 1) to the guard panel, align the snorkel body to the guard panel and upper mounting bracket. When correctly aligned, fasten the snorkel body to the guard panel with body washers (Item 8) and nyloc nuts (Item 9). Fasten the snorkel body to the upper mounting bracket with hex bolts (Item 4). 12 Align the notched end of the air cleaner inlet template (item 13) to the end and moulding part-line of the air cleaner inlet housing as shown.
13 Measure and mark a line around the circumference of the steel adaptor (item 11) 40mm in from the end as shown. Install the steel adaptor and align the marked line to the end of the air cleaner inlet housing. Align the notched relief of the steel adaptor to the air cleaner inlet housing. With the steel adaptor correctly installed mark the three hole positions onto the steel adaptor. Remove the steel adaptor and drill a pilot hole for each of the marked hole positions. Drill the three hole positions to 4.
15 Trial fit the air cleaner housing and check for adequate clearance between the steel adaptor and the standard hole in the inner guard panel, if necessary mark the inner guard panel for the extra clearance. If more clearance is required, remove the air cleaner housing and file/cut the marked section of the inner guard panel for the required clearance. Deburr and paint to prevent rust. Install the air cleaner housing and fasten with standard mounting bolts.
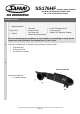
Align the hose for best fitment, correctly position the 80/100mm and 90/110mm hose clamps at either end of the air entry hose and tighten the hose clamps. 18 Install the black hose clamp (Item 16) loosely over the base of the air ram assembly (Item 2). Install the air ram assembly onto the snorkel body. Align the air ram assembly and tighten the black hose clamp (Item 16).