
Instructions / Assembly


Installation
Step 4
Consult a qualified electrician to ensure correct
branch circuit conductor
Step 1
Adjust the metal shade to be an appropriate height, then
place the bulb (D) to the socket.
ENJOY YOUR LAMP
Connect,Hot,Black or Red outlet Supply Wire to:
Connect,Neutral,White Outlet Supply Wire to:
Black
* Parallel Cord(round & smooth)
Clear,Brown,Gold or Black without Tracer(colored stripes)
Insulated Wire(not green) w
ith copper metal conductor
* Parallel Cord(square& ridged)
White
Clear,Brown,Gold or Black without Tracer(colored stripes)
Insulated Wire(not green) with Silver metal conductor
*Note: When parallel wire(SPTI & SPT II) is used.The neutral wire is square shaped and
ridged and the hot wire will be round in shape and smooth.(See illustration on left.)
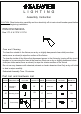
Step 3
Attach the mounting bracket (A) to the junction box with
mounting screw (A1), secure the fixture body (B) with ball
nut (C).
Step 2 Wire Connetion
Note:PLEASE USE ON/OFF TYPE"B" BULB MAX 40-WATT
OR CFL BULB MAX 13-WATT
OR LED BULB MAX 9-WATT
THERE IS LED 4-WATT BULB IN THE BOX
Grounding Instructions:
a) For installation in the United States: Wrap ground wire from outlet box around green
ground screw
on mounting bracket, no less than 2" from wire end. Tighten ground screw. If
fixture is supplied with a ground wire, connect to outlet ground wire with a wire connector.
b) For installation in Canada: If fixture is supplied with ground wire, wrap ground wire
around green grounding screw on mounting bracket. Tighten ground screw.
A1B1