
User`s guide


AIRSHIP © 2009
Page 178
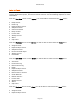
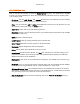
CD / DVD Disc Burn
Click on the Disc Burn button to open the Media Burner program. This application is capable
of writing to CD and DVD drives which are recognized by Windows as CD-R, CD-RW, DVD-
/+R, or DVD-/+RW.
Directory: You can add, delete, and rename directories on the CD/DVD you are creating,
to better organize the recordings for future reference.
Files: You can manually add or delete individual files from the list to be burned. You can
also clear the entire list using the Clear button.
Start Burn: Starts the CD or DVD Burning process.
Stop Burn: Stops a current burning process. The media being burned will not be useable
if you stop in mid-burn.
Eject: Ejects the selected drive.
Load Project: Load an existing saved project to be burned.
Save Project: Saves the current project to be burned later.
Keyboard: Opens Windows On-Screen Keyboard.
Drive: Select which CD or DVD Burner device to use.
Burn Speed: Select the Burn Speed. Try Max first, and then try a slower setting if you
experience problems when burning media. The supported burn speeds are read from
Window‟s detection of the hardware.
Media Label: Click once on the media label to change it. The default is the current yyyy-
mm-dd.
Burn List: Here you see the list of files to be burned to CD. This includes all files 'Added
to the Burn List' from Snapshot Viewer, Video Clip Export, or other tools.
Windows Directory Tree: The Windows Directory tree defaults to the Server or Client's
WorkFolder. Snapshots and other files are in the subdirectories. To add a file to the burn
list, just drag it over to the burn list on the left and drop it.
Add To Burn List: Add the selected recording files to the Files To Be Burned directory
listing on the left.