U.S. Patents #5,104,134 and 4,620,771 International Patents Listed Inside 1-800-829-1625 1777 South Bellaire Street, Suite 330 ♦ Denver, Colorado 80222 Phone: (303) 757-2400 ♦ Fax: (303) 757-1988 E-mail: service@safelinecorp.com ♦ Website: www.safelinecorp.
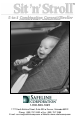
Thank you for purchasing the Sit’n’Stroll 5-in-1 Combination Car Seat/Stroller™. The Sit’n’Stroll™ is the most advanced car seat/stroller available, and we believe the simplest, safest and most convenient way to travel with an infant. The most important benefit the Sit’n’Stroll™ can provide is increased protection for your child. Studies have shown the use of a child restraint system reduces the likelihood of death and injury caused by the tremendous forces involved in an automobile accident.
Limited Six Month Warranty All Safeline products purchased from an authorized Safeline dealer are warranted against defective materials and workmanship for six months from the original date of purchase. This warranty does not include any problems associated with normal wear, abuse, misuse or negligence by the purchaser. This warranty also does not apply to any Safeline product purchased secondhand.
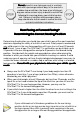
Tab le of Contents able Warranty Get to Know Your Sit’n’Stroll™ Safety Guidelines: Warnings & Important Notes Rear Facing or Forward Facing? Determining the Correct Seating Position Securing Your Child in the Sit’n’Stroll™ & Adjusting the Harness System Rear Facing Forward Facing Choosing an Appropriate Vehicle Seat Installing the Sit’n’Stroll™ in the Vehicle Rear Facing Forward Facing Top Tether Information Installing the Top Tether Rear Facing Forward Facing Installing the Sit’n’Stroll™ on an Aircraft Con
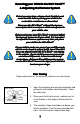
WARNING FAILURE TO FOLLOW EACH OF THE FOLLOWING INSTRUCTIONS CAN RESULT IN YOUR CHILD STRIKING THE VEHICLE’S INTERIOR DURING A SUDDEN STOP OR CRASH.
Safety Guidelines Warnings & Impor tant Notes Important ♦ ♦ ♦ ♦ ♦ ♦ ♦ ♦ ♦ ♦ ♦ ♦ ♦ ♦ This child restraint is designed for use by children who weigh between 5 and 40 pounds (2.3 kg to 18.1 kg) and whose height is between 18 and 40 inches (45.8 cm to 101.6 cm). REAR-FACING this unit is certified for use with children from 5 to 22 pounds (2.3 kg to 9.9 kg). FORWARD-FACING it is certified for use from 20 to 40 pounds (9.1 kg to 18.1 kg).
♦ ♦ ♦ Refer to your vehicle’s owner’s manual for instructions on seat belt use and how to install the restraint in your vehicle.
Do not place this rear-facing car seat in a vehicle seat with a passenger side air bag. In the event of a sudden stop or collision, the force of an inflating air bag can cause serious injury or death to a child. Not following this warning places your child at serious risk. Owners of vehicles with passenger side air bags should refer to their owner’s manual for child restraint installation instructions.
Securing your Child in the Sit’n’Stroll™ & Adjusting the Harness System On hot or sunny days, always check the fabric and metal buckles before placing your child in the restraint to avoid burns or discomfort. Never use the Sit’n’Stroll™ without the harness securely buckled around your child and adjusted to your cchild’ hild’ s siz e. hild’s size Before using your new Sit’n’StrollT™you must adjust the harness system to fit your child.
4. To move the straps to the proper slot position, loosen the harness adjuster. At the back of the Sit’n’Stroll™ remove the shoulder belts from the metal hooks. Pull the shoulder belts from the front of the seat and place back through the desired slots. Reattach the shoulder belts to the metal hooks. Be sure the belts lay flat against the back of the seat shell. If they are over the stroller conversion handle you will not be able to convert the Sit’n’Strol™ to stroller mode. 5.
Shoulder Belt Slots Upper Middle Lower child’s shoulders. If the shoulder belts are below his or her shoulders, you must adjust them to a higher set of slots. 4. The adjuster belt has three loops for use depending on your child’s size. When you move the shoulder belts to the middle or upper shoulder belt slots, use the middle or end adjuster belt loop. 5. To move the straps to another slot position, loosen the harness adjuster.
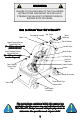
Choosing an Appr opriate Vehic le Seat Location Appropriate ehicle The Sit’n’Stroll™ was designed to be used in automobiles and airplanes, and should not be used in boats or on motorcycles. The Sit’n’Stroll™ must be positioned in a seat that faces the front of the vehicle. The Sit’n’Stroll™ was not designed to be used in seats facing the rear or the center of the vehicle, and it is dangerous to install and use the Sit’n’Stroll™ in any such seat.
Placing your child in the forward-facing position before he or she is over one year old and over 20 pounds, places your child at serious risk. Before placing your child in the forward-facing position, consider both the weight and age guidelines for the forward-facing postion. Consult with your physician to determine the individual needs of your child.
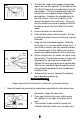
When using the Sit’n’Stroll™ in the rear-facing oll™’ s 5-point harness Sit’n’Stroll™’ oll™’s position, thread the Sit’n’Str system through the shoulder slots at or below the shoulders of the child. Automatic (passive) Seat Belts (See the picture below showing shoulder belt attached to automobile door) Check your vehicle owner’s manual for advice on where and how to install a child restraint. Your vehicle dealer may have a replacement lap belt that, when installed, will hold the restraint tightly.
Manually Adjusted Lap Belts and Locking Latch Plates 1. 2. Rear-Facing Tabs 3. 4. 5. 6. 7. Place the Sit’n’Stroll™ in a rear facing position in the car. Thread the lap belt through the rear facing vehicle-belt tabs. Click the latch plate into the buckle. Push down firmly on the Sit’n’Stroll™ to sink it into the car’s seat cushion, while pulling on the end of the lap belt or shoulder part of the lap/shoulder belt. You may have to press on one armrest at a time to get the auto belt tight.
Switchable Retractors This type of seat belt system stays loose during normal driving. However, they have special retractors which allow use with child restraints. Read your vehicle le owner’s manual and look for a label on the vehicle seat belt. Note: Not all vehic vehicle belts with switchable retractors have instructions for securing child restraints on the vehicle belt. 1. 2. 3. Pull the vehicle belt all the way out. Follow steps 1-6 in the directions for manually adjusted belts.
4. Thread the locking clip onto both belts , placing it as close to the latch plate as possible. 5. Buckle the belt again. It may be necessary to press the Sit’n’Stroll™ into the auto seat cushion to get it buckled. 6. Secure the top tether to the tether anchor in the vehicle if desired. 7. Be sure the back of the Sit’n’Stroll™ is at a 45-degree angle. The base of the seat should be horizontal.
There are some vehicle seat belt systems which will not securely restrain the Sit’n’Stroll™. Follow the instructions in this manual and in the vehicle manual exactly to assure correct installation. Never use only the top tether to install the Sit’n’Stroll™. It is necessary to use the vehicle seat belt system with the top tether y or death could result if tether.. Serious injur injury only the top tether is used.
There are two basic types of automatic belts: automatic shoulder belts or and automatic lap/shoulder belts. Both types automatically move around a passenger when the car door is closed and the car is started. The seat belts will stay loose until there is a sudden stop or crash. Check your vehicle owner’s manual for advice on where and how to install a child restraint. Your vehicle dealer may have a replacement lap belt that, when installed, will hold the restraint tightly.
1. Place the Sit’n’Stroll™ in the vehicle forward facing. 2. Place the lap belt around the front of the Sit’n’Stroll™ and position it through the appropriate forward-facing vehicle belt path. Click the latch plate into the buckle. 3. Push down firmly on the Sit’n’Stroll™ to sink it into the car’s seat cushion while pulling on the end of the lap belt or shoulder part of the lap/ shoulder belt. You may have to press on one armrest at a time to get the auto belt tight.
Lap/Shoulder Belt with Buc kle Tongue that Buckle Slides Freel y Along Seat Belt Webbing Freely Free sliding lap/shoulder belts have a free sliding latch plate that does not lock to the belt. When placing the Sit’n’Stroll™ in seating positions equipped with this system, you must use a locking clip to prevent the seat belt fr om slipping, unless it has a s witc hab le retractor from switc witchab hable retractor.. 1.
Top Tether Inf ormation Information A top tether provides additional protection for your child. The tether reduces the possibility of serious head and neck injuries, which can cause lifelong disability or death. Proper tether anchor hardware is required to securely fasten the top tether of the Sit’n’Stroll™ in your vehicle. Check your vehicle owner’s manual for details on tethering child restraints. Most vehicles have top tether anchor kits available.
Installing the Sit’n’Stroll™ on an Aircraft Tips 1. Contact the airline prior to taking the child restraint on board the aircraft. 2. Install the Sit’n’Stroll™ in the airline seat the same way you would when using it in a car.You may need to raise the armrests in the aircraft to allow room for the Sit’n’Stroll™. After the Sit’n’Stroll™ is in place, you can usually lower the armrest back into place.
Tips The Sit’n’Stroll™ is designed to be converted from car seat to stroller and back again while holding the child, still secured in the Sit’n’Stroll™, OFF THE GROUND. If the Sit’n’Stroll™ is converted on the ground, the mechanism may jam. The Sit’n’Str oll™ is to be used onl yb y one cchild hild at a Sit’n’Stroll™ only by time ver place more than one cchild hild in the seat. time..
Stroller Handle Red Handle Release Tabs 3. With one hand, compress the red handle release tabs located under the stroller handle, and with the other hand, pull up on the stroller handle. Select one of the four (4) handle height positions and release the red handle release tabs to lock the stroller handle into place. Ne ver use the str oller when 4 holes are sho wing on the Never stroller showing handle tube wa ys ensure the red handle release tabs Alwa ways tube..
Con ver ting the Sit’n’Str oll™ fr om Str oller to Car Seat Conver verting Sit’n’Stroll™ from Stroller 1. Compress the red handle release tabs and push the stroller handle down until it locks in its lowest position. 2. Align the front wheels by rolling the stroller back 6 to 12 inches. Place one hand in the slot handle located between your infant’s feet. With your other hand, grasp the slider grip located on the back of the seat. Lift the seat off the gr ound. ground. 3.
The Sit’n’Str oll™ Sunshade Sit’n’Stroll™ Head Rest Clips (2) Hole #1 Hole #2 Hole #3 Push Pin Tension Cord Attaching the Sunshade 1. Attach the head rest clips to the top of edge of the seat back, on either side of the handle tubes. 2. Push the edge of the seat cover forward exposing the plastic shell. Locate the third hole down from the top. 3. Keep the seat cover fabric pushed forward and press the push pin (sewn into the bottom portion of the sunshade) into the third hole until it clicks into place.
Tips For your child’s safety, the Sit’n’Stroll™ utilizes a continuous-loop 5point harness system–the kind most recommended by safety experts. ver use the Sit’n’Str oll™ without the harness Ne Never Sit’n’Stroll™ securel yb uc kled. securely buc uckled.
The harness m ust al wa ys be rrouted outed thr ough (i.e must alwa ways through (i.e.. behind and under) the plastic shell.Ne ver rroute oute the harness thr ough the Never through fabric co ver onl y. cover only Remo ving the Harness Removing To remo ve the fabric co ver ffor or washing it will be necessar y to remo ve the harness system. remove cover necessary remove 1. 2. 3. 4. 5. 6. Unhook the shoulder belt loops from the metal hooks at the back of the seat.
5. 6. 7. The strap should then be placed through the child’s right latch plate (back to front), up through the chest clip and through the appropriate shoulder belt slot on the seat back. Fasten the loop on the end of the strap to the second metal hook. Check to be sure that the webbing is not twisted. The web should lie flat against the bottom of the seat shell. Maintenance and Care Washing the Co ver and Harness Cover 1. Remove the harness from the Sit’n’Stroll™ and detach all buckles. 2.
Vehic le Man ufacturer Contact ehicle Manufacturer Telephone Number s and Websites Numbers Acura Division of American Honda Audi of America, Inc. BMW of North America, Inc. Chrysler - DiamlerChrysler Corp. Dodge - DiamlerChrysler Corp. Ford Motor Company Buick - General Motors Corp. Cadillac - General Motors Corp. Chevrolet/GEO - General Motors Corp. GMC - General Motors Corp. Oldsmobile - General Motors Corp. Pontiac - General Motors Corp. Saab - General Motors Corp. Saturn - General Motors Corp.
800-829-1625 Made in Taiwan, R.O.C.