
Instructions / Assembly


Page 12 www.eagleindustrialgroup.com 877.655.3443
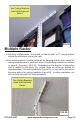
• Look at the ceiling brackets and lag screws to make sure that they have not
pulled out during the beam seating process. If they have, it is an indication
that the lag screws may not be in the center of the ceiling joist, or that they
were not fully tightened when installed.
• Finally, check all the nut and bolt connections on the vertical posts and ceiling
brackets to ensure that everything is tight.
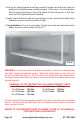
• Congratulations! You are now ready to load your rack and enjoy the extra
space that you have created (Figure 27).
FIG 27
WARNING: Load heavy objects, distributed equally, nearest the vertical posts
and light objects nearest the center. Read the safety label on the rack and
do not overload the system. Do not climb on or hang from the storage rack.
Routinely inspect the rack over time to ensure rivets and wire decking units are
seated properly.
WARNING, DO NOT EXCEED THE FOLLOWING WEIGHT LIMITS
4’ x 8’ Frame 600 lbs. 4’ x 6’ Frame 500 lbs.
3’ x 8’ Frame 500 lbs. 3’ x 6’ Frame 400 lbs.
2’ x 8’ Frame 400 lbs. 2’ x 6’ Frame 300 lbs.
4’ x 4’ Frame 300 lbs.
All stated weight limits are based on static loads with load distribution as stated
above. Some horizontal deection can be expected when racks are loaded
near maximum limits.
REFER TO THE WARNING PAGE ON INSIDE COVER OF THIS MANUAL
FOR ADDITIONAL INFORMATION.