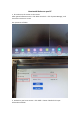
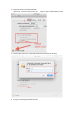
How to add device on your PC 1. Pls make sure the version is the newest. After opened software on PC > click ‘More Function’ > click ‘System Message’, and check if the Version is 3.0.4.2 See 2 pictures as follow. 2. Go back to your home screen > click ‘Add’ > choose ‘Cloud ID’. Pls input information as folow.
Cloud ID: It can be found on your NVR system monitor. Pls go to your system monitor > right click the mouse > click ‘fast netwrok’, then you will find Cloud ID numbers. Password: Your NVR system password. If No password, pls leave it blank. Number Of Channels: Input 4 or 8. Pls do not input other numbers, otherwise it cannot be viewed. Then click ‘Finish’. See picture as follow. 3. After added device, pls right click the Cloud ID and then choose ‘Connect videos’.
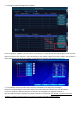
1. Please go to video manage>click “repeater”. 2. At the page of repeater, you will find it each camera is connected to the NVR by green and red lines. Green line means the camera is now connecting to the system, while the red line means this channel is disconnected. We can setup the repeater on the channels that are connected by greenlines. 2. For example, channel 2 and channel 4 are not mounted so far away from eachother.
3. Now let’s begin to add camera 4 to camera 2 by repeater function. Behind each camera, you will see a “+” sign. You can click the “+” on channel 2, then choose “4”, and click “Apply”. 4. After you click “Apply”, it will tell you that “Setup successfully!” (Just like the picture below) Then please just wait 10 seconds, and click “OK” to leave this page. Now the repeater function has been setup already. How to test the hard drive on your PC 1.
How To Make the Wireless Camera Work as Wired One For example,if you want camera4 to work as wired,here as the steps: 1.Use your mouse,go to video manage>delete the IP address of camera 4. 2. Power on this camera, and make sure the NVR is connected to the router by an Ethernet cable. 3. Please connect the camera 4 to the same router by another Ethernet cable. 3. Go back to the monitor, still go to video manage>click Search(or Refresh)>then you will see a new IP address that begins with 192. 4.
How to change the channel order for JA If you want to change the order on your camera, there are two ways. Method 1: Please right click the home screen, click "split screen", and choose "X8". After this, you can just drag your mouse to change the order of every channel in the screen. But this method is available only when the monitor has 8 images.(split screen>"X8") Method 2: Exchange the IP addresses of two cameras to make the order changed.
then click "OK". After you click “OK” to save it, you will see camera 1 will have the same image of camera 2 6. Please use the same way to change the ip address of camera 2 into the ip address of camera 1, and click “OK”. After 10-20 seconds, I believe the image of camera 2 will become camera 1. 7. In a word, just exchanging their ip addresses of two cameras can change their orders on the screen. What should we do when IMAC rejects our Eseecloud Software 1.
4. Please check the screenshot below: a)General b)check “Any source” on c)Go to “key” at left bottom corner 5. Please input your user name and password to activate the setting. 6.
7. After setup,please install the Eseecloud on Imac. Everything should be ok.