Owner’s Manual Model SG22 Model SG22 NC (no cart) use with wood cart or built-ins Saffire Grill Co. Contact us at: contact@saffirebbq.com 1100 Eleventh Street Rockford, Illinois 61104 Phone 815-967-4100 www.SaffireBBQ.
Congratulations on your purchase of the Saffire Grill and Smoker! You now have one of the finest tools available to facilitate your mastery of the art of barbecue. Visit the SaffireGrills.com website in the future for more ideas, recipes and internet links to enhance your barbecue experience. (Saffiregrills.com) Make sure to fill out your warranty card and include your email address for occasional updates on the manual, recipes and new developments.
Page 1 Parts Identifier
Page 2 Parts Identifier
ASSEMBLY Page 3 (You may view the assembly video online at www.SaffireBBQ.com.) For Model SG22 on Stainless Steel Setting (Cart) Start on page 5. Begin here for SG22-NC model for Wood Cart or Built-in SAFFIRE ENCLOSURE DIMENSIONS If you will be building your own enclosure for the Saffire Grill, use the following dimensions and guidelines. It is always best to build a non-combustible enclosure with masonry and/or steel studs and cement board (Hardiebacker, Wonderboard, Durock etc.).
Page 4 ASSEMBLY (You may view the assembly video online at www.SaffireBBQ.com.) Unbox the Grill 1. Cut and remove the plastic bands from the box. 2. Lift off the top of the box. Then lift out the white foam padding. 3. The sides of the box are individually removable. 4. Open the grill and remove the cooking grid and discard the bubble wrap. 5. Remove the items in the bottom of the grill and set aside: Stainless Steel Heat Shield, Ceramic Feet (3 Pcs.), Chimney Top, Handle (Thermometer encl.) and Grate.
Page 5 ASSEMBLY (You may view the assembly video online at www.SaffireBBQ.com.) Unbox the Grill 1. Cut and remove the plastic bands from the box. 2. Lift off the top of the box. Then lift out the white foam padding. 3. The sides of the box are individually removable. As you remove the sides of the box you will want to take hold of the pieces of the Cart Legs and Side Shelves so they do not fall out. 4. Open the grill and remove the cooking grid and discard the bubble wrap. 5.
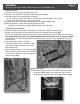
Page 6 Unpack the Grill 11. Remove the foam pads from around the perimeter of the Firebox and lift it out of the grill. Set it aside. It is easiest to lift it by the holes or the clean-out port at the bottom. Fig. 4 Fig. 4 1 Remove the white padding from the bottom inside 12. o the grill and discard. of 1 Remove the Top Dome Handle and enclosed 13. T Thermometer from the bubble wrap. NOTE: There are 2 acorn nuts sealed in a separate compartment of the b bubble wrap with the handle.
Page 7 Final Grill Assembly 17. Place the Fire Ring on top of the Firebox with the large notch facing downward and aligned with wood chip access port on the front of the grill. You may pull the wood chip access port cover plate off the front of the grill to view the alignment. It is held in place by magnets. Just pull straight out horizontally. Fig 8 18. Replace the grate and then place the cooking grid on top of the ceramic Fire Ring. Fig 9 Fig.9 Fig.8 20.
ASSEMBLY Page 8 Final Grill Assembly The shelf with the Towel Bar goes on the left and the shelf with the Tool Hooks goes on the right. When you lift the shelf up, slide the indentation on the shelf rods back so they align underneath the Stop Tab. Fig.12 If the indentation is not aligned with the tab, the shelf will not be level. 21. Remove the nut and washer from the Thermometer. Insert the Thermometer into the hole in the front of the Ceramic Top Dome.
USING THE SAFFIRE 5. If you are using an electric fire-starter nestle it down into the he charcoal so it is resting on charcoal just above the grate. The charcoal should envelope the lower half of the starter element. nt. Plug in the starter and let it operate for 5 to 10 minutes. n 6. Unplug and remove the starter after 5 to 10 minutes when the coals have begun to burn. You do not have to leave the starter in longer as the fire will continue to increase after removing it. Fig.14 7.
Page 10 Startingg & High Higgh Temperature Temp p Grilling and Searing 500° to 600° + Fig.15 F Top Control - Swing chimney top fully open. Bottom Control - 1 to 2 inches open. B Fig.16 Medium Temperatures for Roasting and Grilling 300° to 450° Fig.17 F Top Control - Chimney top closed with spin damper holes 100% open. (Swing chimney top open a little if needed for more heat) Bottom Control - appx. 1/2 to 1 inches open. Bo Fig.18 Low Temperatures for Smoking 200° to 300° p Fig.
Page 11 For Roasting and Smoking you will want to cook with indirect heat to avoid burning the surface of your meat. This can be accomplished by putting your food on a rack which is placed inside a pan. Water, juice, etc. may be added to the pan for a more effective buffer from the heat. Fig. 25 The best method for indirect heat and smoking is to use the optional Heat Deflector (SG-HD). Using the Heat Deflector 1a. After starting the fire, the ceramic Heat Deflector is placed on the ceramic Fire Ring.
Smoking & Pizza Page 12 1. A small handful of chips is spread into the forward half of the stainless steel channel. 2. Remove the magnetic access cover on the front of the smoker by pulling straight out.. Fig. 26 3. Slide the half of the channel with the wood chips into the smoker via the access port. 4. Now use the pusher tool to push the chips into the smoker. The pusher tool will stop when the two teeth on the bottom of the plunger drop into the two holes on the end of the channel. Fig. 27 5.
Saffire Grill LIMITED LIFETIME WARRANTY The parts listed below are warranted as follows, for the period of time specified*; Original owner is entitled to free replacement of any part listed below that fails to operate properly under normal usage or due to manufacturing defects. This does not cover damage due to forces of nature, natural disasters, theft, operator error, abusive over-firing or accidental damage. The reimbursement procedure, listed below, must be followed. EXCEPTIONS: 1.
Saffire Accessories Page 14