FAX 3240 MF 3260 User Manual
Dear Customer, Thank you very much for having decided to purchase a SAGEM fax machine. We hope that you will have lots of fun using your new laser fax machine. With your new fax machine you can send and receive faxes, send and receive SMS messages, as well as make copies. The machine prints on ordinary copier and typewriter and photocopier paper. With the time stamp you can verify the exact arrival time of a fax transmission at its destination location.
Table of Contents Table of Contents Safety Instructions. . . . . . . . . . . 4 Overview . . . . . . . . . . . . . . . . . . 6 Description of the Machine . . . . . . . . . . . . . 6 Operation Panel with LCD Display . . . . . . . . . 7 Package Contents . . . . . . . . . . . . . . . . . . 8 Printing Multiple Copies Time Stamp . . . . . . Broadcast Transmissions Time-Deferred Sending Fax Polling . . . . . . . Journal . . . . . . . . . Jobs . . . . . . . . . . . . . . . . . . . . . . . . . . . . . . . .
Chapter Safety Instructions Safety Instructions In order to avoid possible dangers, damage or malfunctions, please heed the following safety instructions for the setup and operation of your fax machine. Make sure that the fax machine is stable and secure, on a smooth, level surface (do not place the machine on carpets or similar surfaces). If the fax machine should fall, it can be damaged or can cause injury to people, especially small children.
Chapter Safety Instructions The fax function will not operate during power failure. ¿ ¿ Never open the toner cartridge. If toner dust escapes, you should avoid allowing it to contact your skin and eyes. Store both new and used cartridges in a place where they will not come into the hands of children.
Chapter Overview Overview Description of the Machine Document support Document guide Document feed slot Cover Operation panel with LCD display Document outlet Print-out and fax outlet (extendable) Paper tray Opening for Plug’n’Print card Toner cartridge Connections on the Rear Side External device Telephone cable USB port (MF 3260) Mains Cable
Chapter Overview Operation Panel with LCD Display Symbols on the LCD Display }—Access telephone book functions Red lamp v—If the lamp flashes, please read what is indicated on the display f—SFINE resolution configured F—PHOTO resolution configured h—FINE resolution configured I—Incoming calls during absence W—Incoming SMS messages COPY—Press twice: Make copies automatically.
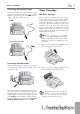
Chapter 1. Installation Package Contents Fax machine 1. Installation Unpacking and Connecting Attaching the Document Support Insert the document support into the two openings in the cover. The document support should snap securely into place. Paper tray Document support Document outlet tray Extending the Print-out and fax outlet tray Starter cartridge Pull the print-out and fax outlet tray out of the paper tray cover.
Chapter 1. Installation Connecting the Telephone Cable Connect the telephone cable to the fax machine by plugging it into the socket located on the rear side of the machine and designated by the word LINE. Insert the telephone plug into your PTT line socket. In GB Toner Cartridge New Toner Cartridge Before you can receive documents, make copies, or print, a toner cartridge must be inserted into the fax machine.
Chapter 1. Installation Store opened or used toner cartridges in their original packing or in a plastic bag in order to prevent toner dust from escaping. Dispose of old toner cartridges by turning them in at specialised shops or at a waste collection site. Never dispose of toner cartridges by throwing them into fire. Toner cartridges should never be allowed into the hands of children. Once you have removed the protection strip, do not shake the toner cartridge any more.
Chapter 1. Installation 11 It may take a moment to update the cartridge. When the process is completed, the following appears on the display: action completed / remove card 12 Pull the Plug’n’Print card out of the fax machine. 3 Pressing C will return you to the previous menu step; pressing STOP will return you to the root menu. Paper Before your fax machine will be ready to make copies or receive faxes, you must load paper into the machine. Use the following paper size: A4, 210 × 297 millimetres.
Chapter 1. Installation 4 If you would like to print on an input sheet (for example, forms or stationery), place the input sheet face down in the paper tray, with the top of the page toward the rear. Special Telephone Connections ISDN Systems Forms that have been printed out by a laser printer are not suitable for further printing. This can lead to a paper jam. If a paper jam should occur, follow the suggestions set forth in the chapter entitled Troubleshooting / Paper Jam.
Chapter 1. Installation Additional Devices You can connect other devices to your PTT line apart from your fax machine, for example, cordless telephones, answering machines or modems. If you would like to utilise special peripheral equipment with your fax machine, you should contact your dealer. For GB: As long as the Ringer Equivalent Number (REN value) on the line doesn’t exceed 4. The REN value of this device is 1.
Chapter 2. Settings 3 2. Settings When needed, your fax machine can print out lists containing the most important functions and settings of the machine. Press the key ¨ on the fax machine. Select with ¾ whether you would like to print out the help page: 1 functions list or the help page: 5 setup. Confirm with OK. You can also print out the function menu by pressing MENU/OK, 41 and OK. The list of settings can also be printed out by pressing MENU/OK, 44 and OK. Open the menu functions with MENU/OK.
Chapter 2. Settings Ring Tone Volume With the function 18, you can set the volume of the ring tone. Three different levels of volume are available to you. To turn off the ring tone entirely, select off. Your fax machine will automatically receive incoming faxes without ringing. If your fax machine is set to the manual reception mode, you can neither hear nor receive incoming fax calls (see chapter entitled Setting the Fax Reception Mode). 1 Press MENU/OK, 18 and OK.
Chapter 2. Settings 4 Enter the code again for confirmation purposes, then press OK. Pressing C will return you to the previous menu step; pressing STOP will return you to the root menu. If you have already saved a code, the device will ask you to provide the old code first before you can enter a new code. Locking the Keyboard 1 Press MENU/OK, 61 and OK. 2 Select lock keybd. with ¾ and confirm with OK. 3 Enter the four-digit locking code and confirm by pressing OK. Select with with ¾.
Chapter 2. Settings 17 recognises a fax signal, it will automatically receive the fax transmission. If you do not have an answering machine connected or if a connected answering machine does not accept the call, the fax machine will take over the call after a predetermined number of rings and automatically receive any possible fax transmission being sent.
Chapter 3.Telephone Book 3 Enter the initial letters or select the entry you would like to change with ¾. Confirm with OK. 4 Change the stored name, the number and the transmission speed. Move the cursor with ¾. Delete individual letters or numbers with C, or with \. 5 Confirm the changes by pressing OK. 3.Telephone Book With the } key, you can access the telephone book functions. You can store new entries, search for entries as well as set and edit groups.
Chapter 3.Telephone Book You can also obtain a print-out of the telephone book by pressing ¨, then selecting help page: 4 directory with ¾. Confirm with OK. The list is printed. Editing a Group ¡ 1 Press }. 2 Select modify with ¾ and confirm by pressing OK. 3 Select the group that you would like to edit by pressing ¾. Confirm with OK. 4 5 If necessary, enter a new name for the group. Confirm with OK. You can delete or add entries. Move the cursor with ¾; use C to delete individual recipients.
Chapter 4. Fax 4. Fax As much as possible, use fax documents printed with darker coloured text (black or dark-blue). Yellow, orange and green are not suitable. Æ Inserting Documents Separate the documents by fanning them out, then align them by tapping the edge of the stack gently against a flat surface. This will prevent several sheets of paper from being drawn in all at once.
Chapter 4. Fax Redial list or caller list: To select a number from the redial list, press º and ¾. To select a number from the caller list, press the blue key and º and ¾. 2 To start the fax transfer, press START. If the connection to the fax recipient cannot be made— for example because the line is busy—your fax machine will try to make that connection again after short time. After two additional attempts, the fax machine will discontinue the automatic redial process.
Chapter 4. Fax Sorted Print-Outs Broadcast Transmissions If your fax machine receives fax transmissions with multiple pages, it will sort the pages as it prints them out. The pages that were received last will be dispensed first. You have the option of turning this function off: 1 Press MENU/OK, 28 and OK.
Chapter 4. Fax Time-Deferred Sending With this function, you can send fax transmissions at a later time—within a 24-hour period. For example, you can use this feature to take advantage of better telephone rates or to send a fax to a recipient who can be reached only at certain times. 1 Insert the document face down into the document feed slot. The lower most document is sent first. 2 Press MENU/OK, 24 and OK.
Chapter 4. Fax Enter the fax number. Add a dialling pause to the number by pressing the blue key along with R/PAUSE. Now enter the direct dial number, the sub-address or the code, for example 12345 R/PAUSE 12. A P for pause will appear on the display: 12345 P 12. The subaddress is not dialled until after the fax connection with the main number has already been established. Journal The fax journal contains a list of the last 30 faxes and SMS messages that you have either received or sent.
Chapter 5. Copier 5. Copier Push the document guide inwards, so that it lies level on the documents. You can copy documents with your fax machine. You have two different options available for copying. It is possible either to make copies automatically or to adjust the copies through your own settings. Use documents of size A4 (210 × 297 millimetres) with 60 to 90 g/m2. Do not use any documents that are smaller than A4. You can put in up to 20 documents at a time.
Chapter 6. SMS Redial list: Press º, then select the desired number from the redial list by pressing ¾. Press W. The fax machine will now send the SMS message. 6. SMS (Short Message Service) Caller list: To select a number from the caller list, press the blue key and º. Press W. The fax machine will now send the SMS message. (Depending on country and telephone network) You can send and receive SMS (Short Message Service) messages with your Laserfax machine.
Chapter 6. SMS Printing SMS Messages If you have turned the automatic printing function off, use this function to print your SMS messages. Sending SMS Messages to E-Mail or Fax (Depending on country and telephone network) 1 Press W, select print SMS with ¾ and confirm with OK. You can send SMS messages to an e-mail address or as fax transmissions to another fax machine.
Chapter 6. SMS Sending SMS Messages to a User Account Turning Off the Automatic Printing Some SMS reception devices can manage several user accounts. You can send an SMS message to a specific user of a device in the following manner: Received SMS messages are printed out automatically. You have the option of turning this function off. 1 Press W, select SEND SMS and confirm with OK. Enter the text that you would like to send, as described under Sending SMS Messages. 2 Press W and enter the number.
Chapter 6. SMS 3 Confirm with OK. Pressing C will return you to the previous menu step; pressing STOP will return you to the root menu. Text2Fax (Depending on country and telephone network) Sending of SMS notifications may involve the payment of a fee. Inquire with your telephone company as to whether or not costs are incurred through the use of this function.
Chapter 7. PC Connection 7. PC Connection (MF 3260) Requirements dows® Explorer and start the program S. with a double-click.) The C S window appears on the screen. You can install or uninstall C S or load the user manual for P P. Click on B C to view the files on the installation CD. This opens a Windows® Explorer window that shows the CD contents.
Chapter 7. PC Connection Next you will be asked to accept the licensing conditions. Click on Y. Only after the restart, connect the laser fax machine to your PC with a typical USB cable. The USB port of your device can be found on the rear side. Uninstalling the Software The program can now commence with the installation. Click on I. Close all open programs and applications before beginning the uninstall process.
Chapter 7. PC Connection After rebooting has occurred, removal of the C S from your computer will be complete. Using the COMPANION SUITE You can start the Companion Suite either by clicking on the Companion Director icon on your desktop or by selecting S > P > C S > C S > C D from the Start menu. You can change the look of the start menu by clicking with the right mouse button.
Chapter 7. PC Connection Enter the name of the group. Click on S M to add new entries to the group. Add new members to the group using the arrow buttons. Confirm with OK. Edit group Select the group that you would like to edit. Choose S M to add new entries to the group or remove entries from the group. Click on D to delete the entire group. Confirm with OK. fax machine. You can also configure the security codes for the fax memory and keyboard lock.
Chapter 7. PC Connection Click in the Print menu on P to edit the printer settings. You can set whether to print in letter or landscape format and how many pages should be printed on a single sheet. Change the print order to print the last page of your document first. A long document is then output sorted; the first page lies on top. Driver as your scanner. The Twain Driver selection window then appears, as described below. Scanning Insert the document face down into the document feed slot.
Chapter 8.Troubleshooting Installation / New Toner Cartridge. If you have inadvertently pressed STOP, you can start the recharging process by pressing MENU/OK, 62 and OK and then selecting new black with ¾. Confirm with OK. 8.Troubleshooting Paper or Document Jams Your fax machine is equipped with sensors that quickly recognise a paper or document jam. If trouble of this sort arises, the feeding of the printer paper or document is stopped immediately.
Chapter Appendix Appendix Calling Line Identification Presentation (CLIP): see Caller Identification Chain Dialling: Before the dialling process Glossary Additional Devices: You can connect additional devices to your fax machine, such as answering machines, telephones, charge meters and computer modems; these can be connected either in series or in parallel. Parallel connection means that the devices are connected to another telephone socket of the same line.
Chapter Appendix specific times (for example after 30 transmissions). Abbreviations Memory: If there is no paper or toner in your fax machine, the machine will store incoming fax transmissions in its memory. SMS messages are stored in the SMS memory. Modem: A modem converts digital computer signals into acoustic signals and vice versa. Analogue telephone lines transfer only acoustic signals, not digital signals (see Hard Modem, see Soft Modem).
Chapter Appendix Sender Identification: The telephone number and name of the sender as well as the date and time of the fax transmission appear in the upper margin of each received fax. Serial Connection: see Additional Devices Soft Modem: The machine does not contain a fixed, built-in modem. A program executes the modem function on demand and accesses the machine memory (RAM). The features and functions of the soft modem can be modified by altering the software (see Hard Modem, see Modem).
Chapter Appendix Functions List 1 Installation 11 country . . . . . . . . . . . . . . . . . . 14 List of the available countries 12 language . . . . . . . . . . . . . . . . . . 14 List of the available languages 13 date/time . . . . . . . . . . . . . . . . . 14 Entering the date and time 14 Number/Name . . . . . . . . . . . . . . . 14 Entering telephone number and name 35 parameters . . . . . . . . . . . . . . 28, 29 Settings for sending and receiving SMS 36 sms centers . . . . . . . . . . . . . . . .
Chapter Appendix Technical Data Measurements (W × H × D) . . . . . 370 × 200 × 330 mm Copier Weight Type . . . . . . Resolution . . . . . . . . . . . . . . fast 200 × 300 dpi . . . . . . . . . . . . quality 400 × 300 dpi . . . . . . . . . . . . photo 400 × 300 dpi . . . . . . . . . . . . . . . approx. 7.25 kg Mains Connection . . . . . . . 220 – 240 Volt / 50 – 60 Hz Power Consumption . . . . . . . . . . . standby < 8.5 W . . . . . . . . . . . . . . transfer < 17 W . . . . . . . .
Chapter Appendix Guarantee • wear and tear from normal daily use of the equipment and its accessories (UK Terms and Conditions) • damage due to insufficient or bad packaging of equipment when returned to SAGEM ATTENTION • supply of new versions of software At the beginning of April 2002, SAGEM SA bought the PHILIPS fax business unit.
Chapter Appendix Index A A4 paper . . . . . . . . . . Abbreviations . . . . . . . Activate/deactivate automatic SMS print . . lock . . . . . . . . . . name of SMS sender . . page header . . . . . . protected fax reception ringer tone . . . . . . . SMS notification . . . . SMS notification tone . sorted print-out . . . . time stamp . . . . . . . Additional devices . . . . Easylink . . . . . . . . . fax reception mode . . starting fax reception . . Address book PC connection . . . . .
Chapter Appendix Number enter . . . . enter at PC . Number of rings set . . . . . Number pad lock . . . . . . . . . . . . . . . . . . 14 33 . . . . . . . 16 . . . . . . . 16 O OK key . . . . . . . Operation panel . . Ordering service . . Overview machine . . . . operation panel . . . . . . 7 . . . . . . 7 . . . . . 44 . . . . . . . . . . . . 6 7 P PABX see Private branch exchange Package contents . . . . . . . 8 Page header . . . . . . . . . 14 enter . . . . . . . . . . . 14 SMS . . . . . . .
Contact Should you have technical problems, please contact our technical customer service: The CE mark confirms that the machine corresponds ot the relevant guidelines of the European Union. United Kingdom Declaration of Conformity (DoC) Telephone: 02 07 - 536 54 00 Hereby, SAGEM Communication Austria GmbH, declares that this SAGEM LF 3240 or LF 3260 is in compliance with the essential requirements and other relevant provisions of Directive 1999/5/EC.