
User's Manual
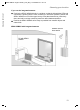
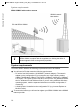
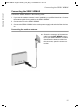
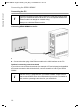
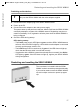
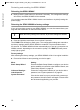
Table Of Contents
- SE681 WiMAX
- User Guide - User
- Contents
- For your safety
- SE681 WiMAX
- Installing the SE681 WiMAX
- Configuration with the Web browser
- Basic Setup Wizard
- Advanced Settings
- Administration
- Status
- Using the SE681 WiMAX
- Appendix
- Glossary
- Index

12
Installing the SE681 WiMAX
SE681 WiMAX / engbt / SE681_FUG_EN_9 / Installation.fm / 18.5.11
Schablone 2011_04_07
Installing the SE681 WiMAX
The SE681 WiMAX can only be used with the device's integrated antenna or with one
of the following outdoor antennas:
This user guide assumes that installation of the outdoor antenna has been completed.
Choosing your location
Choose a location that enables you to simply set up the following connections with-
out any further work.
– Connect the Ethernet cable for connection to a PC or network.
– Connect the power lead to the mains socket.
Stand the SE681 WiMAX upright on an even, non-slip surface.
Lay the cables in such a way that nobody can tread on or trip over them.
Position the SE681 WiMAX so that you can see the LEDs.
Do not cover the openings in the SE681 WiMAX housing to ensure the heat can cir-
culate; otherwise, the duty cycle of the device will be reduced or the SE681 WiMAX
switched off to avoid overheating.
Do not operate the SE681 WiMAX under the influence of direct heat sources (e.g.
directly in the sun).
3.5 GHz 18 dBi WiMAX Antenna Outdoor "Antenna cable 3 m"
2.6 GHz 15 dBi WiMAX Antenna Outdoor "Antenna cable 3 m"
3.5 GHz versions should be used for the European Economic Area.
The following requirements apply:
All the external antennas used for this product must undergo a confor-
mity assessment procedure.
The 3.5 GHz antennas listed here meet the European requirements and
guarantee the functionality of the complete system.
During the conformity assessment procedure it was ensured that the
SAR limits set down in directive 99/519/EC are observed. Verification
was performed using EN 50385.
The outdoor antenna must be installed and put into service by a qualified
electrician.
The notes in the enclosed installation instructions must be followed.