INTRODUCTION Dear customer, Congratulations on buying your SAGEMCOM telephone and thank you for placing your confidence in us. This device has been manufactured with the utmost care. If you should have difficulties in operating it, we recommend that you consult this user manual. You can also find information on the following site: http://www.sagemcom.
INTRODUCTION In regions greatly affected by electrical storms we recommend that you protect your telephone circuit with a special fixture for excess voltage. Le marquage CE atteste de la conformité du produit aux exigences essentielles de la directive 1999 / 5 / CE du Parlement et du Conseil Européen concernant les équipements hertziens et les équipements terminaux de télécommunication. The declaration of compliance may be looked up on the www.sagemcom.
CONTENTS Phone overview 6 Unpacking Your phone Functions 6 6 7 Phone installation 9 Connecting the base Setting up the handset Replacing the batteries Telephone installation as a wall unit Installing the phone as a desktop unit Pairing GAP-compatible DECT handsets on the CC220R base Pairing the CC220R handset on another DECT base Settings required before use Browsing through the menus Menu structure Phone use 9 10 10 11 12 13 13 14 14 15 16 Telephoning Locking the keypad Handset location 16 19 19
CONTENTS Settings 25 Modifying the date and time Adjusting the contrast Manage stored numbers Modifying the language Security Advanced settings / Base settings Advanced settings / Line settings Messaging system number (according to operator) Answering machine 25 25 25 26 26 28 28 30 30 Enabling/disabling the answering machine Modifying the OGM Playing messages Remote access to answering machine Deleting all the old messages Recording a memo TAM setting 30 31 32 32 33 33 33 Activating and deactivat
CC220R 1. PHONE OVERVIEW 1.1. UNPACKING Place the box in front of you, open it and make sure it contains the following items : • one base • one handset, • two battery covers, • two rechargeable batteries for the handset and 3 rechargeable batteries for the base (see page 38 for the characteristics and type of batteries used) • one telephone line cord, • one equipped power adapter, • wall-mounting base, • this user guide. 1.2.
CC220R Hang up/ Pick up Battery compartment + + - Battery cover Handset charging contacts CC220R’s particularity is that it has a wireless handset. It has a radio range of about 50 meters indoors and up to 300 meters in an open space. With the handset in the range of its base, the user can either make a call or end a call using its single button. It should be noted that the handset is provided with a buzzer that sounds on receiving an incoming call.
CC220R - Key : Call the last number dialled. - Key : Enable/disable the MUTE function during the call/Paging (call handset registered on the database)/Pairing on a long press (set the base to recording mode). - Indicator light : - Call the handset registered on the base: Flashing slowly - Pairing: Flashing quickly Incoming call: Flashing in time with the ring tone - Dial tone: Continuously lit - Call forwarding enabled: Continuously lit. - Presence of a new event: Flashing slowly.
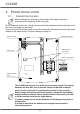
CC220R 2. PHONE INSTALLATION 2.1. CONNECTING THE BASE Before making any connections, please refer to the safety instructions presented at the beginning of this user guide. On the underside of the base, click the phone jack into its socket and connect the other end of the cord to the telephone wall outlet. Connect the end of the power supply cord on the underside of the base and connect the power adapter to the mains socket. The phone display is turned on.
CC220R 2.2. SETTING UP THE HANDSET The batteries are already inserted in the handset. To put the handset into use, simply remove the tab by pulling on it firmly in the direction of the arrow. The handset emits a double beep to indicate that it has started and then a second beep to indicate that the handset is synchronized with the base. From then on, your handset becomes operative and you can use it to make calls. On leaving the factory, the handset is already registered to the base.
CC220R - Remove the battery compartment cover. • Remove the old batteries, insert the new batteries one by one in compliance with the polarity of the batteries (refer to paragraph "Connecting the base", page 9). • Refit the battery compartment cover. Worn out batteries must be discarded, in accordance with the recycling instructions in chapter Environment of this booklet. To avoid damaging your handset, only use certified rechargeable AAA batteries NiMH 1.2 V 450 mAh, never use non rechargeable batteries.
CC220R • Position the phone so that it is safely secured. 2.5. INSTALLING THE PHONE AS A DESKTOP UNIT In this configuration, the base provides ease of use through the phone’s tilted position. Place the phone on the base Align the arrow etched on the base (1)with the “desktop position” mark etched on the underside of the phone (refer to paragraph “Connecting the base”, page 9). Align the slots on the underside of the base with the hooks on the base (2).
CC220R 2.6. PAIRING GAP-COMPATIBLE DECT HANDSETS ON THE CC220R BASE Additional GAP-compatible DECT handsets can be registered on the CC220R base. To register an additional handset on the CC220R base: - Set your CC220R base to pairing mode (refer to paragraph "Set the base to pairing mode", page 28). - Set the additional handset to registration mode. Up to four GAP-compatible DECT handsets can be registered on the CC220R base.
CC220R 2.8. SETTINGS REQUIRED BEFORE USE After installing your phone, set the time and contrast (if need be). It is important to perform these settings before using your phone. Refer to paragraph "Modifying the date and time", page 25 so as to set the phone date and time. If the screen display is not legible, refer to paragraph "Adjusting the contrast", page 25. 2.9. BROWSING THROUGH THE MENUS To access the menu list, press or . Use the browsing keys or to select the desired menu.
CC220R 3. MENU STRUCTURE To access one of your phone’s menus, use key or . Menu RHONEBOOK Option VIEW CALL Edit SEARCH RING TONE ADD NUMBER NEW ENTRY DELETE CALLS INCOMING CALLS OUTGOING CALLS EVENTS ACCESSORIES ALARM TIMER BIRTHDAY BACKLIGHT RING TONE EXTERNAL CALL BEEPS SILENT MODE SETTINGS DATE/TIME CONTRAST SPEED DIAL. LANGUAGE SECURITY ADVANCED SET. VOICE BOX No MESSAGES ON/ OFF OUTGOING MESS. SETTINGS ANS.
CC220R 4. PHONE USE 4.1. TELEPHONING 4.1.1. RECEIVING A CALL When the phone rings, lift the handset from its base and use it just like a standard telephone. • When a call is received, the phone rings. • The line indicator flashes and the caller’s phone number is displayed on the screen if you have subscribed to the “caller ID” service. The caller’s name may also be displayed if it is included in your phone book. Accepting a call in handset mode • Pick up the phone handset.
CC220R Making a call in speakerphone mode Press The icons are displayed on the screen and the line indicator Dial your number on the keypad. This is displayed on the screen. • To end the call, hang up the handset on the base or press comes on in red. . You can also dial a number in pre-dialling mode, whether in handset or speakerphone mode: dial the number on the keypad and then lift the handset or press . If necessary, you can correct the number entered by pressing 4.1.3.
CC220R Ending one of the two calls To end one call and continue with the other, press and then . The call in progress is then permanently ended and you take the second call back. To set up a 3 way-call (the two parties and yourself) During a call, press then . You can then talk to both parties simultaneously. To end the 3 way-call, replace the handset. 4.1.5. Press the REDIAL KEY FUNCTION key to access the list of recently dialled calls, and then pick up the handset.
CC220R You can return to speakerphone mode by holding down the the handset. key and then replacing When you call in hands-free/speakerphone mode, you can decrease the audio volume using and . 4.1.9. increase or DIAL ONE OF THE LAST NUMBERS DIALLED Your CC220R stores the last 20 dialled numbers: • Go to CALLS / OUTGOING CALLS. • Select the number you want to call. • Go to Option / CALL. The number is dialled automatically in speakerphone mode. 4.1.10.
CC220R 5.2. • • • CALLING USING THE PHONEBOOK Go to PHONEBOOK. Select the contact you want to call using keys (refer to paragraph "Searching for a contact", page 20). Select Option / CALL. The number is automatically dialled in speakerphone mode. 5.3. EDITING AN ENTRY • • • • Go to PHONEBOOK. Press keys or to select the contact you want to change. Select Option / Edit. You enter the name input screen. • Press to delete characters. Enter your changes on the keypad.
CC220R 5.6. OTHER NUMBER This function allows you to assign new numbers to the same name. • Go to the menu PHONEBOOK. • Select the entry you want to assign another number. • Go to Option / ADD NUMBER. • Enter the phone number on the alphanumeric keys. Press OK. • Select an icon according to the type of number entered. Press OK. 5.7. DELETING AN ENTRY • • • Go to the menu PHONEBOOK. Press keys or to select the contact you want to delete. Select Option / DELETE. • Press Yes to delete the entry.
CC220R 6.3. THE EVENTS LOG 6.3.1. VIEWING THE EVENTS LOG If one or more new events occurred during your absence, the information screen “NEW EVENTS!“ is displayed and the light - new answering machine messages, - missed calls, - operator messaging system. starts to flash slowly. • • If you do not wish to view the event log at this time, press . To view the event log, press OK. Choose the event using or , press OK.
CC220R 7.1.2. • • ACTIVATING OR DEACTIVATING THE ALARM CLOCK Select ACTIVATE or DEACTIVATE, press OK. The alarm settings information screen appears showing the new status. Press OK. 7.1.3. CHANGING THE ALARM CLOCK RING TONE • Select RING TONE from the list and press OK. • • Select the ring tone of your choice, press Volume . Press or to increase or decrease the volume, press OK. • An information screen shows the alarm clock settings, press Return 7.1.4. .
CC220R 7.3. BIRTHDAY ALARMS You can programme birthday alarms (10 alarms) on your telephone. 7.3.1. • • • • Go to ACCESSORIES / BIRTHDAY / New Enter the name of the person concerned using the keypad keys. Press OK. Enter the birth date using the keypad keys, press OK. Enter the alarm activation time, press OK. 7.3.2. • • VIEWING A BIRTHDAY ALARM Select the alarm you would like to view, and press Option Select VIEW, press OK. 7.3.3. • • ADDING A NEW BIRTHDAY ALARM .
CC220R 8.3. ACTIVATING/DEACTIVATING THE SILENT MODE When in silent mode, the telephone ringer and keypad beeps are inhibited. • Go to RING TONE / SILENT MODE. • Press Yes to activate the silent mode or No to deactivate. When you activate the silent mode, all the alarm based functions will be muted (Timer, Alarm, Birthday). 9. SETTINGS 9.1. • • • Go to SETTINGS / DATE/TIME. Enter the date in DD/MM/AA format, press OK. Enter the time in HH : MM format, press OK. 9.2.
CC220R 9.3.2. STORE A NUMBER IN MEMORY • Go to SETTINGS / SPEED DIAL.. • Select the memory key ( , or ) or keypad key (2 ~9) you want to program the number on. To program a number, select Edit, press OK. Using keys or , select the contact you want to assign a keypad shortcut to. Repeat the operation to add two other quick access numbers. • • To change the number stored on a memory key, save the new number directly on the memory key in question. 9.3.3.
CC220R The following types of numbers should not be programmed: Fire, emergency and police rescue services... • • • • • • Go to SETTINGS / SECURITY / EMERGENCY. An information screen displays the current status. - To keep the setting, press OK. - To modify the setting, press Edit . A list of various executable actions appears: - ACTIVATE :to activate the emergency number. - DEACTIVATE : to deactivate the emergency number. - CHANGE NO : to modify the emergency number.
CC220R • • • • Go to SETTINGS / SECURITY / RESTRICTION. Enter the base code, press OK. Select an empty location (dashes) or a prefix to modify, press OK. Enter the prefix using the keypad. Press OK. - To activate restriction, select ACTIVATE. - To deactivate restriction, select DEACTIVATE. Press OK. 9.5.5. • • • • Go to SETTINGS / SECURITY / CHANGE CODE. Enter the old base code using the keypad, press OK Enter the new base code using the keypad, press OK.
CC220R 9.7.1. MODIFYING THE NETWORK TYPE Your telephone can be installed on a public or private network (when using a PABX). This function enables you to configure your telephone according to the type of network. • Go to SETTINGS / ADVANCED SET. / SET LINE / NETWORK TYPE. • A screen presents the current status. - To keep the status, press OK. - To change the status, press Edit press OK. 9.7.2. . The status is modified on the screen, MODIFYING THE DIALLING MODE The default dialling mode is tone.
CC220R • • • • - ACTIVATE / DEACTIVATE : to select a status. - PREFIX : to enter the number giving you access to the outside line. - EDIT LENGTH : to specify the «digits before prefix». To modify the prefix, select PREFIX, press OK. Enter the prefix using the keypad, press OK. To modify the digits before prefix, select EDIT LENGTH, press OK. Enter the digits before prefix using the keypad, press OK. 9.8.
CC220R • - To change the status, press Edit . To activate the answer and record mode,select RECORD MODE. To activate the answer only mode, select ANSWER ONLY. To turn off the answering machine, select OFF. To activate your voice mail while deactivating your answering machine, select ONLINE BOX. Press OK. The announcement which will then be used is broadcast. Once the announcement has been played back, press OK.
CC220R 10.2.3. DELETING ALL YOUR PERSONAL OGMS If you delete all your personal outgoing messages, the answering machine will automatically be deactivated. • Go to ANS. MACH / OUTGOING MESS. / DELETE ALL. • Press Yes to erase all personal outgoing messages. 10.3. PLAYING MESSAGES If you have new messages (unread), these messages are read first. Afterwards, the messages that have already been taken are played back in chronological order (from the oldest messages to the most recent messages).
CC220R - 3 : next message. 5 : messages read. 7 : enable/disable the answering machine. 8 : record memo. 9 : answering machine off. 10.5. DELETING ALL THE OLD MESSAGES To delete old messages one by one, refer to the previous paragraph and delete unwanted messages during playback. • Go to ANS. MACH / MESSAGES / DELETE OLD. • To confirm the deletion of all the old messages, press Yes . 10.6. RECORDING A MEMO This function allows you to record a personal message on your answering machine.
CC220R - To change the status, press Edit . 11.2. MODIFYING THE REMOTE ACCESS CODE The remote access code enables you to listen to the messages left on your answering machine via another telephone. • Go to ANS. MACH / SETTINGS / REMOTE CODE. • • • Press Yes to change the access code. A base code entry screen is displayed. Enter your Base code (default setting is 0000). Press OK. Enter the new remote access code (4 digits mandatory). Press OK. 11.3.
CC220R 11.5. NUMBER OF RINGS This parameter determines the number of times your phone rings before your answering machine is started. The number of rings is between 2 and 7; you can also select the Saver mode. The Saver mode automatically determines: whether the answering machine contains any new messages or not; if it has no new messages, the number of ring tones will be 4 and if has new messages, number of ring tones will be 2. • Go to ANS. MACH / SETTINGS / NO OF RINGS.
CC220R 12.2. CARE AND MAINTENANCE Turn off your phone. Use a soft damp cloth to wipe it. Do not use a dry cloth, strong liquid detergents, thinners, alcohol or any other type of solvent to clean your phone. These products may damage your phone. 12.3. PROBLEMS Refer to the table presented below in case of an operational malfunction: Problems You are having trouble reading or cannot read the display. No display on the base screen. No tone. Possible causes Contrast too low.
CC220R 13. TECHNICAL CHARACTERISTICS 13.1.
CC220R 13.2. FEATURES Batteries Ni-MH, AAA type 2 x 1.2 V 450 mAh for handset 3 x 1.2 V 450 mAh for base Standard DECT, GAP Radio frequency band 1.88 to 1.90 GHz Handset operating time talk time up to 10 hours standby time up to120 hours Number of channels 120 Duplex mode TDMA Base operating time (with batteries only): talk time up to 4 hours standby time up to 8 hours Spacing between channels 1.
CC220R 14. ENVIRONMENT Environmental protection and sustainable development is an important priority for SAGEMCOM. SAGEMCOM has a policy of using environmentally- friendly systems and makes environmental protection an essential part of the life-cycle of its products – from the manufacturing, to the installation, operation and disposal 14.1.
CC220R A) General Guarantee conditions SAGEMCOM undertakes to remedy by repair or exchange at its own convenience, free of charge for labour and replacement parts, any defects in the equipment during the guarantee period of 12 (twelve) months or 3 (three) months for accessories, from the date of original invoice of the Equipment, where those defects are a result of faulty workmanship.
CC220R access networks or malfunction of the line used by the subscriber or his correspondent - Transmission faults (for example poor geographical coverage by radio and TV transmitters, interference or poor line quality) - Local network faults (wiring, servers, workstations) or the failure of the transmission network (such as but not limited to interferences, fault or poor quality of the network) - Modification of the parameters of the cellular or broadcast network carried out after the sale of the Product
TELECOM Sagemcom Broadband SAS 250, route de l'Empereur 92848 Rueil-Malmaison Cedex - France Tél. +33(0)1 57 61 10 00 Fax : +33(0)1 57 61 10 01 www.sagemcom.