
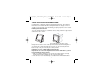
User manual


stage 1 of the installation process above. For Vista users, a screen will appear
saying “WIndows needs to install driver software for your unknown device”. Select
“Ask me again later” and go to stage 1 of the installation process.
Note 2: If you have lost or damaged your CD, you can use Windows Update to
restore or load software drivers.
Note 3: If you install a Saitek X52 Pro after having installed the Flight Instrument
Panel, the Instrument Panel’s Direct Output file will be overwritten. If this happens,
please reinstall the Instrument Panel software.
Troubleshooting
How to assign Flight Simulator X instrument displays to the Pro Flight
Instrument Panel
Once you have installed the Instrument Panel software and plugged the panel’s USB
cable into one or your PC’s free USB ports (or Saitek Pro flight yoke USB hub), the
screen will show a default scrolling display of Saitek Pro Flight products.
The Instrument Panel buttons and screen are now automatically configured to
interact with FS X software. When you open Microsoft FSX you will be asked “Do
you trust this driver from Saitek?” Click “Yes”. You will then be asked “Do you always
want to load this plugin when launching Flight Sim X?” Again, click “Yes”. The
Instrument Panel screen display will switch to show the aircraft Altimeter instrument.
If your FS X software does not recognise the Instrument Panel, unplug the USB
cable and plug it back in.
If FS X appears not to load, this is because it is waiting for a prompt. To view the
prompt window, select it either by pressing Alt + tab or by clicking on the prompt on
the Windows task bar. The prompt reads “Microsoft Flight Simulator security warning
: will happen once after install”. Click Run and when asked “would you like to
designate this module?”, click yes and FS X will continue to load.
then Run and type D:\Setup.exe and click OK - where D:\ is letter of your disc
drive. For Vista users, if you receive the “User Account Control” prompt, click
continue.
3. For XP users, when the Set-up wizard screen appears, click “Next” to continue.
For Vista users, when prompted “Would you like to install this device software?”
click “Install”. After reading the Disclaimer, select the “I accept the terms of the
Disclaimer” option and click “Next” to continue.
4. The following screen will say “Driver set-up is installing Direct Output”.
5. Once the driver installation has finished, click “Finish” to exit the installation
process.
6. Plug in your Flight Instrument Panel.
7. For XP users, the New Hardware Wizard will appear asking “Can Windows
connect to Windows Update to search for software?”. Select “Not at this time” and
click “Next”. For Vista users, the installation will now be completed automatically.
8. At the next screen, XP users should choose the recommended option “Install
software automatically”. Click “Next” and then “Finish” to complete the installation.
9. If prompted, restart your PC.
Note 1: If you plug in your Flight Instrument Panel before installing the drivers, for
XP users, the Found New Hardware Wizard will appear. Click “Cancel” and go to
3
2
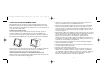
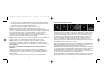
Screen displays
Altimeter
Airspeed
Attitude Compass Turn and Slip
Vertical Speed
Pro_Flight_instrument_panel_resize.qxd 12/03/2009 12:36 Page 2