44090 MUSICAM Digital Camera and MP3 Player Owner’s Manual © 2007 Sakar International, Inc. All rights reserved. Windows and the Windows logo are registered trademarks of Microsoft Corporation. All other trademarks are the property of their respective companies.
Table of Contents Table of Contents .......................................................... 2 Introduction ................................................................... 2 Key Features ................................................................. 3 What your camera includes........................................... 3 Computer System Requirements for Windows ............. 3 A Quick Look at Your Camera ...................................... 4 Charging Your Musicam for Use ........................
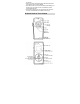
Key Features 1.3 MegaPixel Digital and Video Camera 320 x 240 1.1 Inch Color LCD monitor SD Memory Card Slot only for MP3 device which accepts SD and MMC compatible memory cards from 32MB up to 1GB.
the camera. When you switch off the battery OFF-ON switch all the data in the built-in memory will be deleted. • After taken photos, we recommend always downloading your photos to your computer as soon as possible to prevent unintentional data loss. • We strongly suggest not to use mp3 player and camera at one time, as this will lead to unstable power supply.
Charging Your Musicam for Use Built-in Battery Your camera uses a built-in Lithium battery. When the Battery On/Off switch is On. the USB port serves as a charger for the battery. To charge the battery, simply connect the device via the USB cable to your PC, the camera screen will light up. In the charging period the screen will continue to light up. Please note that you can not power off the screen while the camera is connected to the USB port.
period, leave the switch in the Off position, this will save the energy left in the battery. Battery Capacity Icons: An icon will appear on the top right corner of your LCD screen, showing the amount of battery power available. 1. more than 70% power 35%-70% power 5%-35% power less than 5% power the surface of the camera. Starting Your Camera 1. Shift the Battery On/Off switch to On. 2.
take photos and videos, download them to your PC, or use the device as a webcam. All MP3 functions will be disabled in this mode. MP3 mode: When the mode switch is set to MP3 (up), the device enters Mass Storage (MSDC) mode. All Digital Camera functions except for taking photos will be disabled, and you can now download music or other files onto your SD card. Note: When you pull out the USB cable, the device will power off.
Press the Menu button to enter the Main Menu, and press the Power/Shutter button to select the Camera Submenus. Upon entering the Camera Submenu, you can choose between the following options: Take Photo Self-Timer AVI(Video) Continuous Capture Press the Shutter button to toggle through the various options within this submenu, and the Menu button to select the mode of your choice. The LCD screen will show your choice with a symbol in the upper left corner.
Press the Power/Shutter button to toggle between the different resolution options, and press the Menu button again to select and save the desired resolution. Options within the Resolution Modification Submenu are as follows: SVGA (1280x1024) VGA (640x480) QVGA (320x240) Note: Clearer photos will be taken at higher resolution, however low resolution will allow you to take many photos at one time.
Power/Shutter button to toggle between the frequency options, and the Menu button to select the desired frequency. Options within the Frequency Submenu are as follows: 50Hz 60Hz Note: 60Hz is suitable for the U.S. and Asia, and 50Hz for Europe and Japan. Delete All Submenu Press the Menu button to enter the Main Menu, press the Down button until the Delete All icon is selected and then press the Power/Shutter button to select this submenu.
Press the Shutter button on the left side of the camera. Press the “Preview” left dial arrow for the last photo taken to appear on the LCD screen. Now press the “Power Off/Menu” (up arrow on dial) mode button and the following screen will appear: Use the Down arrow to toggle between the Yes or No choices Yes to delete the photo currently viewed, or No to cancel. Press the Shutter button to activate your choice. Capturing Photos TAKING INDIVIDUAL PHOTOS You can compose your shot using the LCD screen.
Your camera can be set up to take 3 photos in one continuous shot. Select the Continuous shot mode from the camera menu options on the LCD screen. Select the Menu (up arrow) mode. When the continuous shot icon appears in the top left corner you can now take your shots. Press the Shutter button once and the camera will take 3 consecutive shots saved in jpeg format. TIMER Your camera can be set up with the timer mode to take a photo after 10 seconds.
Once in the Video mode, press the shutter button for the camera to start capturing an AVI video. A clock counter on the bottom right corner of the LCD screen will begin to count. The video is now being captured. To end the video capture press the shutter button again. The Video has now been captured and is ready to be downloaded from the camera to your computer.
“Music Express” section of this manual. The MP3 Player has a memory card slot that enables you to insert any “SD” compatible memory card. The amount of music that can be enjoyed while using this device depends on the capacity of the card inserted. The greater the memory of the card the more songs you can add. Adding a memory card will allow you to increase the capacity of your music. NOTE: SD memory card is required for normal use. Installing the SD Memory Card: 1. 2. 3.
memory Card. 6. 7. 8. 9. 10. 11. 12. 13. 14. After unlocking your memory card insert your SD/MMC memory card into the SD slot at the base of the device.
seconds. Volume control To increase the volume press the up arrow on the dial, and to lower the volume press the down arrow on the dial. Sleep Mode (Power-Saving) The sleep mode uses low energy consumption in order to prolong the device`s battery life. In order to enter this mode while the MP3 player is playing music, simply press and hold down the Power/On/Off/Play button for 3 seconds. The red indicator LED will change from a flashing light to constant. When this happens release the button immediately.
To Install the Software and Driver for the Digital Camera select the “Install PhoTags and WebCam Express software” button. This will begin the installation of the software. Please follow the instructions carefully to install this software to your computer. DO NOT PLUG YOUR CAMERA INTO THE USB PORT UNTIL THE SOFTWARE INSTALLATION HAS BEEN COMPLETELY INSTALLED.
On the “PhoTags Express" screen, click the “Next” button. Please review the license terms and click the “Agree” button to continue. Let the “PhoTags Express” installer create the folder where the program will be installed to, and then click “Install”.
Click “Finish” to let the “PhoTags Express” installer finish the installation program. This will automatically launch the Install shield for the camera driver. Click “Next” to continue. Follow the Setup screens that appear to install the driver for this camera .
Once the program has finished installing you will be asked to restart your computer. Please do so. Congratulations!! You have successfully installed the “PhoTags Express”, “WebCam Express” software and the Camera Driver. To use the WebCam Express software see the “Using your Camera as a Webcam” section.
If the Camera is off it will automatically be turned on when the USB cable is properly connected and the Transfer mode icons will appear on the LCD screen. Click the “PhoTags Express” icon that appears on your desktop to open the “PhoTags Express” Software. From the Main Menu screen that appears, select the “Select Photos”, “Enhance Photos” or “Add Captions” buttons.
Postcards on standard photo paper... You can purchase Albums and Video CD, two additional workshop projects online at anytime and these will be automatically activated in “PhoTags Express”. Create Photo Albums and Slide Shows on CDs that can be viewed on your PC and VCD’s for viewing on your TV using your DVD player. Add background music to your slideshow.
Select the “Dual Mode Camera” option in the Active Devices window on the left. and select the “Custom” copy radial button in the Copy methods box. Click the “Next” button. Add Active Captions to your pictures. You can add a date, keywords, categories and more. Click “Next” to continue.
Choose where to place your photos and videos. The default is to place all photos and video into a folder under the C:\My Documents\ My Pictures folder with the date the photos where taken as the folder name. Click the “Finish” button to start the download process. A photos download progress bar appears showing the number of media (videos included) downloading to your computer. All the media – Photos and Videos on your camera are now downloaded to your computer.
transferred. For more information please refer to the Quick Start guide in PhoTags Express. Viewing Videos Make sure that your camera is connected to your computer with the USB cable. Open any application that will enable you to view video files (for example Windows Media Player). Videos created and downloaded should be sitting in the C:\My Documents\My Pictures\{date} folder. Videos are saved in AVI format. Double click on a video with the avi extension.
3. Adjust your Camera/Webcam to the desired position. The computer screen will display what the Webcam “sees”. 4. To add audio to your video, plug a microphone into your computer. 5. Click the “Capture” button to start recording the video. The recording elapse time will appear under the video. 6. Click the “Pause” button to hold the recording. To continue recording click the “Capture” button again. 7. To finish recording click the “Stop” button. 8.
Method 1 – Capture Mode: 1. Position the Webcam so that it is pointing in the direction of the object you wish to photograph. 2. The “image” appears in the application’s view screen. 3. Select the “Capture” mode button at the top of the application screen 4. Click the “Snapshot” button on the top left of the view screen. 5. The photo will be saved automatically as a jpeg picture in the My Documents/ My Pictures/ My WebCam folder on your computer. 6.
To learn more on how to capture JPEG snapshots from your Webcam or from your existing AVI movies, go to the “Take Snapshots” section in the Quick Start Help guide in the application. To learn how to change the User Settings, go to the “Set User Preferences” section in the Quick Start Help. Webcam: You can use this Webcam to chat with friends and family, sending live video feeds straight to them. NOTE: In order to use this Webcam you must make sure that you have YAHOO MESSENGER Ver 5.5 or later. 1.
Note: Before you install the software please make sure that the device is NOT connected to the computer by the USB cord. If your camera is connected please DISCONNECT it now. 1. 2. Insert the Software CD that came with your Musicam Digital Camera and MP3 Player into the CD-ROM drive. Make sure that your Digital Music Player is NOT connected to the computer. A menu screen will automatically appear. 3. Select the “Install Music Express software” button to install the Music Express software. 4.
5. Please review the license agreement and click the “Agree” button 6. Let the “Music Express” installer create the folder where the program will be installed to, and then click “Install” 7. Click “Finish” to let the “Music Express” installer finish the installation program.
8. Congratulations!! You have successfully installed the “Music Express” software. Digital Music Player Registration Make sure that your Digital Music Player is NOT connected to the computer. Note: The first time you open “Music Express” the wizard will open automatically requesting device installation. 1. To launch “Music Express”, double click on the program icon on your desktop. 2.
3. Select your Digital Music Player model from the drop down list and click the “Next” button. 4. Insert a name for the Digital Music Player device and click the “Next” button. 5. Make sure that the button on the right side of the device is in the MP3 (up) position, and press and hold down the Power/On/Off/Play button for 4-5 seconds to power on the MP3 player, and then plug your Digital Music Player to the USB port.
6. Once the computer recognizes that you plugged your device, an “Install now” button will show, press it. 7. When the installation is done, a message will come up saying that the device has been successfully registered.
The next time you plug in your Digital Music Player device, it will automatically open “Music Express” and display its contents in “My music player” mode. (For more information please refer to the help file in the software.) Device Auto-Detect The Device Auto-Detect detects your Digital Music Player as soon as you plug it into the USB port. The "Music Express" software opens in "My music player" mode, displaying the contents of your Digital Music Player and allowing for upload of new songs.
To reset the Auto-Detect to launch at system start up do one of the following: Right click on the Auto-Detect icon in the notification area, press "Preferences" and check the check box. Click the "Preferences" button on the "Music Express" main window, choose the Auto-Detect tab and check the check box. Press the "iConcepts Music Express" from the programs menu and choose "Launch Auto Detect".
Rip an Audio This feature requires Windows XP. Rip music from a music CD, copy it to your computer and add it to your music library. 1. Click the “Rip CD” button in the “Get music” mode. 2. Click the “Load CD” button to load the CD from the CD drive. Note: The default name of the CD can be changed. 3. Mark the songs you want to rip (to choose all of the songs on the CD press the “Select all” button) 4. Press the “Browse” button to choose the folder you want to copy the songs to. 5.
Copy music from removable drive Copy music files from any removable drive connected to your computer and add them to your music library. 1. Make sure the removable drive is connected to your computer. 2. Click the “Copy music from removable driver” button in the “Get music” mode. 3. Select the removable drive from the drives list. 4. Choose a playlist to add the songs to: a. Create a new playlist. b. Choose from an existing playlist. c. Don’t add songs to any playlist. 5. Click the “Begin search” button. 6.
3. The new playlist will now be listed in the “My playlists” window. Add music files to a Playlist 1. Select the music file/files you wish to add from the “All music” playlist or another existing playlist. 2. Click on the “Add music to playlist” button and choose the playlist you want the song to be in or drag the selected music file/files onto the playlist in the “My playlists” window you want the song to be in.
6. Previous- play the previous song on the playlist. 7. Next- play the next song on the playlist. Change the order of songs in your playlist Change the order of the songs by using the arrows: 1. Move song up- move a selected song up in the playlist. 2. Move song down- move a selected song down in the playlist. Remove songs from playlist Remove a selected song or a group of songs from the playlist. 1. Choose the song you wish to remove from the playlist.
Delete a playlist 1. Choose the playlist you wish to remove. 2. Click the “Delete playlist” button. 3. A window will appear asking you to confirm your wish to permanently delete the playlist. If you wish to delete the playlist press “Yes”, if not press “Cancel”. The “All Music” Playlist The top playlist in the “My playlists” window is a default playlist called “All Music”. It contains all the music on your computer, and cannot be deleted.
4. Make sure you have a blank CD in the drive before pressing the “Begin burn” button. 5. Once CD is ready a message will come up saying “Your CD has been successfully created”. My Music Player Mode The "My Music Player" mode lets you view, listen, upload, download and remove music files and playlists from and to your Digital Music Player.
Save songs as Playlist After you transferred the selected songs to the Digital Music Player you can save the songs as a new playlist. 1. Press the “Save as playlist” button. 2. Insert a new playlist name. 3. The new playlist will appear in the “My playlists” window.
Maintenance of Your Digital Camera Your 2 in 1 Digital Camera and MP3 Player is a delicate instrument- please handle it with care. Sakar Warranty Card This warranty covers for the original consumer purchaser only and is not transferable. Products that fail to function properly UNDER NORMAL USAGE, due to defects in material or workmanship. Your product will be repaired at no charge for parts or labor for a period of one year.
Shooting Mode Exposure White Balance Shutter Speed File Format Storage capability PC-Camera Interface Depth of field Operating Systems Single Shot, Self-timer Shot, Movie (QVGA 320x240): AVI format, 6 frame/sec Automatic Automatic Electronic Shutter, 1/6-1/8,000 sec DC: JPEG/AVI MP3: MP3, WMA, ASF Resolution Hi Lo L (1280x1024) 15 30 M (640x480) 46 92 S (320x240) 138 276 640x480: 8 frame/sec, 320x240: 6-15 frame/sec DC: USB 1.1, MP3: USB2.
Athlon 300 MHz, or a Celeron 400 MHz or higher as well as at least 128MB of RAM. Please note that the older AMD K6 processors will not work. More information about determining your computer's specifications can be found in the General Computer Information section. If you have determined that you have pictures in your camera and you meet the system requirements, follow the steps below to reinstall the software. Software Re-installation First install the software.
Unfortunately, the system requirements for our digital cameras andwebcams require a Windows operating system. There is no Mac driver available and no current plan to develop Q: If the webcam does not work: Make sure you have connected the webcam correctly into an available USB port or hub.