CR-650DIG 3.
TABLE OF CONTENTS TABLE OF CONTENTS.............................................................................................. 1 SAFETY PRECAUTION ............................................................................................. 2 PACKAGE CONTENTS.............................................................................................. 2 FEATURES ................................................................................................................ 2 TECHNICAL SPECIFICATION......
SAFETY PRECAUTION • • • • • • • Keep away from water or moisture and dusty areas. Ambient Temperature 0~35°C. Never store in hot and very cold areas. Be carefully to keep it without dropping it or strong impact. Do not try to open the case alone without technical support. Connect the AC adapter to the DC IN jack and to power outlet. Only use attachments/accessories specified by the manufacturer. When left unused for a long period of time, the unit should be unplugged from the household AC outlet.
TECHNICAL SPECIFICATION • Panel size: 3.5 Inch • Aspect Ratio: 4:3 • Included AC/DC Adapter: 5V, 1A • Operating temperature: 41~95°F, 5~35°C • Memory Card Supported: SD/MMC/MS “not larger than 2GB” • Weight: 0.13 kg • Dimensions (W x H x D): 3.94 X 3.38 X 1.97 inches (100 X 86 X 50 mm) • FM Band: 87.5 - 108 MHz INSTALLATION AND MAINTENANCE 1.
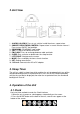
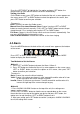
2. Unit View 1. ALARM 1/ALARM 2: Press to set, valid or invalid the alarms, repeat alarm. 2. SNOOZE/ BRIGHTNESS CONTROL: Repeat alarm in several minutes interval. / Press to turn ON/OFF the backlight. 3. SD/MS/MMC: SD/MS/MMC card reader. 4. VOL +/-: Adjust the volume of the unit. 5. FM/CLOCK: Press to exchange between radio and clock. 6. SLEEP: Sets, activates or deactivates the sleep function. 7. LEFT/RIGHT: Navigate on the screen. 8. MODE: Press to display the icons of main function. 9.
Press LEFT or RIGHT button to highlight the Clock icon , and press MODE button to display the Clock interface. 3. Press the FM/CLOCK button on the unit one or several times to display the Clock interface. Changing the Display Mode of the Clock On the Clock screen, press SET button on the back of the unit, a menu appears on the screen, press LEFT or RIGHT button to select the option on the screen, then press SET button to confirm your selection. The menu is: Back: Choose it to return the Clock screen.
Press the LEFT/RIGHT to highlight the Yes option and press SET button, the player begins to scan and will store the channels automatically. Setting your Radio On the Radio screen, press SET button on the back of the unit, a menu appears on the screen, press LEFT or RIGHT button to select the option on the screen, then press SET button to confirm your selection. The menu is: Back: Choose it to return the Radio screen.
The menu is: ON/OFF: Setting the alarm on or off. -- :-- AM: Use SET button to choose Hour or Minute, press LEFT or RIGHT button to change the digits. Working day/Every day: Setting the alarm to work on working day/Every day. Radio on/Music/Buzzer: Setting the ringing type of alarm. Note: If you want to choose a radio channel as the alarm ringing, you should set a channel as alarm firstly on the Radio interface, see the part “Save as Alarm Channel”, then choose the “Radio on” option.
Setting the Date 1. Press the MODE button on the back of the unit. 2. Press LEFT or RIGHT button to highlight the Setting icon , and press MODE button to enter the Setting menu. 3. Press LEFT or RIGHT button to highlight the Date option. 4. Press SET button, depending on the chosen DATE format, adjust digits at the first position highlighted by the box by pressing LEFT/RIGHT button. 5. After setting the position, press SET and the box will highlight the next position.
pressing the SET button will delete the photo. You can also delete the photos on your card. Copy to flash: Choose this and a warning “This file will be copied to Memory, are you sure?” appears on the screen. Use LEFT or RIGHT button to choose YES and pressing the SET button will copy the photo to the memory. 4.6 Music Insert your card to the SD/MS/MMC slot, press the MODE button on the back of the unit; several icons will appear at the bottom of the screen.
Time Format: Set the time display format. (12/24 Hours) Date: Month-Day-Year/ Day-Month-Year Time: Hour: Minute: Second Reset Setting: Restore to the factory default settings. (Yes/No) Firmware Version Select Different OSD Languages Go to RESET setting. Use the LEFT/RIGHT button to choose YES. Press SET button. Pop up question will ask user to confirm choice if YES. Use the LEFT/RIGHT button to choose YES. Press SET button. Pop up message ‘Please wait’ will appear.
RECYCLING This product bears the selective sorting symbol for waste electrical and electronic equipment (WEEE). This means that this product must be handled pursuant to European Directive 2002/96/EC in order to be recycled or dismantled to minimize its impact on the environment. For further information, please contact your local or regional authorities.
CR-650DIG 3.
INHOUDSTABEL INHOUDSTABEL........................................................................................................ 1 VEILIGHEIDSVOORZORGEN ................................................................................... 2 INHOUD VERPAKKING ............................................................................................. 2 KENMERKEN............................................................................................................. 2 TECHNISCHE SPECIFICATIE..............
VEILIGHEIDSVOORZORGEN • Houd uit de buurt van water of vochtigheid en stoffige ruimtes. • Omgevingstemperatuur 0~35°C. Nooit opbergen in warme en erg koude ruimtes. • Zorg ervoor dat u het apparaat niet laat vallen of vermijd hevige schokken. • Probeer niet om de behuizing te openen zonder technische bijstand. • Sluit de AC adapter aan op de DC IN aansluiting en het stopcontact. • Gebruik enkel toebehoren /accessoires die door de fabrikant opgegeven zijn.
TECHNISCHE SPECIFICATIE • Grootte paneel: 3,5 Inch • Aspectverhouding: 4:3 • AC/DC Adapter inbegrepen: 5V, 1A • Werktemperatuur: 41~95°F, 5~35°C • Ondersteunde geheugenkaarten: SD/MMC/MS “niet groter dan 2GB” • Gewicht: 0,13 kg • Afmetingen (B x H x D): 3.94 X 3.38 X 1.97 inch (100 X 86 X 50 mm) • FM Band: 87.5 - 108 MHz INSTALLATIE EN ONDERHOUD 1.
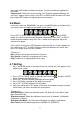
2. Afbeelding apparaat 1. ALARM 1/ALARM 2: Druk om in te stellen, de alarmen in of uit te schakelen, het alarm te herhalen. 2. SNOOZE/ BRIGHTNESS (SLUIMER/HELDERHEID) BEDIENING: alarm herhalen in een interval van enkele minuten./ Indrukken om de achtergrondverlichting aan of uit te zetten . 3. SD/MS/MMC: SD/MS/MMC kaartlezer. 4. VOL +/-: De volume van het apparaat aanpassen. 5. FM/CLOCK (FM/KLOK): Druk om te schakelen tussen radio en klok. 6.
Druk op de LEFT (LINKS) of RIGHT (RECHTS) knop om de Klok pictogram markeren, en druk op de MODE (MODUS) knop om de Klokinterface weer te geven. 3. Druk eenmaal of meermaals op de FM/CLOCK (FM/KLOK) knop op het apparaat om de klokinterface weer te geven. te De weergavemodus van de klok veranderen In het Klokscherm, drukt u op de SET (INSTELLEN) knop aan de achterzijde van het apparaat. Er verschijnt een menu op het scherm.
verschijnt een afbeelding op het scherm indien er nog geen zenders ingesteld staan: Er zijn geen vooraf opgeslagen kanalen, wilt u eens scannen ? Druk op de LEFT/RIGHT (LINKS/RECHTS) knop om de Ja optie te markeren en druk op de SET (INSTELLEN) knop ; de speler zal beginnen scannen en zal de kanalen automatisch opslaan. Uw Radio instellen Op het Radioscherm drukt u op de SET (INSTELLEN) knop aan de achterzijde van het apparaat. Er verschijnt een menu op het scherm.
een menu op het scherm verschijnen. Druk op de LEFT (LINKS) of RIGHT (RECHTS) knop om de optie op het scherm te selecteren. Druk vervolgens op de SET (INSTELLEN) knop om uw selectie te bevestigen. Het menu is: Terug: Kiezen om terug te keren naar de Alarminterface. Geldig: Kies: het alarm dat u gekozen hebt, is geldig. Ondertussen verandert de kleur van het pictogram rechts bovenaan het scherm in geel. Ongeldig: Kies: het alarm dat u gekozen hebt is ongeldig.
Druk op de LEFT (LINKS) of RIGHT (RECHTS) knop om het Kalender pictogram te markeren en druk op de MODE (MODUS) knop om de Kalenderinterface weer te geven. Druk op de LEFT (LINKS) of RIGHT (RECHTS) knop om de kalender te bekijken. De Datum instellen 1. Druk op de MODE (MODUS) knop aan de achterzijde van het apparaat. 2. Druk op de LEFT (LINKS) of RIGHT (RECHTS) knop om het Instellingen pictogram te markeren en druk op de MODE (MODUS) knop om het Instellingenmenu te openen. 3.
4.5 Foto Steek uw kaart in de SD/MS/MMC gleuf. Druk op de MODE (MODUS) knop aan de achterzijde van het apparaat. Er verschijnen verschillende pictogrammen onderaan het scherm. te Druk op de LEFT (LINKS) of RIGHT (RECHTS) knop om het Foto pictogram markeren en druk op de MODE (MODUS) toets om de diavoorstelling van foto’s te starten. Tijdens de diavoorstelling van de foto’s, drukt u op de SET (INSTELLEN) knop aan de achterzijde van het apparaat. Er verschijnt een menu op het scherm.
In het Muziekscherm, drukt u op de SET (INSTELLEN) knop aan de achterzijde van het apparaat. Er verschijnt een menu op het scherm. Druk op de LEFT (LINKS) of (RIGHT) RECHTS knop om de optie op het scherm te selecteren en druk vervolgens op SET (INSTELLEN) om uw selectie te bevestigen. Het menu is: Terug: Kiezen om terug te keren naar de Muziekinterface. Afspelen (Pauze): Kies dit om het liedje af te spelen/te pauzeren. Stop: Kies dit om het afspelen van het liedje te stoppen. 4.7 Instelling 1.
7. Het apparaat zal opnieuw opstarten, vervolgens zal een scherm met de nationale vlaggen van de verschillende beschikbare OSD talen verschijnen waaruit de gebruiker kan kiezen. 8. Gebruik de LEFT (LINKS), RIGHT (RECHTS) en SET (INSTELLEN) knoppen om de taal die u wenst te kiezen als de Taal die op het scherm weergegeven wordt. AFSTAND EN Er worden regelmatig updates gemaakt van de hardwarecomponenten.
RECYCLING Dit product draagt het selectieve symbool voor afval van elektrische en elektronische apparatuur (WEEE). Dit betekent dat het product moet behandeld worden volgens de Europese Richtlijn 2002/96/EC om gerecycleerd of uit mekaar gehaald te worden om zo de impact op de omgeving te minimaliseren. Gelieve uw lokale of regionale overheidsinstanties te contacteren voor verdere informatie.
CR-650DIG 3.
TABLE DES MATIERES TABLE DES MATIERES............................................................................................. 1 PRECAUTIONS DE SECURITE................................................................................. 2 CONTENU DE L’EMBALLAGE .................................................................................. 2 CARACTERISTIQUES ............................................................................................... 3 SPECIFICATIONS TECHNIQUES .......................
PRECAUTIONS DE SECURITE • Gardez l’appareil éloigné de l’eau et de l’humidité ainsi que des lieux poussiéreux. • La température ambiante doit être de 0 à 35°C. Ne rangez jamais l’appareil dans un lieu très chaud ou très froid. • Evitez de faire tomber le cadre et évitez qu’il soit sujet à des chocs violents. • Ne tentez jamais d'ouvrir le boîtier. Pour toute réparation, référez-vous toujours à un technicien qualifié. • Connectez l’adaptateur CA à la prise d’entrée CC et à une prise électrique murale.
CARACTERISTIQUES Votre cadre de 3.5” associe les fonctions d’alarme, d’horloge, d’audio, de calendrier, de radio et d’affichage photo. L’unité offre une technologie de pointe et est conçu pour être utilisé avec les cartes mémoire SD/MMC/MS. SPECIFICATIONS TECHNIQUES • Taille du panneau: 3.
2. Présentation de l’unité 1. ALARME 1/ALARME 2: Appuyez sur le bouton correspondant pour régler, activer ou désactiver l’alarme, répéter l’alarme. 2. RAPPEL D’ALARME/ CONTROLE DE LUMINOSITE: Appuyez sur ce bouton pour répéter l’alarme après quelques minutes / Appuyez pour mettre le rétroéclairage activé ou désactivé. 3. SD/MS/MMC: lecteur de carte SD/MS/MMC. 4. VOL +/-: Appuyez sur ces boutons pour ajuster le niveau de volume. 5.
Appuyez sur le bouton GAUCHE ou DROITE pour surligner l’icône Horloge et appuyez sur le bouton MODE pour afficher l’interface de l’horloge. 3. Appuyez une ou plusieurs fois sur le bouton FM/CLOCK de l’unité pour afficher l’interface de l’horloge. Changement du mode d’affichage de l’horloge Sur l’écran de l’horloge, appuyez sur le bouton SET situé à l’arrière de l’unité et un menu apparaîtra sur l’écran.
Appuyez sur le bouton GAUCHE ou DROITE pour surligner l’icône Radio et appuyez sur le bouton MODE pour démarrer la radio. Ou vous pouvez appuyer sur le bouton FM/CLOCK pour mettre la radio en marche. Une photo apparaitra sur l’écran. Appuyez sur les boutons GAUCHE/DROITE pour surligner l’option OUI et appuyez sur le bouton SET. Le lecteur commencera à balayer la bande et sauvegardera automatiquement les stations de radio.
Deux méthodes pour régler les alarmes Méthode 1 1. Appuyez sur le bouton GAUCHE ou DROITE pour choisir l’Alarme 1/ l’Alarme 2. 2. Appuyez sur le bouton SET situé à l’arrière de l’unité et un menu apparaît sur l’écran. Appuyez sur le bouton GAUCHE ou DROITE pour sélectionner l’option sur l’écran puis appuyez sur le bouton SET pour confirmer votre sélection. Les paramètres du menu sont: Retour: Appuyez sur ce bouton pour retourner à l’interface de l’alarme.
4.4 Calendrier Appuyez sur le bouton MODE situé à l’arrière de l’unité et plusieurs icônes apparaîtront en bas de l’écran. Appuyez sur le bouton GAUCHE ou DROITE pour surligner l’icône Calendrier et appuyez sur le bouton MODE pour afficher l’interface du calendrier. , Appuyez sur le bouton GAUCHE ou DROITE pour visualiser le calendrier. Réglage de la date 1. Appuyez sur le bouton MODE situé à l’arrière de l’unité. 2.
Les paramètres du menu sont: Retour: Appuyez sur ce bouton pour retourner à l’interface du calendrier. Inversion de couleur: Appuyez sur ce bouton pour changer la couleur du fond et de l’interface. 4.5 Photo Insérez votre carte dans la fente SD/MS/MMC, appuyez sur le bouton MODE situé à l’arrière de l’unité et plusieurs icônes apparaîtront en bas de l’écran. Appuyez sur le bouton GAUCHE ou DROITE pour surligner l’icône Photo appuyez sur le bouton MODE pour démarrer le diaporama des photos.
4.6 Musique Insérez votre carte dans la fente SD/MS/MMC, appuyez sur le bouton MODE situé à l’arrière de l’unité et plusieurs icônes apparaîtront en bas de l’écran. Appuyez sur le bouton GAUCHE ou DROITE pour surligner l’icône Musique et appuyez sur le bouton MODE, les plages musicales sur la carte se mettront automatiquement en lecture. Appuyez sur le bouton GAUCHE ou DROITE pour choisir une autre plage. Appuyez sur le bouton Vol +/- du lecteur pour ajuster le volume du lecteur.
Les paramètres du menu sont: Effet du diaporama: Permet de sélectionner les effets du diaporama (Tous/ Rouleau/ Cercle 3D / Onde/ Porte qui s’ouvre / Projection / Horloge/ échange ) Intervalle entre les photos du diaporama: Permet de sélectionner la durée d’intervalle entre les photos du diaporama (3 Secondes/ 10 Secondes/ 30 Secondes/ 1 Minute) Diaporama avec musique: Permet de visualiser un diaporama avec ou sans musique Mp3 (Mp3 sur la carte) Format de la date: Permet de régler le format de la date affic
DENI DE RESPONSABILITE Les mises à jour des composants matériels sont effectuées régulièrement. Par conséquent, certaines des instructions, les spécifications et les photos dans cette documentation peuvent légèrement différer de votre situation spécifique. Tous les éléments décrits dans ce manuel à titre indicatif seulement peuvent ne pas s'appliquer à la situation particulière. Aucun droit légal ou autres droits ne peuvent être obtenus d’après les descriptions effectuées dans ce manuel.