DAB/FM Radio Instruction Manual DAB3010FM IMPORTANT: Please read all instructions carefully before use and keep for future reference Ver 1.
Safety Warnings • • Retain the manual. If you pass the unit onto a third party make sure to include this manual. Check that the voltage marked on the rating label matches your mains voltage. Mains Adapter • Damage • • Please inspect the unit for damage after unpacking. Do not continue to operate the unit if you are in any doubt about it working normally, or if it is damaged in consult your dealer. Interference • Location of Unit • • • • not subjected to vibrations.
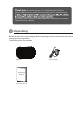
Thank you for Portable DAB radio. for purchasing purchasing your your new new Salora SALORA Portable DAB radio. We recommend that you spend some time reading this instruction manual Read all the safety instructions carefully before use and keep this instruction manual for future reference. Unpacking Remove all items from the packaging. Retain the packaging. If you dispose of it please do so according to local regulations.
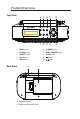
Product Overview Top View 6 7 8 9 10 Sleep Mode Snooze Scan Enter Info Alarm Preset 1 2 3 4 5 /MODE Button 1. INFO Button 6. 2. ALARM Button 7. SLEEP/SNOOZE Button 3. PRESET Button 8. SCAN Button Button 9. Button 10. 4. VOL- Button 5. VOL+ Button Rear View 14 15 14. Telescopic Aerial 15.
Side View 11. ON/OFF switch button 12. DC IN Socket 11 13. 12 13 • Always unclip and extend the aerial when listening to DAB or FM radio. The aerial has a swivel base for best reception. • Extend the aerial before switching This will ensure that the initial scan captures all stations in your area.
Power Source Mains Power Connect the mains adapter to the DC IN socket and then the mains socket. Battery Power Insert 4 AA batteries (not included) correctly by following the polarity (+ or –) indications in the battery compartment. Battery Life (Approx. Hours) Battery Type Alkaline (Size AA) DAB FM 12 13 Handling the Batteries • Improper or incorrect use of batteries may cause corrosion or battery leakage, which could cause personal injury or damage to property.
• If the batteries are replaced while the power is on, the unit may revert to the factory setting. • Due to the short battery life span of some alkaline batteries. It is recommended to use rechargeable batteries. You will need to purchase a charger to charge the rechargeable batteries. This saves money and is more environmentally friendly. Switching On Your Unit for the First Time 1. After connecting the unit to the power source, Switch the button to switch on the unit.
Alarm When the unit is in standby mode, press the ALARM button repeatedly to set the alarm status of Alarm1 or Alarm 2. When the LCD display shows Alarm1 and Alarm2, press the / Button to select to choose ON or OFF. Press the ENTER Alarm setup In standby mode, press the ALARM Button repeatedly to set the alarm status of Alarm1 or Alarm2. Press the / Button to select ON and then press the ENTER Button to Alarm1 Time Set/Alarm 2 Time Set. 1.
DAB Operation To listen to the tuned stations press the / Button. Each time you press the / Button, you will skip to the previous or next stored station (including primary and secondary station). The unit will display the station name. Auto Scan Modes Full scan Searches all DAB channels in DAB Band III. Press and hold the SCAN Button for about 2 seconds to start searching. Manual Scan As well as the auto tune function, you can manually tune the receiver.
DAB Display Modes Every time you press the INFO Button, the bottom line of the display will cycle through the following display modes. DLS (Dynamic Label Segment) Dynamic Label Segment is a scrolling message that the broadcaster may include with their transmissions. The message usually includes information, such as programme details etc. Programme Type This describes the “Style” or “Genre” of music that is being broadcast e.g. “Rock” or “Classical”.
FM Operation Switching from DAB to FM Mode Press the /MODE Button to switch to FM mode. The display will show FM frequency. On the top line of the display is the current frequency. On the bottom of the display, will show since no channel is tuned in and no RDS (Radio Data System) data are available. Auto Scan To search for an FM station, press the SCAN Button. This will start scanning up the frequency band. To scan down the frequency band, press and hold the SCAN Button.
FM Display Modes Every time you press the INFO Button, the bottom line of the display will cycle through the following display modes. Frequency This shows the frequency of the current station, e.g. 89.80 MHz. Audio Mode When in FM mode, the display will show if the station being received is in mono or stereo mode. The receiver will automatically switch between Stereo and Mono modes.
Software Version While in DAB or FM mode, press and hold the INFO Button. The LCD display will show SYSTEM RESET. Press the INFO Button again to show the software version of this unit on the LCD display. System Reset There may be times when you need to reset your unit to the factory settings. If you experience reception problems you may want to reset and try again.
Hints and Tips Problem Cause / Solution No Sound Adjust the volume control, it may not be turned up. Static Sound Signal reception is too low. Adjust the aerial or move the unit to a stronger signal location. Sound is distorted Volume is too high. Adjust the volume control. Desired station not found Weak signal. Use the Manual Tune function. The display shows “Not No DAB coverage in your area or poor reception. Adjust the available” position of the aerial.
Veiligheidswaarschuwingen Bewaar deze handleiding. Indien u dit apparaat overdraagt aan derden, geef dan deze handleiding ook mee. Controleer op het typeplaatje of dit het voltage overeenkomt met uw stopcontact. Beschadigingen Nadat u het apparaat hebt uitgepakt dient u het te controleren op beschadigingen. Gebruik het apparaat niet indien u twijfelt aan de werking of indien het op enige manier is beschadigd. Zet de schakelaar uit, trek de stekker uit het stopcontact en neem contact op met uw leverancier.
Kabel van de adapter Controleer of het apparaat niet op de elektrische kabel van de adapter staat. Het gewicht zou de kabel kunnen beschadigen en schade veroorzaken. Adapter De adapter zal elektriciteit gebruiken zolang deze in het stopcontact zit. Vanuit veiligheidsoverwegingen en vanwege onnodig energieverbruik, dient u het apparaat uit te zetten indien u deze langere tijd niet zult gebruiken, bijv. weekendje weg of vakantie. Zet de schakelaar uit en trek de stekker uit het stopcontact.
Service Om het risico op een elektrische schok te vermijden, dient u de schroeven van dit apparaat niet los te maken. Dit apparaat bevat geen onderdelen die door de gebruiker kunnen worden vervangen. Voor onderhoud dient u zich te wenden tot gekwalificeerd personeel. Open geen vastgemaakte deksels om blootstelling aan hoge voltages te voorkomen. Onderhoud Voordat u het apparaat wilt reinigen dient u de stekker uit het stopcontact te halen.
Overzicht van het product Boven aanzicht 1. 2. 3. 4. 5. INFO knop ALARM knop PRESET knop VOL- knop VOL+ KNOP 6. 7. 8. 9. 10. q/MODE knop SLEEP/SNOOZE knop SCAN knop 7 knop 8 knop Zij aanzicht 11. AAN/UIT schakelaar 12. DC IN ingang 13.
Achter aanzicht 14. Telescopische Antenne 15. Deksel batterij compartiment Maak altijd de antenne los en trek deze volledig uit zodra u naar de radio gaat luisteren. De antenne heeft een roterende basis die u in verschillende hoeken kunt plaatsen voor een optimale ontvangst. Trek de antenne volledig uit voordat u deze voor de eerste keer in de DAB modus zet. Dit om te garanderen dat alle beschikbare stations in uw regio worden gescand.
Stroomvoorziening Voorziening door elektriciteit Doe de adapter in de DC IN ingang van het apparaat en daarna de stekker in het stopcontact. Voorziening door batterijen Plaats 4 AA batterijen (niet inberepen) rekening houdend met de juiste polariteit (+/-) aangegeven in het batterij compartiment.
Aanzetten van uw apparaat voor de eerste keer 1. Nadat u het apparaat heeft aangesloten op de elektriciteit, zet u de AAN/UIT schakelaar op aan. Op het LCD scherm zal Welcome to Digital Radio verschijnen en de radio zal in de Stand-by modus gaan. Druk nogmaals op de q/MODE knop en de radio zal automatisch in de DAB modus gaan. Op het LCD scherm verschijnt nu Autotune Full Scan en de radio zal een automatisch scan uitvoeren. 2.
Alarm Alarm aan- of uitzetten In de Stand-by modus, drukt u meerdere keren op de ALARM knop om Alarm1 of Alarm2 in te stellen. Zodra op het LCD scherm Alarm1 of Alarm2 verschijnt, drukt u op de 5/6 knoppen om aan of uit te selecteren. Druk op de ENTER knop om te bevestigen. Alarm instellen In de Stand-by modus, drukt u meerdere keren op de ALARM knop om Alarm1 of Alarm2 in te stellen. Druk op de 5/6 knoppen om ON (AAN) te selecteren. Druk op de ENTER knop om te bevestigen.
DAB bediening Om de gevonden stations te beluisteren drukt u op de5/6 knoppen. Iedere keer als u op de knop drukt gaat u naar het vorige of volgende opgeslagen station (inclusief de primaire en secundaire stations). Op de display verschijnt de naam van de groep van de gevonden stations. Auto scan modus Volledige Scan Hiermee zoekt u automatische alle beschikbare stations van de DAB band III. Houd de SCAN knop ongeveer 2 seconden ingedrukt om het zoeken te starten.
DAB display modi Zodra u op de INFO knop drukt, verschijnt in de onderste regel van de display aanvullende informatie door middel van een scrollende tekst. DLS (Dynamic Label Segment) Dynamic Label Segment wordt geleverd door de zender die informatie als scrollende tekst op de display weergeeft. Deze bevat gewoonlijk informatie m.b.t. het programma. Programma Type Dit omschrijft de Stijl of Genre van het programma zoals, “Rock” of “Klassiek” .
FM bediening Schakelen van DAB naar FM modus Druk op de q/MODE knop om te schakelen naar de FM modus. Op de display verschijnt de FM frequentie. De bovenste regel geeft de huidige frequentie aan. Op de onderste regel verschijnt omdat er geen kanaal is afgestemd en er geen RDS (Radio Data System) beschikbaar is. Auto Scan Om naar FM zenders te zoeken, houdt u de ENTER knop ingedrukt. Hiermee zal het zoeken op de FM band gestart worden. Om te zoeken houdt u de SCAN knop ingedrukt.
FM Display modi Zodra u op de INFO knop drukt, verschijnt in de onderste regel van de display aanvullende informa door middel van een scrollende tekst. Hier 89.80 Om te wisselen tussen Stereo en Mono, drukt u één keer op de ENTER knop, op de display verschijnt “Auto” of “Mono”. Om weer te veranderen drukt u nogmaals op de ENTER knop. Frequen e wordt de huidige frequen e weergegeven, bijv. MHz. Audio Modus Inde FM modus, gee de display aan of het programma in stereo of mono wordt ontvangen.
Tijd/Datum atum wordt weergegeven op de display. De So ware versie In de DAB of FM modus, drukt u op de INFO knop en houd deze ingedrukt. Op het scherm verschijnt SYSTEM RESET. Druk nogmaals op de ENTER knop en de so ware versie van dit apparaat zal op Na de reset zullen alle opgeslagen DAB en scherm verschijnen. het FM sta ons worden verwijderd. System Reset Soms is het nodig om het apparaat terug te ze en naar de fabrieksinstellingen.
Onderhoud Reinig het apparaat met een vo ge, niet pluizende doek. Gebruik geen vloeistoffen die alcohol, ammoniak of schuurmiddelen beva en. Spuit geen sprays naar of bij het apparaat. Hints en Tips Probleem Geen geluid h geluid Geluid is vervormd Gewenste sta on is niet gevonden Display toont “Not available” Display is leeg Specif ica s U hee geen DAB+ ontvangst in uw regio, of een slecht ontvangst. Pas de posi e van de antenne aan.
Aver ssements Veuillez conserver ce manuel. Si l'appareil devait être cédé à une autre personne, assurezvous que ce manuel soit donné à son nouvel u isateur. Contrôlez bien que la tension de réseau correspond avec la tension indiquée sur la plaque que. sign Endommage Inspectez l’appareil, après le déballage s’il n’y pas de dommages. N’u isez pas l’appareil si vous êtes en doute de son bon fon onnement ou si l’appareil est endommagé.
Assurez-vous que l’appareil n’est pas placé sur le câble de l’adaptateur, le poids de l’appareil pourrait endommager le câble et causer danger. Adaptateur secteur L’adaptateur secteur consomme électricité quand il est connecté à la prise secteur. Pour raisons de sécurité ou consommation d’énergie inutiles, ne laissez jamais l’adaptateur secteur branché dans la prise secteur si vous n’utilisez pas pendant une période prolongée. Débranchez l’adaptateur de la prise secteur.
Pour éviter le contact avec des component de haute voltage ou exposition à radiation dangereuse, n’essayer pas d’ouvrir l’appareil. Manutention Avant le nettoyage de l’appareil, assurez-vous de débranchez-le. N’utilisez pas aucune type des produits abrasifs ou des solutions de nettoyage abrasives, cela pourrait endommager la surface de l’appareil. N’utilisez pas de liquides pour nettoyer l’appareil. Merci beaucoup pour votre achat du nouveau SALORA Radio Portable DAB.
Présentation du produit Vue de dessus 1. 2. 3. 4. 5. Bouton INFO Bouton ALARME Bouton PRÉRÉGLAGE Bouton VOLBouton VOL+ 6. 7. 8. 9. 10. Bouton q/MODE Bouton SLEEP/SNOOZE Bouton BALAYAGE Bouton 7 Bouton 8 Vue de côté 11. Interrupteur MARCHE/ARRÊT 12. Prise DC IN 13.
Vue Arrière 14. Antenne télescopique 15. Couvercle compartiment piles Détachez et dépliez l’antenne en écoutant la radio DAB ou FM. L’antenne est fournie avec une base pivotante pour régler bien l’angle d’inclinaison pour une réception optimale. Dépliez l’antenne avant mettre la radio en mode DAB pour la première fois. On s’assure ainsi d’un balayage de toutes les stations de votre région.
Source d’alimentation Alimentation du secteur Connectez l’adaptateur secteur dans la prise DC IN et puis dans la prise secteur. Alimentation Piles Insérez les 4 AA piles (pas inclues) correctement en suivant les indications de la polarité (+ ou -) dans le compartiment piles. Durée de vie des piles (Env.
Mettre en marche votre appareil pour la première fois. 1. Après branchement de l’appareil à la prise secteur, mettez l’interrupteur On/Off en position On pour le mettre en marche. L’écran LCD affichera Welcome to Digital Radio, l’appareil se mettre en mode veille. Appuyez une autre fois sur le bouton q/MODE et l’appareil se mettra en mode DAB automatiquement. L’écran LCD affichera Autotune Full scan et commencera la recherche automatique. 2.
L’alarme Activer ou désactiver l’alarme En mode Veille, vous appuyez plusieurs fois le bouton ALARM pour régler l’alarme1 ou l’alarme2. Lorsque l’écran LCD affiche Alarm1 ou Alarm2. Appuyez les boutons 5/ 6 pour sélectionner ON ou OFF . appuyez sur le bouton ENTER pour confirmer. Réglage de l’Alarme En mode veille, vous appuyez plusieurs fois sur le bouton ALARM pour régler l’alarm1 ou l’alarm2. Appuyez les boutons 5/ 6 pour sélectionner ON et appuyez sur le bouton ENTER pour confirmer.
Fonctionnement DAB Pour écouter les stations DAB appuyez sur les boutons 5/ 6. Chaque fois que vous appuyez sur les boutons 5/ 6 vous passera à une station suivante ou précédente mémorisée (les stations primaires et secondaires inclues). L’appareil afficher le nom de la station. Modes Recherche Automatique Balayage complet Une recherche complète de toutes stations DAB bande III. Appuyez et tenez enfoncé le bouton SCAN pendant environs 2 secondes pour commencer la recherche.
Modes DAB Affichés Chaque fois que vous appuyez le bouton INFO, la ligne inférieure affichera un cycle de modes d’affichage suivant : DLS (Dynamic Label Segment) Texte déroulant avec information supplémentaire, mise à disposition par la station. Cet information comprend généralement détails de programme. Etc. Type de programme Cela décrit le Style ou genre de la musique diffusée, p. ex. Rock ou Classique. Fréquence La fréquence de la station actuelle sera affiché, comme « 11C 220.
Fonctionnement FM Passer du mode DAB au mode FM Appuyez sur le bouton q/MODE pour passer au mode FM. L’écran affichera la fréquence FM. Sur la ligne supérieure vous voyez la fréquence actuelle. A l’inférieur de l’écran, sera affiché « Programme Type » car il n’y a pas une station réglée et il n’y ont pas de données RDS (Radio Data System) disponible. Recherche Automatique Pour chercher une station FM, appuyez sur le bouton SCAN, pour une recherche automatique de la bande de fréquences.
Modes FM Affichés Chaque fois que vous appuyez le bouton INFO, la ligne inférieure affichera un cycle de modes d’affichage suivant : Fréquence La fréquence de la station actuelle sera affiché, p. ex « 89.80 MHz » Mode Audio En mode FM, l’écran affichera si le signal est reçu en mode mono ou stéréo. Le récepteur passera automatiquement en mode Stéréo ou Mono. Cependant vous pouvez le changer manuellement. Cela pourrait être utile avec une réception faible.
En mode DAB ou FM, appuyez sur le bouton INFO. L’écran affichera SYSTEM RESET. Appuyez de nouveau sur le bouton INFO pour l’affichage du version du logiciel de cet appareil. Réinitialisation du Système Quelque fois il pourrait être nécessaire de réinitialiser l’appareil au réglage par défaut. Si vous avez des problèmes de réception vous pouvez réinitialiser l’appareil et essayez de nouveau.
Problème Pas de son Son statique Son est déformé Station désirée n’est pas trouvée Ecran affiche « not available » L’écran n’affiche rien Cause/Solution Réglez le volume, c’est possible que le volume n’est pas assez fort. Le signal est trop faibles. Ajustez l’antenne ou déplacez l’appareil pour une réception meilleure. Le volume est trop élevé, diminuez le volume. Signal trop faible. Cherchez la station manuellement. Il n’y a pas un couverture du service DAB ou un signal faible.