
Instructions / Assembly


SALSBURY INDUSTRIES
1010 East 62
nd
Street, Los Angeles, CA 90001-1598
Phone: 1-800-624-5269 Int’l Phone: 323-846-6700
Fax: 1-800-624-5299 Int’l Fax: 323-846-6800
www.lockers.com www.mailboxes.com engineering@mailboxes.com engineering@lockers.com
Installation instructions are provided as general guidelines. It is advised that a professional installer be consulted. Salsbury Industries assumes no product assembly or installation liability.
Copyright © 2014 Salsbury Industries. All rights reserved. (Rev. 12, 1/21/2014) Page 5 of 10
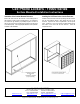
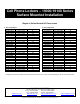
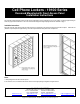
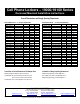
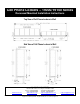
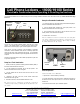
Cell Phone Lockers - 19000 Series
Recessed Mounted Installation Instructions
The recessed mounted cell phone locker must be securely supported by a frame constructed of 2”x4” or 2”x6” lumber. Construct support framing as
shown on page 8 of these instructions. Cut a hole in the wall according to the Rough Opening Dimensions calculated on page 7.
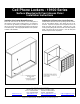
Installation Instructions
Place the unit in the rough opening. Open all left hand compartment
doors. Locate a screw in each compartment fastened into the left
vertical door frame member (some compartments may not have a
screw). Remove screws.
Open the front panel and drill mounting holes through the sides of the
peripheral flange of the locker unit. Fasten the unit (hardware not
provided) to the support framing. Close the front panel and re-install
the removed screws.
Notes
1. Wall opening and lumber frame must be square.
2. Do not deform, force, or twist the locker frame to fit an incorrect
rough opening or fit against an irregular surface.