
Instructions / Assembly


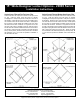


Table Of Contents

15" Wide Designer Locker Options - 20000 Series
Installation Instructions
SALSBURY INDUSTRIES
18300 Central Avenue, Carson, CA 90746-4008
Phone: 1-800-562-5377 Int’l Phone: 323-846-6700
Fax: 1-800-562-5399 Int’l Fax: 323-846-6800
www.lockers.com engineering
@lockers.com
Installation instructions are provided as general guidelines. It is advised that a professional installer be consulted. Salsbury Industries assumes no product assembly or installation liability.
Copyright © 2020 Salsbury Industries. All rights reserved. (Revision 06, 08/17/2016) Page 5 of 7
Vertical Corner Filler and Flat Top Corner Filler
Vertical corner fillers are comprised of a 3” and a 2” wide piece, each
72” long. Install the vertical corner filler pieces by vertically
overlapping the 3” wide piece beyond the 2” wide piece as shown in
the illustration. Fasten the pieces to the lockers by installing screws
from inside the lockers into the vertical corner fillers. Install optional
48” long cleats for greater stability by installing screws from inside
the lockers into the cleats. Install two 12” long cleats 1/4” from the
top edge of the lockers by installing screws from inside the lockers
into the cleats then install two additional cleats at the same elevation
onto the wall. Fasten the flat top corner filler to the cleats with liquid
nails (or similar product). Notch the flat top corner filler to fit behind
the vertical filler. #8 x 1-1/4” screws are provided for installation of
the vertical filler and cleats.
Vertical Corner Filler and Sloping Hood Corner Filler
Vertical corner fillers are comprised of a 3” and a 2” wide piece, each
72” long. Install the vertical corner filler pieces by vertically
overlapping the 3” wide piece beyond the 2” wide piece as shown in
the illustration. Fasten the pieces to the lockers by installing screws
from inside the lockers into the vertical corner fillers. Install optional
48” long cleats for greater stability by installing screws from inside
the lockers into the cleats. Install two 12” long cleats 3/4” from the
top edge of the sloping hoods by installing screws into the cleats and
through the sloping hoods then install two additional cleats onto the
wall to support the sloping hood corner filler. Fasten the sloping
hood corner filler to the cleats with liquid nails (or similar product). #8
x 1-1/4” screws are provided for installation of the vertical filler and
cleats.