
Installation Sheet


SALSBURY INDUSTRIES
1010 East 62
nd
Street, Los Angeles, CA 90001-1598
Ph: 1-800-624-5269 Int’l Ph: 323-846-6700
Fx: 1-800-624-5299 Int’l Fx: 323-846-6800
www.mailboxes.com engineering@mailboxes.com
Installation instructions are provided as general guidelines. It is advised that a professional installer be consulted. Salsbury Industries assumes no product assembly or installation
liability. Copyright © 2017 Salsbury Industries. All rights reserved. (02/10/17) Page 1 of 3
3800 Series Surface Mount Enclosures
For 3700 Series 4C Front Loading Recessed Mounted Horizontal Mailboxes
Installation Instructions
With its high quality design and construction, Salsbury’s 3800 series 4C horizontal mailbox surface mount enclosure will provide years of
maintenance free service. Please read this entire document before beginning installation.
WARNING: Installation of the 4C enclosure and mailbox unit must be to a surface of sufficient load bearing strength. Attachment of
the enclosure to the surface must be with fasteners that can adequately support the weight of the enclosure and mailbox unit.
Installing to a deficient load bearing mounting surface and/or use of inadequate fasteners could cause the 4C enclosure and
mailbox unit to fall from the surface possibly resulting in serious injury. See below for further information.
Installation Planning
1. Determine the horizontal location of each of the 3700 series
mailbox units with its 3800 series wall mount enclosure.
2. Consider the combined weights in the table below when
designing the wall or selecting the appropriate fasteners and
anchors to be used.
3. If attaching to studs in a custom built wall, determine the
optimum location of the wall studs to which to fasten the
enclosures. Frame the wall with wood studs. Build a robust
wall.
4. If attaching to studs in an existing wall, determine the stud
locations, and position enclosures to maximize the number of
studs to which the enclosures will be attached.
5. If not attaching to studs, choose an appropriate high strength
anchor, especially if attaching directly to drywall. When
attaching to drywall, place the anchor and fastener as close as
possible to the studs to which the drywall is attached.
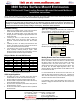
Weight of Mailbox Unit and Wall Enclosure
Enclosure Model
Total Weight - Lbs.
Enclosure Model
Total Weight - Lbs.
3816D
305
3816S
210
3815D
285
3815S
195
3813D
260
3813S
175
3811D
240
3811S
150
3809D
200
3809S
135
3807D
160
3807S
110
3805D
125
3805S
80
3803D
100
3803S
65
The weights above include the mailbox unit, the wall mount enclosure, and from 15 to 75
lbs of mail depending on the size of the mailbox unit.
USPS Height Regulations
1. The USPS arrow lock in the Carrier Access Door shall be
located between 36” and 48” above the finished floor (AFF).
2. No tenant mailbox lock shall be located more than 67” AFF.
3. No tenant mailbox compartment (interior bottom shelf surface)
shall be positioned less than 28” AFF.
4. No parcel locker compartment (interior bottom shelf) shall be
positioned less than 15” AFF.
5. At least one tenant mailbox compartment shall be positioned
less than 48” AFF.
Types of Fasteners Used
Type A, Fig. 1 - If fastening into wood studs, use a #12x2” wood
screw (not supplied). If fastening into metal studs or directly into dry
wall, choose and use an appropriate wall anchor with screw.
Type B, Fig. 2 – To fasten the mailbox unit into the enclosure, use
the #8x3/4” pan head self-tapping screws (supplied).
Marking Distance from Floor and Stud Location
Mark the wall with a horizontal line representing the distance from
the floor to the bottom surface of the enclosure. The distance from
the bottom surface of the enclosure to the surface of the lowest
compartment shelf or the parcel locker shelf is 2-7/16”. The
distance from the bottom surface of the enclosure to the floor may
be derived from the USPS Height Regulations above. Pay
particular attention to the height limitations for the USPS Arrow Lock
in the Carrier Access Door.
It is recommended that the enclosure be tied to studs due to its
significant total weight including the mailbox unit. If attaching to
studs, mark the wall with two (2) vertical lines representing two (2)
wall studs to which the enclosure will be fastened.
If not attaching to studs, install appropriately strong anchors and
fasteners to engage the outermost slots in the rows of slots in the
rear panel.
Fig. 1
Type A
1
Fig. 2
Type B
1