
Installation Guide

Standard Lockers – 61000 Series
Installation Instructions - Options
Thank you for selecting Salsbury’s standard single tier lockers. We are confident that the quality and construction of the lockers will prove to be a
good investment. These instructions are intended to assist you in assembling option items into the locker. The name plates, front bases, end bases,
and sloping hoods are each separate option items and may or may not be included in your order.
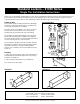
Name Plates
The name plates are installed with #4 slotless screws and nuts.
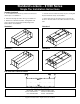
Sloping Hoods
The sloping hoods are assembled and installed on the locker units
with #10 x 3/8” slotless screws and nuts. The side plates should be
installed inside the flanges of the sloping hood. Only 1 side panel
should be assembled between adjacent sloping hoods.
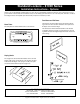
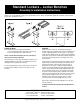
Front Bases and End Bases
The front bases are simply snapped into position between the two
legs in the front of the locker unit. No fasteners are required due to
the dimples on the front base flanges.
The end bases are installed and fastened with 2 screws and nuts
such that the end base front edge is inserted inside the locker front
leg with the end base rear flanges wrapped around the outside of the
locker rear leg.
SALSBURY INDUSTRIES
1010 East 62
nd
Street, Los Angeles, CA 90001-1598
Phone: 1-800-562-5377 Int’l Phone: 323-846-6700
Fax: 1-800-562-5399 Int’l Fax: 323-846-6800
Installation instructions are provided as general guidelines. It is advised that a professional installer be consulted. Salsbury Industries assumes no product assembly or installation liability.
Copyright © 2010 Salsbury Industries. All rights reserved. (Rev. 06, 8/4/2010)