
Installation Guide


SALSBURY INDUSTRIES
1010 East 62
nd
Street, Los Angeles, CA 90001-1598
Phone: 1-800-562-5377 Int’l Phone: 323-846-6700
Fax: 1-800-562-5399 Int’l Fax: 323-846-6800
Installation instructions are provided as general guidelines. It is advised that a professional installer be consulted. Salsbury Industries assumes no product assembly or installation liability.
Copyright © 2011 Salsbury Industries. All rights reserved. (Rev. 01, 1/5/2010) Page 1 of 4
Heavy Duty Storage Cabinets – 8000 Series
Assembly Instructions
Thank you for selecting Salsbury’s heavy duty storage cabinets. We are confident that the quality and construction of the cabinets will prove to be a
good investment. Individual job conditions will dictate whether the storage cabinets must be anchored to the wall, the floor, or both and the type of
fasteners to use.
General Notes
1. This document provides instructions and illustrations for the heavy duty standard storage cabinets. For the wardrobe, combination and counter
height storage cabinets, use these instructions as a guide.
2. All the screwed connections should initially be only finger tight. Square the cabinet assembly before tightening all the screwed connections.
Typical Assembly – Heavy Duty Standard Storage Cabinet
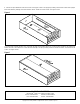
1. Lay the back panel down on a flat surface with the flanges up. The end with holes is the top end. The end with no holes is the bottom end. See
Figure 1.
Figure 1
2. Place the right upright along the right side of the back panel then slide the back panel into the flange of the right upright. See Figure 1. The
lanced shelf supports should be towards the front. Align holes then install screws from the rear of the back panel. Thread nuts onto the screws.
3. Repeat with the left upright.
4. Insert the top underneath the top flanges of the back panel, right upright, and left upright making sure the number of holes on the rear or the top
match the number of holes on the top of the back panel. Attach the top to the back panel, right upright and left upright by aligning holes then install
screws from the outside of the cabinet. Thread nuts onto the screws. See Figure 2.