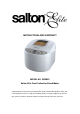
INSTRUCTIONS AND WARRANTY MODEL NO. SFBM01 Salton Elite Food Collection Bread Maker Congratulations on purchasing our Salton Elite Food Collection Bread Maker. Each unit is manufactured to ensure safety and reliability. Before using this appliance for the first time, please read the instruction manual carefully and keep it for future reference.
FEATURES OF THE SALTON ELITE BREADMAKER IMPORTANT SAFEGUARDS When using any electrical appliance, basic safety precautions should always be followed including the following: 1. Please read the instructions carefully before using the breadmaker. 2. Always ensure that the voltage on the rating label corresponds to the mains voltage in your home. 3. Incorrect operation and improper use can damage the breadmaker and cause injury to the user. 4. The breadmaker is intended for household use only.
13. The use of accessory attachments that are not recommended or supplied by the manufacturer may result in injuries, fire or electric shock. 14. A short cord is provided to reduce the hazards resulting from becoming entangled in or tripping over a longer cord. 15. Do not let the cord hang over the edge of a table or counter. Ensure that the cord is not in a position where it can be pulled on inadvertently. 16.
30. The manufacturer does not accept responsibility for any damage or injury caused by improper or incorrect use, or for repairs carried out by unauthorised personnel. 31. In case of technical problems, switch off the machine and do not attempt to repair it yourself. Return the breadmaker to an authorised service facility for examination, adjustment or repair. Always insist on the use of original spare parts.
6. Use the size button to choose the size – small i (500g), medium j (750g), large k (1kg). 7. Use the + and - buttons to set the timer (optional). 8. Press the start/stop button to start the program. 9. The display counts down, then, when it’s finished, it’ll beep. After the beep, the breadmaker will keep the bread warm for an hour, on the basic, French, wholewheat, sweet, sandwich, gluten free, fastbake 1, and fastbake 2 programs. Preparation 10.
the “g” with “ml” (millilitres), but the results may not be consistent. f) If you’re using a recipe from elsewhere, replacing millilitres (ml) of water with grams (g) will help with the accuracy and consistency. Adding the ingredients in order. 20. It’s important that you add the ingredients in the correct order: a) If the yeast gets wet, it may activate too early b) If it comes in contact with salt, it may not work properly c) We’ve numbered them, to make it easier to follow the recipes 21.
29. The breadmaker will give a long beep to indicate they are needed. The beep comes about 22 minutes after the start of programs 1 (basic) and 5 (sweet), but 47 minutes after the start of program 3 (wholewheat), to allow for 30 minutes preheating. Loading the breadmaker 30. Clean any spillage off the outside of the loaf tin. a) Spillage inside the machine will burn on to the surfaces. b) Spillage on the element will reduce its life. 31. Lower the loaf tin into the breadmaker. 32.
= P), dark (display = H). 39. The crust colour button only works with the basic, French, wholewheat, and sweet programs, sizes: I j k. 40. Use the size button to move the arrow on the top of the display to the size you want – the options are: small I (500g), medium j (750g), large k (1kg). 41. These sizes are approximate – think of them as small, medium, and large. 42. The size button only works with the basic, French, wholewheat, sweet, and sandwich programs. Program Buttons No.
46. Don’t use the timer with a recipe containing fresh milk, yoghurt, cheese, eggs, fruit, onions, or anything else that might go off if left for a few hours in a warm moist environment. 47.
51. Don’t worry, nothing’s wrong – this program needs the time to preheat the ingredients to about 25°C. Nuts and raisins 52. If the recipe uses nuts, raisins, or the like, they should be added during the kneading process a) This affects only programs 1 (basic), 3 (wholewheat), and 5 (sweet) b) You’ll know when it’s kneading – you’ll hear the paddles whirring c) The new ingredients should be as dry as possible d) If you’re using fresh fruit or vegetables, dry them with kitchen towel.
Finishing 61. When it’s done, the breadmaker beeps to let you know your bread is ready. 62. Press the START/STOP button, and hold it down for 2 seconds, to stop the breadmaker. 63. Remove the bread (point 70, below). Keeping warm 64. If you don’t press the START/STOP button, the element will cycle on and off, to keep the bread warm for an hour. 65. After the hour is up, it’ll beep 10 times, then power down. 66. Don’t leave the bread in the loaf tin after the keep warm hour is up. Removing the bread 67.
non-stick surface. 79. Check that the paddle is still in the loaf tin. 80. If the paddle has come off with the bread: a) use something blunt, to avoid scratching the non-stick surfaces of the paddle b) use something slim, to avoid digging a hole in the bread c) a wooden kebab, ice lolly, or cocktail stick will do nicely d) turn the bread upside down (with the oven gloves) e) gently ease the paddle out with the stick 81.
Wholewheat The heavier flour needs preheating for about 30 minutes before kneading. Wholewheat/ wholemeal loaves tend to be smaller and denser. They don’t work very well with the timer. Cake This program is for cake and batter recipes, rather than dough, generally using baking powder or baking soda as the raising agent, rather than yeast. Sweet This program is used for sweeter bread recipes, often containing fruit.
Fastbake I and II There are variations on the basic program, with reduced kneading, rising, and baking times, as they cut the program times to 55 and 80 minutes respectively, because of this, your bread will be smaller, denser, and coarser than normal, and any additional ingredients (raisins, nuts, etc.) may be mashed, or unevenly distributed. Speciality This program is specially designed for the malt loaf recipe. Ingredients flour The type of flour used is important. Use bread flour.
4. Don’t use fresh or tinned yeast – they won’t work properly with your breadmaker. 5. Check the “best before” date on the sachet of yeast – if it’s approaching its “best before” date, don’t take any chances – throw it out and buy some more. 6. You may also see “fast action’ or “bread machine” yeast – really potent yeasts that can make dough rise up to 50% faster. If you want to use these, you’ll need to do a bit of experimenting to get the best results.
3. Don’t use artificial sweeteners. None of these will feed the yeast, some of them will kill it. Salt Salt helps to control the growth of the yeast. Without salt, the bread could rise too much, and then collapse. It also adds to the flavour. Keep it away from the yeast until the last minute, or it might inhibit it. Eggs Eggs will make your bread richer and more nutritious, add colour, and help with the structure and texture.
2. Your bread won’t have any of these, so it won’t keep like commercial bread, and it won’t look like commercial bread. On the plus side, it won’t taste like commercial bread either – it’ll taste like bread should. 3. It’s best eaten fresh, but you can store it for a couple of days at room temperature, in a polythene bag with the air squeezed out. 4. To freeze bread, let it cool, put it in a polythene bag, suck all the air from the bag, then seal it. 5. Don’t put bread in the fridge.
Recipes 1. Many external factors affect the taste and texture of your bread (e.g. yeast type, flour type, sugar type, kitchen temperature, even air pressure and height above sea level). 2. The recipes supplied have been designed specially for this breadmaker. 3. If you want to experiment, use the recipes as a guide, but vary the ingredients, vary the quantities, taste the results. Keep notes, write down what changes you make, and you’ll build up a range of recipes which suit your taste.
Put the ingredients into the loaf tin in the correct order – we’ve numbered them, to make it easier to follow the recipes. Troubleshooting – what to do if: the bread collapses 1. The dough may have been too moist. Reduce the recipe liquid by 2 tbsp. If tinned fruit was used, it may not have been properly drained. 2. Leaving the bread in the loaf tin while it cools can cause moisture released in the baking process to soak back into the bread. 3. The flour may have been too coarsely ground.
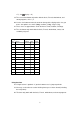
RECIPES Loaf size (500g) (750g) (1kg) 1 water 190g 260g 360g 2 olive oil 1 tbsp 1 tbsp + 1 tsp 2 tbsp 3 salt 1 tsp 1½ tsp 2 tsp 4 sugar 1 tbsp 1 tbsp + 1 tsp 2 tbsp 5 dried milk powder 1 tbsp 1½ tbsp 2 tbsp 6 white bread flour 350g 500g 650g 7 yeast 1½ tsp 1¼ tsp 2 tsp White bread Setting: Basic French Setting: French 1 water 200g 300g 400g 2 salt 1 tsp 1½ tsp 2 tsp 3 white bread flour 360g 545g 725g 4 yeast 1 tsp 1½ tsp 1 water 200g 300g 400g 2 olive oil
Mixed fruit cake (750g) Setting: Cake 1 lemon juice 1 tsp 2 egg-small 2 3 vanilla extract ¼ tsp 4 butter, melted - (must be melted) 50g 5 mixed fruit (soaked) 175g 6 white bread flour 250g 7 sugar 150g 8 cinnamon ¼ tsp 9 nutmeg ¼ tsp 10 baking powder 2 tsp 11 brandy (optional) a dash If, during the first 30 minutes of the program, ingredients stick to the walls of the loaf tin, give the dough a little careful “help” with a soft spatula to incorporate them in the loaf.
Dough (pizza) (750g) Setting: Dough 1 Water 250g 2 Olive oil 1 tbsp 3 Salt 1 tsp 4 Sugar 2 tbsp 5 Strong white flour 400g 6 Yeast 1tsp 7 Mixed herbs 1 tsp Remove from the loaf tin, work into a ball on a floured surface, then leave to rest under a clean cloth for about 15 minutes. If the dough is sticky, add a little extra flour and it’ll form a nice ball as you work it in.
Loaf size (500g) (750g) (1kg) Sandwich Setting: Sandwich 1. Milk 250g 300g 400g 2. Olive oil 1 tbsp 1½ tbsp 2 tbsp 3. Salt 1 tsp 1½ tsp 2 tsp 4. Sugar 1½ tbsp 2 tbsp 3 tbsp 5. Strong white flour 370g 450g 600g 6. Yeast 1½ tsp 2 tsp 1 sachet Gluten free Setting: Gluten Free 1. Water 350g 2. Olive oil 1½ tbsp 3. Salt ½ tsp 4 4. Sugar 1 tbsp 5. Gluten free mix 400g 6.
Loaf size (500g) (750g) 1kg) Fastbake 2 Setting: Fastbake 2 1 water 400g 2 olive oil 2 tbsp 3 salt 2 tsp 4 sugar 2 tbsp 5 strong white flour 630g 6 dried milk powder 2 tbsp 7 yeast 1sachet Malt loaf Setting: Speciality 1 water 270g 2 olive oil 1 tbsp 3 salt 1 tsp 4 dried milk powder 1 tbsp 5 white bread flour 450g 6 yeast 1½ tsp 7 sultanas 200g 8 honey 1 tbsp 9 malt extract 2 tbsp 10 black treacle 1½ tbsp Traditional South African Vetkoek Setting: Dough Ingredients 1kg
Method 1. Weigh the flower and set aside. 2. Measure the liquid into a measuring jug. Have all other ingredients at hand. 3. Starting always with the liquid, add ingredients in the tin in the order set out in the recipe. As a general rule, always add the water and any other moist ingredients first, followed by items such as oil, sugar, salt etc. Next add in the flower, which will create a barrier between the wet ingredients and the yeast. Lastly add the yeast on top, as well as the baking powder.
Chakalaka Bread Setting: Basic or White Ingredients 950g Water 285ml Chakalaka 100ml Canola oil / butter 1 tbsp Cremora powder 2 tbsp Sugar 2 tsp Salt 2 tsp Cake flour 500g Dried active yeast 4 tsp Method 1. Weigh the flour out and set aside. 2. Next measure (or weigh for great accuracy) the water in a measuring jug. Mix the chakalaka into the water. Have all other ingredients at hand. 3. Starting always with the liquid, add the ingredients into the tin in the order set out in the recipe.
Handy Hint: Create your own chakalaka butter by blending 50g butter and 25g chakalaka for an extra boost of flavour. Spread on as you would with normal butter. You can also determine the bite of your bread by using mild, medium, hot or extra hot chakalaka.
8. When the cycle has finished, the machine will beep and the bread will be kept warm for 1 hour. For best results, remove from tin immediately and allow to cool on a wire rack for 20 - 30 minutes before slicing. Handy Hint: Create your own feta butter by blending 50g butter and 25g crumbed feta for an extra boost of cheese flavour. Spread on as you would with normal butter. Crumbed feta can also be strewn on top of the bread just as it finished baking.
Lastly add the sachet yeast on top. There is no need to re-activate dried sachet yeast in water first, as it is ready to use. 4. Set to the program directed in the recipe, e.g. ‘Basic’ or ’French’. 5. Set size of loaf to 1kg. 6. Set desired crust colour, light, medium or dark 7. Press start. 8. When the cycle has finished, the machine will beep and the bread will be kept warm for 1 hour. For best results, remove from tin immediately and allow to cool on a wire rack for 20 - 30 minutes before slicing.
3. Starting always with the liquid, add the ingredients into the tin in the order set out in the recipe. As a general rule always add water and any moist ingredients first, followed by items such as oil, sugar, salt etc. Next add in flour which will create a barrier between the wet ingredients and the yeast (particularly important if using the timer delay setting). Lastly add the sachet yeast on top. There is no need to re-activate dried sachet yeast in water first, as it is ready to use. 4.
• You may wash the loaf tin and paddles in a dishwasher. Please note that the inside of the dishwasher may affect the surface finishes. If you do, then you must put the paddle, on its own, in a compartment of the cutlery basket. • Wipe all other surfaces, internal and external, with a damp cloth. Use a little washing-up liquid if necessary, but be sure to clean it all off, otherwise it might taint the next lot of bread.
• Proof of purchase is attached. • A reason is provided for why it is being returned. If the supply cord is damaged, it must be replaced by the manufacturer or an authorised service agent, in order to avoid any hazard. If service becomes necessary within the warranty period, the appliance should be returned to an approved Tedelex Trading (Pty) Ltd service centre. Servicing outside the warranty period is still available, but will, however, be chargeable.
PLEASE AFFIX YOUR PROOF OF PURCHASE/RECEIPT HERE IN THE EVENT OF A CLAIM UNDER WARRANTY THIS RECEIPT MUST BE PRODUCED. WARRANTY 1. Tedelex Trading (Pty) Limited (“Tedelex”) warrants to the original purchaser of this product (“the customer”) that this product will be free of defects in quality and workmanship which under normal personal, family or household use and purpose may manifest within a period of 1 (one) year from the date of purchase (“warranty period”). 2.