
Operating instructions


3
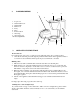
2. PARTS DESCRIPTION
1. Top Cover
2. Water Tank Cover
3. Water Tank
4. Funnel-out
5. Body
6. Base
7. Power Switch
8. Glass Jug
9. Glass Jug Cover
10. Glass Jug Handle.
3. OPERATING INSTRUCTIONS
Before first use
For a perfect taste, carry out 2 or 3 boil-processes with fresh water only i.e. without coffee:
1. Once all the water has passed through the permanent filter switch off the appliance and let it
cool down for about 5 minutes. Then repeat the process with fresh, cold water.
Making coffee
1. Take the water tank out and fill with cold fresh water then set it back in place.
2. Make sure the nose of the water tank base inserts securely into the groove on the unit, and
allow it to slide in completely to ensure that it does not come loose when water is poured in.
The number of cups can be read on the water level indicator.
3. Fill in the desired quantity of ground coffee either directly into the permanent filter or into
filter paper, size “1x4” that has been fitted into the filter holder. In the latter instance, remove
the permanent filter and replace with the filter paper. Do not use both the permanent filter and
filter paper together.
4. Switch on the appliance. Wait until the brewing process is finished and the filter has run
empty.
For large cups: takes 5-6g of ground coffee each cup.
Making more coffee straight away?
If you have made one jug of coffee and wish to make some more straight away, please switch
off the coffee maker and allow at least 5 minutes for it to cool down. Then you can refill the
water tank.
9
9
1
2
5
7
8
10
4
3
6