
Use and Care Manual


5
INSTRUCTION FOR USE
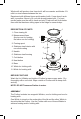
1. Choose the appropriate Whisk and insert into Frother
2. Pour cold milk into the Frother making sure not to exceed the
maximum measurement lines marked on the inside of the jug.
REMINDER: The lower MIN/MAX marking is for frothing milk, the
top marking closest to the rim of the Frother is the MAX marking for
heating milk.
DO NOT ll past the MAX level indicators located inside the jug.
Overlling may cause milk to overow.
3. Place the lid securely on top of the Frother.
4. Plug power cord into 120V AC wall outlet. NEVER plug the Frother
into the wall outlet when empty.
5. a) Frothing only (without heat)
Press the Cold button; the blue indicator light will illuminate and
frothing will begin. Once milk is frothed the blue indicator light will go
off.
b) Frothing and Heating / Heating only
Press the Heat button; the red indicator light will illuminate and frothing
and/or heating will begin. Once milk is frothed and/or heated the red
indicator light will go off.
6. After frothing or heating, allow the unit to cool for a few minutes before
reusing.
Whisk - For frothing
Whisk - For heating
8
5
Whisk Function Capacity
- Frothing
MIN: 75 ml
(2.5 oz)
MAX: 120 ml
(4 oz)
- Heating (small
amount of froth)
MAX: 230 ml
(7.7 oz)
Whisk – For frothing
Whisk – For heating
Whisk - For frothing
Whisk - For heating
8
5
Whisk - For frothing
Whisk - For heating
8
5