
User Manual


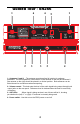
Table Of Contents
- p8
- User Manual
- Stage5_55_um
- Stage266 user manual
- Kilo_OM_5L_v2 - 副本
- Stage266 user manual
- Kilo_OM_5L_v2 - 副本
- Stage266 user manual
- pdftemp
- ENGLISH
- FRANÇAIS
- Introduction
- Tour d'horizon - Façade avant du SR55
- Tour d'horizon - Façade arrière du SR55
- Tour d'horizon - Façade avant du SR5
- Tour d'horizon - Façade arrière du SR5
- Tour d'horizon - SR5 / ST5
- Tour d'horizon - HT5
- Réglage et utilisation du système
- Stage 55 Series / Stage 5 Series
- Caractéristiques techniques
- DEUTSCHE
- ESPAÑOL
- Introducción
- Recorrido Guiado - Panel frontal del SR55
- Recorrido Guiado - Panel trasero del SR55
- Recorrido Guiado - Panel frontal del SR5
- Recorrido Guiado - Panel trasero del SR5a
- Recorrido Guiado - SR5 / ST5
- Recorrido Guiado - HT5
- Ajuste y utilización de su sistema
- Stage 55 Series / Stage 5 Series
- Especificaciones técnicas
- ITALIANO
- Introduzione
- Visita Guidata - il Pannello
- Frontale dell'SR55
- Visita Guidata - il Pannello Posteriore dell'SR55
- Visita Guidata - il Pannello
- Frontale dell'SR5
- Visita Guidata - il Pannello Posteriore dell'SR5
- Visita Guidata - l'ST5
- Visita Guidata - l'HT5
- Il Collegamento e l'Uso del
- Sistema Serie Stage 55 /Stage 5
- Specifiche
- Appendix A: Carrying Case
- Stage266 user manual
- pdftemp

Guided Tour - HT6
1: Audio on-off switch - When set to the “up”
position, audio signal is transmitted. When set to
the “down”
position, the audio signal is muted.
Because the carrier signal remains during muting,
no “pop” or “thud” will be heard. Note that turning
this off does not turn off the transmitter power—it is
simply a way to temporarily mute the transmission
of audio signal. If you don’t plan on using the HT6
for extended periods, turn off its power by using
the power on-off switch (see photo above).
2: Battery level meter
color LEDs indicates relative battery power, indi-
cating whether the installed battery is at low (red),
high (green) strength.
When only the red “low” indicator lights RF perform-
ance is degraded and the battery needs to be replac-
ed.
3: Power on-off switch* - Use this to turn the
HT6 on or off (to conserve battery power, be sure
to leave it off when not in use).
4: Battery holder - Insert a standard 9-volt alkaline battery here, being sure to observe
the plus and minus polarity markings shown. We recommend the Duracell MN 1604 type
battery. Although rechargeable Ni-Cad batteries can be used, they do not supply ade-
quate current for more than four hours. WARNING: Do not insert the battery backwards;
doing so can cause severe damage to the HT6 and will void your warranty.
* Be sure to mute the audio signal at your external mixer or amplifier before turning trans-
mitter power on or off, or an audible pop may result.
1
3
2
4
10