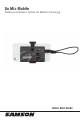
Go Mic Mobile Professional Wireless System for Mobile Filmmaking Quick Start Guide
Go Mic Mobile Important Safety Information ATTENTION RISQUE D’ÉLECTROCUTION ! NE PAS OUVRIR ! This lightning flash with arrowhead symbol within an equilateral triangle is intended to alert the user to the presence of non-insulated “dangerous voltage” within the product’s enclosure that may be of sufficient magnitude to constitute a risk of electric shock.
Owner’s Manual Important Safety Information 1. Read these instructions. 2. Keep these instructions. 3. Heed all warnings. 4. Follow all instructions. 5. Do not use this apparatus near water. 6. Clean only with dry cloth. 7. Do not block any ventilation openings. Install in accordance with the manufacturer’s instructions. 8. Do not install near any heat sources such as radiators, heat registers, stoves, or other apparatus (including amplifiers) that produce heat. 9.
Go Mic Mobile Important Safety Information FCC Notice 1. This device complies with Part 15 of the FCC Rules. Operation is subject to the following two conditions: (1) This device may not cause harmful interference. (2) T his device must accept any interference received, including interference that may cause undesired operation. 2. C hanges or modifications not expressly approved by the party responsible for compliance could void the user’s authority to operate the equipment.
Owner’s Manual Introduction Congratulations on purchasing the Samson Go Mic Mobile Wireless System. The Go Mic Mobile is a dual wireless system designed to deliver professional quality audio for mobile video. Pair and mix two transmitters to the GMM and turn your mobile device into a complete video production studio. It is the ideal solution for mobile journalists, filmmakers, videographers or anyone looking to add wireless audio to their video projects.
Go Mic Mobile Charging the Go Mic Mobile Receiver Battery The Go Mic Mobile Receiver has an internal lithium-ion rechargeable battery. The receiver is charged via the Mini USB jack located on the side of the receiver. To charge the receiver, use the included USB charging cable and AC adapter. Charging may also be done with 3rd party AC 5V adapters, or by connecting the units to a standard computer USB port.
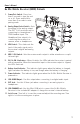
Owner’s Manual Go Mic Mobile Receiver (GMM) Callouts 1. 2. 3. Power/Pair Switch - Press less than 5 seconds to turn the unit on or off. Press and hold for more than 5 seconds to enter pairing mode. nalog Output Select Switch - Sets A the wiring of the analog output. The OUT 1 & 2 positions are for connecting to a smartphone’s TRRS headset input. The Headphone/Line output is for connecting the receiver to a camera, mixer or headphones.
Go Mic Mobile Go Mic Mobile Receiver (GMM) Callouts 12. Adjustable Mounting Arm - This mounting arm is adjustable to affix the GMM Receiver to a smartphone. To adjust, loosen the Lock Screw on the top of the GMM Receiver. To fix the arm in place, tighten the Lock Screw. The Adjustable Mounting Arm can be removed by loosening the Lock Screw completely and sliding the Mounting Arm out of the GMM Receiver. 12 13 13.
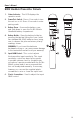
Owner’s Manual HXD2 Handheld Transmitter Callouts 1. Status Indicator - This LED displays the operation mode. 2. Power/Pair Switch - Press <5 seconds to turn the unit on or off. Press >5 seconds to enter pairing mode. 3. Battery Cover - Unscrew the battery cover and slide down to open the Go Mic Mobile Handheld battery compartment. 4. Battery Holder - Open the battery holder by pressing the tab and lifting the cover.
Go Mic Mobile PXD2 Belt Pack Transmitter Callouts 1. Input Connector - Connect the input device via the mini-XLR connector. The PXD2 is supplied with a lavalier microphone. 2. Status Indicator - This LED displays the operation mode 3. Power/Pair Switch - Press <5 seconds to turn the unit on or off. Press >5 seconds to enter pairing mode. 4. Input GAIN Control - This control adjusts the transmitter input sensitivity. 5.
Owner’s Manual Getting Started - Pairing The Go Mic Mobile system will come paired from the factory. If you need to re-pair the system for any reason follow these steps: 1. Turn on the Go Mic Mobile Receiver (GMM) and Go Mic Mobile transmitter by pressing their Power/Pair buttons for less than 5 seconds. 2. On the GMM, press and hold the Power/Pair button for more than 5 seconds. The CH1 LED will start flashing slowly. 3.
Go Mic Mobile Getting Started - Audio Connections The Go Mic Mobile can be connected to a smartphone using the Micro USB digital output or 3.5mm analog output. Connecting to an iOS device (iPhone, iPad or iPod Touch) Using the included Micro USB to Lightning cable, connect the cable to the USB Audio Output jack on the GMM to the Lightning connector on the iOS device. Once connected, the iOS device will recognize the Go Mic Mobile as the audio input device.
Owner’s Manual Getting Started - Setting the system volume Good audio can vastly improve a poorly shot video, but bad audio can hurt any video. In order to achieve the best results when adding audio to video with the Go Mic Mobile, it is important to pay attention to the gain staging of the transmitters and receiver. If the signal is too high, it can overload or distort. Conversely if the signal is too low, you will need to raise it up in post-production which can add background noise.
Go Mic Mobile Getting Started - Mounting to a smartphone 1. Loosen the Lock Screw until the mounting arm can be adjusted. 2. Position the receiver on the rear side of the smartphone. 3. Slide the mounting arm so that it is tight with the edge of the smartphone. 4. Tighten the Lock Screw. Affixing to a cold shoe adapter 1. Remove the Fixed Mounting Arm by removing the two screws. Note: Save screws for reattaching the mounting arm. 2.
Owner’s Manual Specifications Go Mic Mobile Wireless System Simultaneous Systems 3 Working Range 100’ (30m) line of sight Working Frequency 2.406 ~ 2.478 GHz Frequency Response 10 Hz – 22 KHz Operating Temperature -10°C ~ +50°C Firmware Version V1.0 Hardware Version V1.0 Signal To Noise 90 dB (A) mic at minimum gain 78 dB (A) mic at maximum gain Accessories Micro USB to Lightning cable, Micro USB to Micro USB cable, Micro USB to USB-C cable, Mini-B USB to USB-A cable, 3.
Declaration: “Made for iPod,” “Made for iPhone,” and “Made for iPad” mean that an electronic accessory has been designed to connect specifically to iPod, iPhone, or iPad, respectively, and has been certified by the developer to meet Apple performance standards. Apple is not responsible for the operation of this device or its compliance with safety and regulatory standards. Please note that the use of this accessory with iPod, iPhone, or iPad may affect wireless performance.