ER-260/265 Electronic Cash Register AU Operation and Programming Manual All specifications are subject to change without notice. JK68-60980A Rev. 3.07 (Jun11) From ER260/265 v01.000 Up to ER260/265 v05.
ATTENTION The product that you have purchased contains a rechargeable Ni-MH battery. This battery is recyclable. At the end of its useful life, under various state and local laws, it may be illegal to dispose of the battery into the municipal waste system. Check with your local solid waste officials for details concerning recycling options or proper disposal. WARNING This is a Class A product.
Precaution Statements Follow these safety, servicing and ESD precautions to prevent damage and to protect against potential hazards such as electrical shock. 1-1 Safety Precautions 1. Be sure that all built-in protective devices are replaced. Restore any missing protective shields. 2. When reinstalling the chassis and its assemblies, be sure to restore all protective devices, including nonmetallic control knobs and compartment covers. 3.
1-2 Servicing Precautions WARNING: First read the-Safety Precautions-section of this manual. If some unforeseen circumstance creates a conflict between the servicing and safety precautions, always follow the safety precautions. WARNING: An electrolytic capacitor installed with the wrong polarity might explode. 1. Servicing precautions are printed on the cabinet. Follow them. 2.
Contents Getting Started 1 Using This Manual .................................................................................................................... 1 Using Flowcharts......................................................................................................... 1 Unpacking.................................................................................................................................. 2 Installing the Paper ..........................................................
Preset Price PLU........................................................................................................27 PLU Repeat Entry......................................................................................................27 PLU Multiplication....................................................................................................28 PLU Multiplication with Decimal Point....................................................................28 Split Pricing PLU .....................
PC Online Mode ...................................................................................................................... 53 Program Mode Programming 55 Default Programming .............................................................................................................. 55 Basic Programming ................................................................................................................. 56 Setting the Date ..........................................................
Getting Started Using This Manual Congratulations! You have selected a very flexible electronic cash register designed for years of reliable service. The SAM4s ER-260/265 will fit many retail stores, shops and restaurants. It provides fast transaction processing, security, and detailed sales information. • To Get Started turn to “Quick Setup”. This section covers unpacking, memory clearing, a few simple programming steps, and instructions for basic cash register transactions.
Unpacking 1. Unpack and unwrap the cash register. 2. Locate in the packing the following items: • 1 roll of paper • 1 rewind spindle • 1 set of control keys • This Operation and Programming Manual, 3. Remove the cardboard protectors from the cash drawer. 4. Plug the register into a grounded outlet (three prong), insert a control key and turn the key to the REG control lock position. Installing the Paper When you have an ER-260/265 with EPROM v 05.
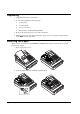
3. Load the paper and close the platen roller. 4. Close the platen roller firmly. 5. Tear off the excess paper and close the platen roller. ※ If you wish to use the printer to print a sales journal, insert the paper into the paper take-up spool. Wind the paper two or three turns around the spool shaft and install the spool in the mount A. If you use the ER-260/280 Series with 1-station, refer to below figure. .
The earlier versions (GOD 01.013A and earlier) have different Printer Unit. Please refer to information below. 1. Remove the printer cover. 2. For proper feeding through the print head, cut or tear a straight even edge on the end of the paper roll. (Be sure to remove any paper with glue residue.) Place the paper roll in the paper holder so that the paper will feed from the bottom of the roll. 3. Insert the end of the paper into the paper slot.
4. Close the paper lever. (ER-260/265 is possible to feed automatically when you rock the paper levers and insert paper). Replace the printer cover. ※ If you wish to use the printer to print a sales journal, insert the paper into the paper take-up spool. Wind the paper two or three turns around the spool shaft and install the spool in the mount. .
* In case of Paper Jam, refer to below figure. A. Open the paper lever and open the cap printer. B. Remove the jamming paper. (Be carefull not to get burned in the hand because it is very hot in the cap printer.
Basic Features and Functions Standard Hardware • Display: Ten position front and rear displays standard. Both displays are fixed to the housing. • Keyboard => ER-260 Series: 48 position Raised Keyboard. => ER-265 Series: 48 position Flat Keyboard. • 1 station Thermal 32-column printer. • Cash Drawer => ER-265B: Morden design cash drawer with 4 Bill / 4 Coin configuration. => ER-26xALB: Sturdy Metal Cash Drawer with removable 4 Bill / 8 Coin drawer insert • 7-position control lock.
Front Display DPT RPT AMOUNT DPT Indicates the department number of the registration (2 digits). RPT Indicates the number of times an item has been repeated. AMOUNT Displays the amount the amount of the item, subtotal or total. CLERK If the clerk system is implemented, one of 10 lines illuminate indicating which clerk is active. RPT 5 of items link to department 1 at $2.
Total of Sale DPT RPT AMOUNT Negative Entry 2 of items link to department 1 total at $5.
Rear Display The rear display is a 10 digit florescent display that allows your customer to monitor the transaction and view the sale total. The rear display is for easy customer viewing. Rear Display Information Item Count Amount The number of times an item has been repeated is displayed The amount of the item, subtotal or total, is displayed in the rightmost portion of the display RPT 5 of items link to department 1 at $2.
Negative Entry 2 of items link to department 1 total at $5.
Display Messages 12 • C Change Due E Error - Negative entry = Total E1 Input Error E3 Printer Error (paper jam) E4 Non Add # required E5 Cash Declaration required E6 Cash Drawer is open E8 No Paper Getting Started ER-260/265 Electronic Cash Register AU
Control Lock OFF VOID Use to void (correct) items outside of a sale. VOID REG OFF The register is inoperable. X REG Use for normal registrations. X Use to read register reports. Z Use to read register reports and reset totals to zero. Z PGM PGM Use to program the register. S S The S Position is a hidden position reserved for dealer access. The SAM4s ER-260 Series includes two sets of keys that may be used to access the following key lock positions.
Keyboard The ER-260 Series keyboard includes 48 positions with default legends and key assignment as shown below. The keyboard legend sheet can be replaced by lifting the protective plastic cover and/or keycaps. PAPER FEED ADD CHECK TAX # / NS CLERK RA PO - -% +% C/CONV RETURN VOID CANCEL CLEAR X / TIME PLU CHARGE 1 6 11 2 7 12 7 8 9 CHECK 3 8 13 4 5 6 SUB TOTAL 4 9 14 1 2 3 5 10 15 0 00 • CASH / TEND Alpha Keyboard Overlay - for EPROM v1.
Alpha Keyboard Overlay - for EPROM v1.010 (& Earlier) Space Double Ü£Ñ ØÁ€ ÍÓÚ \{} _.
Memory Clear WARNING: This is a one time procedure. Do not repeat this procedure after the cash register is programmed, it causes all programs and totals to be erased. Memory All Clear (RAM Clear) This step insures that the cash register is cleared of any totals or programming. After this procedure, the cash register is ready for programming and operation. To Perform a Memory All Clear - reset memory completely 1. Unplug the register. 2. Turn the control lock to the S position (one past PGM). 3.
Initial Clear (Status Clear) CAUTION: Do not share this information with unauthorized users. Distribute the S Mode key only to those you may want to perform this function. The initial clear function allows you to exit any register activity and return to a beginning or cleared state. Any transaction that is in progress will be exited and totals for that transaction will not be updated.
Operating Instructions Function Key Descriptions Key Descriptions Key Description PAPER FEED Press to advance then printer paper. Numeric Keypad: 0-9 and 00 Use the numeric keypad to enter amounts, other numeric values. CLEAR Press to clear numeric errors made on keyboard prior to pressing the registration key. Also press to stop the error alarm when incorrect entries are made. Department Keys There are eight department keys on the keyboard to register different types of merchandise.
Key Description percentage from an item or the subtotal of the sale. 5You can enter the amount of the percentage before pressing the -% or +% keys, or you can program a preset percentage if you are consistently using the same percentage. See “+% and -% Key Programming” to set a preset percentage. 20 • PLU Use to register a Price Look Up (PLU). RA (RECD ACCT) Use to accept cash into the cash drawer when you are not actually selling merchandise.
Clerk Operations If you wish to use the clerk system, you must first activate the clerk system by setting system option #16. See “System Option Programming”. You can activate the clerk system for stay down or popup mode. • Stay down means that once a clerk is signed on, the same clerk will remain signed on until a different clerk signs on or the original clerk signs off.
Basic Operations Registering Items 1. Enter an amount on the ten key pad. Do not use the decimal key. For example, for $2.99, enter: 2 9 9 2. Press a department key. For example, press department 1: ____THANK_YOU ___CALL_AGAIN DEPT.1____________T1 $2.99 ROUND $0.01 GST AMOUNT $0.27 CASH $3.00 16:52 03-01-2006 000002 00 1 Repeating an Item 1. To register a second item exactly as the first, press the department key a second time. For example, press department 1: 1 ____THANK_YOU ___CALL_AGAIN DEPT.
Department Registrations As you make department registrations, you can follow your entries by viewing the display. The digits marked “DPT” indicate the department used. The digit marked “RPT” counts items as they are repeated. Open Department 1. Enter an amount on the ten key pad. Do not use the decimal key. For example, for $2.99, enter: 2 9 9 2. Press a department key. For example, press department 1: ____THANK_YOU ___CALL_AGAIN DEPT.1____________T1 $2.99 ROUND $0.01 GST AMOUNT $0.27 CASH $3.
Department Repeat Entry Open or preset price departments may be repeated as many times as necessary by pressing the same department again. (Likewise open or preset PLUs may be repeated by pressing the PLU key again.) 1. Enter an amount on the ten key pad. Do not use the decimal key. For example, for $2.99, enter: 2 9 9 2. Press a department key. For example, press department 1: ____THANK_YOU ___CALL_AGAIN DEPT.1____________T1 $2.99 DEPT.1____________T1 $2.99 ROUND $0.02 GST AMOUNT $0.54 CASH $6.
Department Multiplication with Decimal Point If you are selling items by weight, or if you are selling yard goods, you can multiply a fraction of a unit. 1. Enter the quantity purchased with the decimal point, press the X/TIME key. For example, for 3 ¾ kilos of produce, enter: 3 . 7 5 X/TIME 2. Enter an amount on the ten key pad. Do not use the decimal key. For example, if the price is $.99 per kilo, enter: 9 ____THANK_YOU ___CALL_AGAIN 3.750 X $0.99 DEPT.1____________T1 $3.71 ROUND -0.
Single Item Department Single item departments automatically total as a cash sale immediately after registration. Use single item departments for speedy one item sales. For example if you are selling admission tickets, and all ticket sales are one item sales, you can assign open or preset department single item department for ticket sales. After each registration, the drawer will immediately open, and a separate receipt is printed. See “Department Programming” to program a single item department. 1.
PLU (Price Look Up) Registrations PLUs must be programmed before operated. See “PLU (Price Look Up) Programming” to program open or preset PLUs. Open PLU 1. Enter the PLU number, press the PLU key. For example, enter: 2 PLU 2. Enter an amount on the ten key pad. Do not use the decimal key. For example, for $2.99, enter: 2 9 ____THANK_YOU ___CALL_AGAIN PLU2______________T1 $2.99 ROUND $0.01 GST AMOUNT $0.27 CASH $3.00 16:52 03-01-2006 000012 00 9 3. Press the PLU key again. PLU Preset Price PLU 1.
PLU Multiplication When several of the same items are to be entered into the same PLU, you can use multiplication. You may enter a quantity up to 4 figures (1 to 9999) using the X/TIME key. You may multiply open or preset open or preset PLUs. 1. Enter the quantity of items being purchased, press the X/TIME key. For example, enter 4 on the numeric key pad and press the X/TIME key: 4 X/TIME 2. Enter the PLU number, press the PLU key. For example, enter: 1 ____THANK_YOU ___CALL_AGAIN 4 X $1.
Split Pricing PLU When items are priced in groups, i.e. 3 for $1.00, you can enter the quantity purchased and let the register calculate the correct price. 1. Enter the quantity purchased, press the X/TIME key. For example, enter: 2 X/TIME 2. Enter the quantity of the group price, press the X/TIME key. For example, if the items are priced 3 for $1.00, enter: 3 ____THANK_YOU ___CALL_AGAIN 2/3 X $1.29 PLU1______________T1 $0.86 ROUND -0.01 GST AMOUNT $0.08 CASH $0.85 16:52 03-01-2006 000017 00 X/TIME 3.
Percent Key (+% and -%) Operations Use the Percent keys to add a percentage surcharge or subtract a percentage from an item or the subtotal of a sale. You can enter the amount of the percentage before pressing the -% or +% keys, or you can program a preset percentage if you are consistently using the same percentage. Programming determines whether it is possible to enter a percentage when the key is also programmed with a preset percentage. See “+% and -% Key Programming” to set a preset percentage.
Percent on Sale Total In this example a surcharge of 15% is applied. 1. Register the items you wish to sell. 2. Press SUBTOTAL: DEPT.2____________T1 SUBTOTAL +% SUB TOTAL 3. Enter the percentage. For example, for 15% enter: 1 ____THANK_YOU ___CALL_AGAIN 5 4. Press the +% key: ROUND GST AMOUNT CASH 16:52 000020 $10.00 $10.00 15.000 $1.50 $0.00 $1.05 $11.50 03-01-2006 00 +% 5. The surcharge is automatically added.
Return Merchandise Registrations If you wish to return or refund an item, press Return Merchandise, then re-enter any item you wish. You can return merchandise as part of a sale, or you can return merchandise as a separate transaction and return cash to the customer. 1. To return an item, press RETURN: ____THANK_YOU ___CALL_AGAIN RETURN 2. Enter the price of the item you wish to return, then press the department key where it was registered originally. For example, for $2.
Void Previous Item This function allows you to correct an item registered previously in a transaction. 1. Register an item. Then register a second item. 2. To correct the first item, press CLEAR, then press VOID: CLEAR VOID 3. Enter the price of the first item, then press the department key where it was registered originally. 1 2 9 2 ____THANK_YOU ___CALL_AGAIN DEPT.2____________T1 $1.29 DEPT.1____________T1 $2.29 VOID DEPT.2____________T1 -1.29 ROUND $0.01 GST AMOUNT $0.21 CASH $2.
- (Minus) Key Registrations You can register a negative amount by entering a price, then pressing the - (Minus) key. For example, you can enter bottle returns or coupons using the - (Minus) key. NOTE: You can program the minus key so that tax is charged on the gross amount or on the net amount after the subtraction. See “- (Minus) Key Programming”. 1. Register the items you wish to sell. 2. Enter the amount you wish to subtract from the sale. For example for a $.50 coupon, enter: 5 0 3.
No Sale Operations Open Drawer The #/NS key will open the cash drawer when you have not already started a transaction. ____THANK_YOU ___CALL_AGAIN 1. Press #/NS: # / NS 2. The drawer will open and the receipt will print as in the example on the right. OPEN DRAWER 16:52 000027 03-01-2006 00 Non Add Number You can also use the #/NS key to print any number (up to 8 digits) on the printer paper. You can enter the number any time during a transaction.
Received On Account Operations You can use the Received on Account key to accept cash into the cash drawer when you are not actually selling merchandise. For example, use the Received on Account key to accept payments for previously sold merchandise or record loans to the cash drawer. 1. Enter the amount of cash you are receiving. For example, enter: 2 0 0 0 2. Press RA: ____THANK_YOU ___CALL_AGAIN RECEIVED ON 16:52 000029 $20.00 03-01-2006 00 RA 3.
Totaling a Cash Sale 1. Register the items you wish to sell. 2. To display and print the subtotal of the sale including tax, press SUBTOTAL: SUB TOTAL 3. To total a cash sale, press CASH/TEND: CASH/ TEND 4. The display will indicate “=” for total, the drawer will open and the receipt will print as in the example on the right. _______THANK_YOU ___CALL_AGAIN DEPT.1____________T1 $2.99 DEPT.1____________T1 $2.99 4 X @1.99 DEPT.2____________T1 $7.96 SUBTOTAL $13.94 ROUND $0.01 GST AMOUNT $1.27 CASH $13.
Tendering a Check Sale 1. Register the items you wish to sell. 2. To display and print the subtotal of the sale including tax, press SUBTOTAL: SUB TOTAL 3. Enter the amount of the check tendered by the customer. For example, for $20.00 enter: 2 0 0 0 _______THANK_YOU ___CALL_AGAIN DEPT.1____________T1 $2.99 DEPT.1____________T1 $2.99 4 X @1.99 DEPT.2____________T1 $7.96 SUBTOTAL $13.94 GST AMOUNT $1.27 TOTAL $13.94 CHECK $20.00 CHANGE $6.06 16:52 03-01-2006 000033 00 4. Press CHECK: CHECK 5.
Totaling and Tendering Three keys may be used to total and total a sale: CHECK, CHARGE, CASH/TEND key. The CHECK and CASH/TEND keys can also be used for change calculation. Subtotaling a Sale 1. Register the items you wish to sell. 2. To display and print the subtotal of the sale including tax, press SUBTOTAL: SUB TOTAL 3. The subtotal will display with “=” indicated in the left digit position of the display. ____THANK_YOU ___CALL_AGAIN DEPT.1____________T1 DEPT.1____________T1 4 X DEPT.
Tendering a Check Sale 1. Register the items you wish to sell. 2. Enter the amount tendered by the customer. For example, for $20.00 enter: 2 0 0 0 3. Press CHECK: CHECK 4. The display will indicate “C” for change, the drawer will open and the receipt will print as in the example on the right. ____THANK_YOU ___CALL_AGAIN DEPT.1____________T1 $2.99 DEPT.1____________T1 $2.99 4 X $1.99 DEPT.2____________T1 $7.96 SUBTOTAL $13.94 GST AMOUNT $1.27 TOTAL $13.94 CHECK $20.00 CHANGE $6.
Check Cashing Check cashing means exchanging cash for a check. Normally, this function is not allowed. If you wish to allow check cashing, you must set system option #15 to a value of 1. See “System Option Programming”. 1. Enter the amount of the check tendered by the customer. For example, for $20.00 enter: 2 0 0 0 ____THANK_YOU ___CALL_AGAIN _______< CHECK CASHING > CHECK CASH 16:52 000040 2. Press CHECK: $20.00 -20.00 03-01-2006 00 CHECK 3.
Post Tender Post tendering means computing change after the sale has been totaled and the drawer is open. This feature is useful when a customer changes the amount of the tender or the clerk becomes confused counting change manually. Normally, this function is not allowed. If you wish to allow post tendering, you must set system option #14 to a value of 1. See “System Option Programming”. 1. Register the items you wish to sell. 2. Press CASH/TEND: CASH/ TEND 3.
Currency Conversion If you normally accept currency from a neighboring nation, you can program the SAM4s ER260/265 to convert the subtotal of a sale to the equivalent cost in the foreign currency. To do this, you need to program the conversion factor. For example, if the Amount (home currency) is worth 1.3720 Canadian dollars (foreign currency), the conversion factor is 1.3720. See “Programming Currency Exchange Rates” to set a conversion rate. 1. Register the items you wish to sell. 2.
Add Check Use the ADD CHECK key when you wish to issue a receipt, but not yet pay for the sale. For example, one person may wish to pay for two guest checks at a restaurant, or one person may pay for two admissions, where separate receipts are required for each person. 1. Register the items you wish to sell on the first receipt. ____THANK_YOU ___CALL_AGAIN 2. Press ADD CHECK to issue a receipt for the items: DEPT.1____________T1 $2.00 ADD CHECK $2.00 GST AMOUNT $0.
Receipt On/Off and Receipt on Request When a receipt is not normally issued, you can turn the receipt function on or off. If the receipt is off, you can still issue a receipt after the sale has been completed. Normally, this function is not allowed. If you wish to allow after sale receipts, you must set system option #17 to a value of 1. See “System Option Programming”.
Calculator Operation You can use a calculator program in the REG or VOID mode. 1. Turn the control lock to the REG or VOID position. 2. Enter 100 on the numeric keypad and press the SUB TOTAL key. 3. Enter a first number for calculation on the numeric keypad. 4. Choose one out of below operators. VOID + CANC EL - C/CONV X 5. Enter a second number for calculation on the numeric keypad. 6. Press the CASH/TEND key to finish.
X/Z Mode Reporting Report Summary There are two basic types of reports: "X", or read-only and "Z", or read & reset to zero. Some reports are available in both types. The following table summaries the reports available on the SAM4s ER-260/265: Running a Report 1. Find the report you wish to run from the table on the previous page. 2. Turn the control lock to the X or the Z position. 3. Press the appropriate key for the report you wish to run.
Report Table Control Lock Position Key Financial X or Z CASH/ TEND Period-to-Date Financial X or Z CHARGE Hourly Sales X or Z X/TIME All PLU X or Z PLU Clerk X or Z CLERK Report String Report (Financial, PLU, Time and Clerk reports in sequence) SUB TOTAL Z PLU First PLU From/To PLU X PLU Last PLU 50 • Cash in Drawer X SUB TOTAL Check in Drawer X CHECK X/Z Mode Reporting ER-260/265 Electronic Cash Register AU
Electronic Journal (EJ) Table PRINT ALL EJ X 3 0 0 CASH/ TEND PRINT EJ CASH X 3 0 1 CASH/ TEND PRINT EJ CHECK X 3 0 2 CASH/ TEND PRINT EJ CHARGE X 3 0 3 CASH/ TEND PRINT EJ % X 3 0 4 CASH/ TEND PRINT EJ RA/PO X 3 0 5 CASH/ TEND PRINT EJ RETURN X 3 0 6 CASH/ TEND PRINT EJ EC/VOID X 3 0 7 CASH/ TEND PRINT EJ NO SALE X 3 0 8 CASH/ TEND PRINT EJ CANCEL X 3 0 9 CASH/ TEND PRINT EJ BY CLERK CASH/ TEND X 401 ~ 410 PRINT EJ RESET ER-260/265 Electronic
Cash-In-Drawer Declaration Cash-In-Drawer Declaration is an optional feature that forces you to count the drawer and declare the drawer count before a report can be run. By forcing the operator to declare, without knowledge of the expected drawer totals, you are assured that all cash will be deposited. System option #8 must be set to a value of 1 to enforce cash declaration. See “System Option Programming” for detail. Declaring Cash 1. Turn the control lock to the X position.
Service Mode Programming Memory Allocation Scan Program 60 - Memory Allocation Scan 1. Turn the control lock to the S position. 2. To view Memory Allocation, enter 60, and then press the SBTL key. 6 0 SUB TOTAL 3. Press CASH key. CASH EPROM Information Program 50 - EPROM Information 1. Turn the control lock to the S position. 2. To Scan EPROM Information, enter 50, and then press the SUBTOTAL key. 5 0 SBT L PC Online Mode In ER-260/265 Series, There are easy to enter PC Online Mode. 1.
Program Mode Programming Default Programming • All keyboard Departments are taxable and preset, without entry limits by default status programming of "310" (EPROM v01.014A and later); are taxable and open, without entry limits by default status programming of "10" (EPROM v01.013A and earlier). • All PLUs are taxable and preset, without entry limits by default status programming of "110". • All system options are set to 0 in default programming, unless otherwise noted.
Basic Programming This section covers the basic programming necessary to get your cash register running quickly. See “Advanced Programming” for if you wish to program options that are not included in this section. Setting the Date The date sequence is Day- Month -Year. 1. Turn the control lock to the PGM position. 2. Enter the date in the format you have selected and press the X/TIME key. 3. Press CASH/TEND.
Setting the Time 1. Turn the control lock to the PGM position. 2. Enter the hour and minute in military time (24 hour time) and press the X/TIME key. 3. Press CASH/TEND.
Programming Tax You can be programmed by entering a tax percentage rate Programming a Tax Rate Percentage 1. Turn the control lock to the PGM position. 2. Enter the rate, with a decimal. 0.000-99.999. It is not necessary to enter proceeding zeros. For example, for 6%, enter 06.000 or 6.000.) 3. Enter 10. 4. Enter: 1 to set GST rate 2 to set tax 2 rate 3 to set tax 3 rate 4 to set tax 4 rate 5. Press the TAX key. 6. Press the CASH/TEND key to end programming. 7. See tax rate program examples.
Department Programming Programming Department Status There are two parts to department programming. Department status is set here. Depending on whether you select open or preset department status is this section, you can also program either the open department entry limit or the preset department price. See “Programming Department Entry Limit or Price”.
Programming Department Status 1. Turn the control lock to the PGM position. 2. Enter 1 0 0 SBTL for department programming. 3. Decide if you want a negative, enforced non-add entry, or disabled department. If you do not want any of these department options, enter 0. If you wish to select any of these options, complete the table below by adding the status digits for each option. Enter the resulting digit.
Department Status Programming Flowchart Repeat for each Department 100 SUB TOTAL X/TIME Negative? Non-Add? Disabled? Preset? Single item? Tax Status Code DEPT KEY CASH/ TEND Send KP Department Status Programming Examples For example, set: • department 1 open, taxable by rate 1 • department 4 preset, taxable by rate 2 • department 9 negative, preset, taxable by rate 3 To set Department 1, enter: 100 SUB TOTAL 0 0 1 0 X/TIME 0 1 2 0 X/TIME 1 1 3 0 X/TIME 1 To set Department 4
Programming Department Entry Limit or Price NOTE: Open departments are automatically assigned a 7 digit entry limit. You do not need to program this section for open departments, unless you wish to set a different limit. If you are programming a open department: • You can limit errors by setting the maximum amount that may be entered into a department. If you are programming a preset department: • You can set the preset price.
Department Entry Limit or Price Programming Flowchart Repeat for each Preset Department DEPT KEY CASH/ TEND Preset Price or High Amount Lock Out (Leading zeros are not necessary) Department Entry Limit or Price Programming Examples For example, set: • department 1 open, with a entry limit of $50.00 • department 4 preset for $2.50 • department 9 preset for $0.
PLU (Price Look Up) Programming The SAM4s ER-260/265 offers 1000 PLUs (Price Look Ups) as a standard feature. Like departments PLUs (Price Look Ups) may be open or preset. • Preset PLUs are used to register preset items. The most significant difference between a preset department and a preset PLU is the method of registration. While preset departments are registered by simply pressing the department key, preset PLUs are registered by entering the PLU number and pressing the PLU key.
Programming PLU Status 1. Turn the control lock to the PGM position. 2. Enter the number of the PLU you wish to program (1-1000), press the PLU key. 3. Decide if you want a negative, enforced non-add entry, or disabled PLU. If you do not want any of these options, enter 0. If you wish to select any of these options, complete the table below by adding the status digits for each option. Enter the resulting digit.
PLU Status Programming Flowchart Repeat for each PLU DEPT KEY PLU CASH/ TEND PLU # Negative? Preset? Non-Add? Single Disabled? item? Tax Status Code Send KP PLU Status Programming Examples For example, set: • PLU #1 preset, not single item, taxable by rate 1, with sales reported to department 2. • PLU #30 preset, single item, taxable by rate 2, with sales reported to department 4. • PLU #6 open, not single item, non-taxable, with sales reported to department 9.
Programming PLU Entry Limit or Price NOTE: Open PLUs are automatically assigned a 7 digit entry limit. You do not need to program this section for open PLUs, unless you wish to set a different limit. If you are programming a open PLU: • You can limit errors by setting the maximum amount that may be entered into a PLU. If you are programming a preset PLU: • You can set the preset price. The price you program here is the amount that is automatically registered when the PLU is entered.
PLU Entry Limit or Price Programming Flowchart Repeat for each Preset PLU PLU X/TIME C ASH/ TEND Preset Price or High Amount Lock Out (Leading zeros are not necessary) PLU # PLU Entry Limit or Price Programming Examples For example, set: • PLU 1 with a preset price of $1.99 • PLU 30 with a preset price of $10.00 • PLU 6 with a entry limit of $5.
System Option Programming Twenty system options are provided so that you can configure the SAM4s ER-260/265 to your exact requirements. Refer to the “System Option Table” to review the system options. Read each option carefully to determine if you wish to make any changes.
System Option Table NOTE: Bold font is the default settings. In other words, the Bold font setting indicates the way the register is automatically set up after. Option No. SYSTEM OPTION STATUS 1 Print the grand total on X,Z report. YES = 0 NO = 1 2 Print the gross total on X,Z report. YES = 0 NO = 1 3 Reset the consecutive number counter after a Z report. NO = 0 YES = 1 4 Reset the Z counter after Z report. NO = 0 YES = 1 5 Skip totals with zero value on X,Z report.
Option No. SYSTEM OPTION STATUS Incactive Stay Pop Up 16 Select clerk option: 0 1 2 17 Allow receipt after sale. NO = 0 YES = 1 18 Print Currency Symbol $ 19 Enforce cash or check tender at totaling. 20 Date sequence NO = 0 YES = 1 MM-DD-YY 0 DD-MM-YY 1 YY-MM-DD 2 21 Select drawer compulsory NO = 0 YES = 1 22 Use spool NO = 0 YES = 1 Disable. 0 Enable Print from Oldest.
Advanced Tax Programming Use the instructions in this chapter only if you wish to determine tax program entries yourself. See “Programming Tax” to enter a simple tax rate. Important Note: After you have entered your tax program, test for accuracy by entering several transactions of different dollar amounts. Carefully check to make sure the tax charged by the cash register matches the tax on the printed tax chart for your area. As a merchant, you are responsible for accurate tax collection.
Tax Rate Examples If tax 1 is 6 percent, enter: 6 • 0 0 0 0 0 1 TAX 0 0 2 0 3 TAX If tax 3 is 8 percent, enter: 8 • 0 Press the CASH/TEND key to end programming. CASH/ TEND The rates you have entered will display and print on the printer: ____THANK_YOU ___CALL_AGAIN TAX1 STATUS 00 TAX1 RATE 6.000 TAX3 STSTUS 03 TAX3 RATE 8.
+% and -% Key Programming There are two percentage keys on the keyboard: +% and -%. The +% key applies a surcharge. The -% key applies a discount. Without any further programming, you can apply a discount or surcharge to an individual item or to the subtotal of a sale be entering a percentage and pressing the +% or -% key.
- (Minus) Key Programming The - (Minus) key is used to enter the amount of a coupon that is subtracted from the sale. • The - (Minus) key can programmed to be taxable or non-taxable. In other words, when you are subtracting a coupon, you can calculate sales tax on the net or the gross cost of the item. If the - (Minus) key is taxable, you will calculate sales tax on the net cost of the item. If the - (Minus) key is -non-taxable, you will calculate sales tax on the gross cost of the item.
CANCEL Key Programming The CANCEL key can be made inactive. Normally the key is active, however, you may wish to inactivate it for security reasons. Programming the CANCEL Key 1. Enter: 0 to activate the CANCEL key 1 to inactivate the CANCEL key 2. Press the CANCEL key. 3. Press the CASH/TEND key to end programming.
Currency Conversion Programming If you normally accept currency from a neighboring nation, you can program the SAM4s ER260/265 to convert the subtotal of a sale to the equivalent cost in the foreign currency. To do this, you need to program the conversion factor. For example, if the Amount (home currency) is worth 1.3720 Canadian dollars (foreign currency), the conversion factor is 1.3720. NOTE: Foreign currency exchange rates may be stated as “foreign currency in dollars”, or “dollars in foreign currency”.
Clerk Programming If you wish to use the clerk system, you must first activate the clerk system by setting system option #16. See “System Option Programming”. You can activate the clerk system for with a stay down or pop-up mode. • Stay down means that once a clerk is signed on, the same clerk will remain signed on until a different clerk signs on or the original clerk signs off.
Clerk Programming Example To set Clerk 5 with a code of 5 6 7, enter: 5 CLERK 5 6 7 X/TIME C ASH/ TEND Printing Clerk Codes: If you need to verify clerk codes: 1. Turn the control lock to the PGM position. 2. Press the CLERK key. 3.
Register Number Programming You can program a two digit register number that will print on the lower right corner of each transaction. If you are using more than one cash register, the register number can be used to identify the register where the transaction was entered. ____THANK_YOU ___CALL_AGAIN MACHINE NO. 99 _______PROGRAM TERMINATE 16:36 03-01-2006 000059 99 Register Number To set a register identification number: 1. Turn the control lock to the PGM position. 2.
Descriptor Programming Alpha Overlay Method Using the Overlay layout - EPROM v1.013A and Later 1. According to the Alpha overlay, find the character you wish to print. 2. Press the bottom with the character you need.
Using the Overlay layout - EPROM v1.010 and Earlier 1. Find the key that has the character you need. 2. According to the order on the key in the overlay below, press once will give you the first character, press twice will give you the second character, press three times will give you the last character. For example, press Department 7 key once will give you an ‘M’, twice will give you an ‘N’, three times will give you an ‘O’.
Code Table Method Using the Code Table 1. Find the character you wish to print. 2. Find the first entry digit for the character by following the column to the top of the table. 3. Find the second entry digit for the character by following the row to the left margin of the table. For example, enter code “1 4” for character “4”, code “2 0” for character “A”, and code “4 5” for character “Z”.
Customer Logo Descriptor Without otherwise programming, the customer logo will print a two line message at the top of each receipt: ____THANK_YOU ___CALL_AGAIN If you wish you can replace this message with your own custom message. Your message can be up to 6 lines long. (see “Alpha Program Overlay”) Programming a Custom Logo: 1. Turn the control lock to the PGM position. 2. Press the X/TIME key. 3. Enter up to 32 characters for a line of the logo * * * For EPROM v1.
Logo Descriptor Programming Flowchart Repeat for each Line of the Logo X/TIME Enter up to 32 charact ers X/TIME CHECK CASH/ TEND Line # Code (v1.011 & after) Repeat for each Line of the Logo X/TIME • X/TIME Up to 32 characters follow up with decimal point key CHECK CASH/ TEND Line # Code (v1.
Department Descriptor Without otherwise programming, each department will print the department number for registrations and reporting. (see “Alpha Program Overlay”) For example, the receipt will look like this: DEPT.1____________T1 DEPT.7____________T1 $2.99 $1.99 If you wish you can each department descriptor with a custom descriptor, up to 18 characters in length. For example, you could program your own descriptors like this: GRECERY___________T1 MEAT______________T1 $2.99 $1.
Department Descriptor Programming Flowchart Repeat for eac h department X/TIME Ent er up to 18 characters X/TIME DEPT KEY CASH/ TEND DEPT KEY CASH/ TEND (v1.013A & later) Repeat for each department X/TIME • X/TIME Up to 18 character with decimal point (v1.
PLU Descriptor If you are using PLUs, the PLU descriptor print the PLU code unless you choose to program a custom descriptor. (see “Alpha Program Overlay”) For example, the receipt will look like this: PLU1______________T1 PLU23_____________T1 $2.99 $1.99 If you wish you can each department descriptor with a custom descriptor, up to 18 characters in length. For example, you could program your own descriptors like this: CIGARETTE_________T1 APPLES____________T1 $2.99 $1.99 Programming a PLU Descriptor 1.
PLU Descriptor Programming Flowchart Repeat for each PLU X/TIME Enter up to 18 charact ers X/TIME PLU CASH/ TEND PLU Code (v1.011 & after) Repeat for each PLU X/TIME • X/TIME PLU CASH/ TEND PLU Code Up to 18 character with decimal point (v1.
Descriptor Programming Example For Customer Logo Descriptor, Department Descriptor and PLU Descriptor, the example key sequence between X/TIME keys is shown below. Please note the different between new (EPROM v01.013A and later) and previous (EPROM v01.010 and earlier). In the example, those boxes with pattern indicate the length of description has exceed 18 charactors and only capable with Logo Descriptor.
• Using two digit code entry method In SINGLE SIZE, Enter the codes “2 0 3 5 3 5 3 1 2 4 7 0 2 7 3 4 4 0 3 8 2 4” representing the text. X/TIME 2 2 7 0 3 3 4 5 4 3 0 5 3 3 8 1 2 2 4 4 7 0 X/TIME In DOUBLE SIZE, Enter the codes “7 9 2 0 7 9 3 5 7 9 3 5 7 9 3 1 7 9 2 4 7 9 7 0 7 9 2 7 7 9 3 4 7 9 4 0 7 9 3 8 7 9 2 4” representing the text.
Program Scan Department and Option Program Scan You can generate a print of all the programming options scan. 1. Turn the control lock to the PGM position. 2. Press the CASH/TEND key to print the program report. PLU Programming Scan You can generate PLU PROGRAM SCAN. 1. Turn the control lock to the PGM position 2. Enter 15 on the numeric keypad and press the SUB TOTAL key. 3. To read PLU program information, enter the number(1-1000) of the start PLU and press the PLU key 4.
Program Scan Example ____THANK_YOU ___CALL_AGAIN Department Status -> Department Price or Limit -> DEPT.1 DEPT.2 DEPT.
Report Samples Financial Report NOTE: This sample report is shown with items of zero value listed on the report. Your report may only show totals with values other than zero, depending on the setting for system option #5. ____THANK_YOU ___CALL_AGAIN < DAILY REPORT > Report Name -> Report Type/Reset (X/Z) Counter -> Department Activity Counter -> Department Sales Total -> X DEPT.1 DEPT.2 DEPT.3 DEPT.4 DEPT.5 DEPT.6 DEPT.7 1 18.00 $33.03 1.00 $0.07 4.00 $50.99 2.00 $3.50 0.00 $0.00 0.00 $0.00 1.00 $20.
Taxable sales for tax rate 1 Tax 1 amount collected Taxable sales for tax rate 2 Tax 2 amount collected Taxable sales for tax rate 3 Tax 3 amount collected Taxable sales for tax rate 4 Tax 4 amount collected -> -> -> -> -> -> -> -> TAXABLE1 TAX AMOUNT TAXABLE2 TAX AMOUNT TAXABLE3 TAX AMOUNT TAXABLE4 TAX AMOUNT Activity count for discount key Dollar amount of discounts Activity count for surcharge key Dollar amount of surcharges Activity count for –(MINUS) key Dollar amount of –(MINUS) -> -> -> -> -> ->
Hourly Sales Report The Hourly sales report lists the number of transaction and their dollar total for each hour of the day.
PLU Report The PLU report lists the activity and sale total for each PLU. ____THANK_YOU ___CALL_AGAIN < PLU REPORT > Report Name -> Report Type/Reset (X/Z) Counter PLU Activity Counter -> PLU tax status/PLU price or limit -> Reporting Dept/PLU Sales Total -> (PLU Counters and Totals are listed for each PLU) Activity count of all PLUs Total of all PLUs Time/Date Transaction Counter/Register Number 98 • Report Samples -> -> -> -> X 1 PLU1 1 T1_______@1.99 DEPT.2 $1.99 PLU30 1 T2_______@10.00 DEPT.
Clerk Report If you are using a clerk system, the clerk report is available. (See “System Option Programming” on page 64 and set option #16 to a value of 1 or 2 if you wish to use the clerk system.) ____THANK_YOU ___CALL_AGAIN < CLERK REPORT > Report Name -> Report Type/Reset (X/Z) Counter X Total sales for the clerk -> Number of no sales performed -> Customer Count for the clerk -> •CLERK 1 NO SALE CNT. CUSTOM. CNT •CLERK 2 NO SALE CNT. CUSTOM.
Cash-in-Drawer Report Run a Cash-in-Drawer report to quickly verify the amount of cash that should be in the cash drawer. ____THANK_YOU ___CALL_AGAIN < CASH-IN-DRAWER > Report Name -> CASH-IN-DRAWER Cash in drawer amount -> Time/Date -> Transaction Counter/Register Number -> $81.58 03-01-2006 00 16:15 000063 Check-in-Drawer Report Run a Check-in-Drawer report to quickly verify the amount of checks that should be in the cash drawer.
System Balancing Department Sales Total + +DEPT TTL (Add All Positive Departments) - -DEPT TTL (Add All Negative Departments) = ADJST DEPT TTL Net Total + ADJST DEPT TTL + TAX1 AMOUNT + TAX2 AMOUNT + TAX3 AMOUNT + TAX4 AMOUNT + +% (Surcharge Total) - -% (Discount Total) - - (Minus Key Total) = NET TTL Gross Total + NET TTL + RETURN MDSE + VOID KEY - +% (Surcharge Total) + -% (Discount Total) + - (Minus Key Total) = GROSS TTL Grand Total + Yesterdays Grand Total + Gro