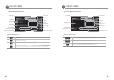
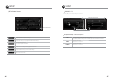
USB (SD CARD) USB (SD CARD) MUSIC Mode Main Screen PHOTO Mode Main Screen Current Folder Mode Select Current File Elapsed Time Exit Exit Scroll Bar Scroll Bar Playlist Move by Track Progress Bar Playlist Move by Track Playback Screen Move by Page Mute Dual ON Status (Refer to page 102.) Move by Page Dual ON Status (Refer to page 102.) Volume Control & Display MUSIC FUNCTION Icons MUSIC Function Icons Slide Show Function (displays each photo for 3 seconds).
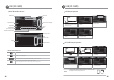
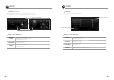
USB (SD CARD) USB (SD CARD) MOVIE Mode Main Screen USB Simple Operation Full Screen Mode Select Exit Playback Screen Volume Control & Display the USB cable to an USB connection starts auto1 Connect 2 The external device (external hard drive, matically. 3 Select a mode. memory stick, etc.). Progress Bar File list Mute Dual ON Status (Refer to page 102.) MOVIE FUNCTION Icons Movie main screen Scroll the FUNCTION icons as 4 Use desired. the
AV BLUETOOTH Connect to and use with an AV device such as a camcorder. The BLUETOOTH Function is available only with BLUETOOTH-enabled mobile phones. Refer to the Mobile Phone Manual for instructions regarding mobile phone BLUETOOTH connection.
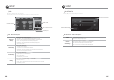
BLUETOOTH BLUETOOTH The BLUETOOTH Function is available only with BLUETOOTH-enabled mobile phones. Refer to the Mobile Phone Manual for instructions regarding mobile phone BLUETOOTH connection. (Default password: 0000) BLUETOOTH Simple Operation BLUETOOTH Detailed Functions 01 the product with a mobile 1 Connect 2 Select . phone. Use to make calls and enter phone numbers. - Making Calls • Press the icon to call the last phone number connected. .
BLUETOOTH REAR CAMERA Mobile Phone MP3 Player Function REAR CAMERA Main Screen The MP3 Player Function is available only when Pairing has been successful. 01 Operates only when the REARVIEW Cable of the Power & Speaker Cable (16P) is connected to the car. Converts to REARVIEW MODE when Backgear is detected.
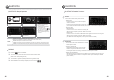
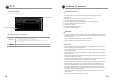
SETUP SETUP SETUP Main Screen SOUND - EQ Use the [◄►] icons to adjust settings in each menu. Move to Previous Screen Move to Main Screen Restore Default Settings EQ (EQUALIZER) – Menu Description Adjust equalizer and speaker settings. Adjust DVD settings . Can set Dual Zone on/off. Can confirm system information. EQ Can set to [OFF►CLASSIC►POP►ROCK►JAZZ]. * The settings menu is available only when the EQ Mode is set to OFF.
SETUP SETUP SOUND - SPEAK DISPLAY Use the [▲▼◄►] icons to adjust the menu settings. Use the [▲▼] icons to adjust the menu settings. Use the [◄►] icons to adjust settings in each menu. Move to Previous Screen Move to Previous Screen Restore Default Settings Move to Previous Screen SPEAK – Menu Description BALANCE/ FADER SUB WOOFER CENTER BALANCE: Adjust the left/right sound balance. FADER: Adjust the initial/closing sound. Can be set to <-10~0~+10>.
SETUP SETUP DVD BLUETOOTH ◄►: Move Left/Right, ▲▼: Move Up/Down Press the [SEL] icon to move to the settings menu and/or move to the previous menu. Use the [◄►] icons to adjust settings in each menu. Move to Previous Screen MOVE ICONS DVD SETUP Menu Move to Previous Screen Restore Default Settings Enter(Set) Icon DVD - Menu Description The user can set the desired language. Language Setup OSD Menu : Set to English/Deutsch/Korean/Español, pyccкий.
SETUP Installation & Connection INFO/DUALZONE Installation Procedure Use the [◄►] icons to adjust settings in each menu. Move to Previous Screen Restore Default Settings 1 To prevent a short circuit, remove the key from the ignition and disconnect the negative post (-) battery. 2 Make the proper input and output wire connections for each unit. 3 Connect the speaker wires of the wiring harness. 4 Connect the wiring harness wires in the following order: ground, battery, ignition.
Installation & Connection Installation & Connection 01 How to install 02 How to install Bord 01 Unpack the GIFT BOX. Screw Helf Sleeve 01 Unpack the GIFT BOX. 04 Front dash board Helf Sleeve Screw Helf Sleeve Screw : P/H M5.0mm X 8.0mm 8ea 04 Screw a not provided to the right and left side of the set. Bord 02 Detach the unit from the Half Sleeve. 02 Detach the unit from the Half Sleeve. 05 Source the half sleeve by bending the metal Tabs. downward Bracket Screw 05 Screw the Dash board.
Installation & Connection How to disassemble Set Key 01 Insert the 'Set Key' into the slot between dash board and of the both side of the unit, left and right. Set Key 02 Insert the 'Set Key' deeply into the centerslot of left and right hand side of the unit.
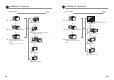
System Connection Glossary Glossary Turning Power ON Chapter number (DVD) A type of disc which contains recording of audio/video packaged media with high video and audio quality, such as a movie, featuring large recording capacity and digital signal processing capability. The chapter is a section of video and audio recorded in a DVD. A tile is composed of several chapters. The numbers assigned to individual chapters are referred to as the chapter numbers.
Troubleshooting Prior to Service Inquiry Troubleshooting Prior to Service Inquiry What might appear to be a malfunction in your unit may just be the result of slight misoperation or misfiring. Before calling service, first check the following table for possible problems. What might appear to be a malfunction in your unit may just be the result of slight misoperation or misfiring. Before calling service, first check the following table for possible problems. General Question The power does not turn on.