
User Manual


9
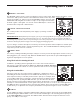
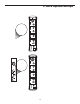
MIC/INST - Select switch
The MIC/INST switch is used to set the operating level of the C valve’s input. When using a microphone, set the
switch to the “MIC” position, which is selected when the switch is in the out position
and the green LED is off. When you press the MIC/INST switch in, the green LED
will illuminate indicating that the C valve is ready to accept a signal from an instru-
ment like a guitar or bass guitar. You can also use the INST input to connect a line
level device like a keyboard or drum machine.
48 VOLT - Phantom Power Switch
The C valve provides on-board phantom power supply for powering condenser
microphones.
IMPORTANT NOTE:
With all phantom power supplies, you can get an annoying POP when you engage the phantom power
supply, or when you unplug a cable that has phantom power on it. Depending how loud you are monitoring, this POP can
cause damage to your speakers, and even to your hearing. Be sure to turn your speakers, and/or headphone levels, all the way
down when switching the phantom supply on and off or plugging and unplugging cables.
If you are using a condenser microphone, turn down your monitors speakers and/or headphones, and then press
the front panel 48 VOLT switch to engage the phantom power. The red LED will illuminate indicating the phan-
tom power is present on the mic connector.
PHASE – Switch
For a variety of miking and mixing techniques, it may be necessary to invert the signal phase from the source you
have plugged into your C valve pre-amp. When the PHASE switch is pressed in, the yellow LED will light show-
ing that the input signal is now out-of-phase.
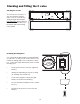
Using The C valve For Getting A Sound
In addition to providing a pristine signal path, the C valve offers several features to
help you get a sound. They include the LOW CUT, VOCAL EQ, LIMITER, ENHANCE
and SATURATION control. Each one of these parameters has an effect on the signal.
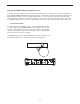
Using the Low Cut Filter
Like any good mic pre, the C valve features a LOW CUT, or (High-Pass), filter for
attenuating the bottom-end frequencies. The LOW CUT filter allows you to remove the
lower frequencies that you sometime just don’t want to pick up. For example, when
you are miking a high-hat you only want to capture the frequencies that the hi-hat is
producing. Therefore, by using the LOW CUT filter, you can reduce the amount of
pick-up from the low toms and bass drum that may leak into the hi-hat mic. You can use the same
technique on other instruments like acoustic guitar, violin, piano and even on vocals. In live sound applications,
the LOW CUT filter is especially useful for removing stage rumble. The C valve provides a variable LOW CUT fil-
ter that allows you to adjust the exact frequency at which the low frequencies begins to roll-off, or attenuate.
LOW CUT
Use the LOW CUT switch to engage the LOW CUT filter. When the switch is pressed in, the green LED will illu-
minate indicating the LOW CUT filter is active. The bottom-end will begin to roll-off starting at the frequency set
on the LOW FREQUENCY control knob. The LOW CUT filter attenuates all the frequencies below the set fre-
quency at a 12dB per octave slope.
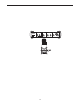
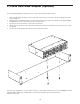
Operating The C valve
7
4
5
6
8
4
5 6
7