
Instruction Manual

PAGE 1 OF 3
SamsonRope.com | Email CustServ@SamsonRope.com | Tel +1.360.384.4669
12-Strand Class II Tuck-Bury End-For-End Splice
SAMSON SPLICING INSTRUCTIONS
1
step
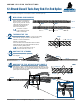
Tape the ends of the ropes to be
spliced. Lay Ropes A and B side-by-
side and measure 1-1/2 tubular d
lengths, (if using a wire d, measure
3 d lengths because wire ds are
half size) from the taped end of
each line and make Mark 1.
1A
2A
From Mark 1, measure
1-3/4 d lengths and make
Mark 2 on both ropes.
2
step
At Mark 1, pull out half the strands (3 “S” and 3 "Z") by rotating
around the rope, pulling out strands in the pattern shown:
Z Strands = counter clockwise twist
S Strands = clockwise twist
This should leave 6 strands still braided down the middle.
Tightly tape the ends of the 6 individual strands, and the
end of the remaining braided portion.
On 1 side you should have 2 S and 1 Z
and on the other side, 2 Z and 1 S.
The Tuck-Bury splice is designed as a short splice for Class II 12-strand ropes only.
MEASURING AND MARKING
TAPERING THE TAIL
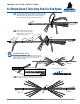
Reposition the ropes for splicing according
to the diagram.
3
step
ROUTING THE STRANDS
Mark 1Mark 2
1-3/4 fids 1-1/2 fids
Rope A
Rope B
Mark 1
Bitter end
z
s
s
s
z
z
Rope B
Mark 1
z
s
z
s
z
s
Rope A
Mark 1
Mark 1
Mark 1
Mark 2
Mark 2
s
z
s
z
z
s
s
z
s
z
s
z
Mark 1
Mark 1
Mark 1
Mark 1
Entry pointExit points
Standing rope
4
step
From Rope A, pass the 3 closest strands to Rope B through Rope B, 1 or 2
picks down from Mark 1. Do not pull strands all the way through at this stage.
The strands enter at the entry point 2 picks from Mark 1, and exit at the exit
points 2 picks from the entry point.
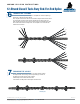
BURYING THE TAIL OF ROPE A INTO ROPE B