
User guide

PAGE 1 OF 3
SamsonRope.com | Email CustServ@SamsonRope.com | Tel +1.360.384.4669
8-Strand Class I Eye Splice
SAMSON SPLICING INSTRUCTIONS
8-strand ropes, also known as plaited ropes, are composed of 8 strands grouped into
4 pairs. 2 of these pairs turn to the left (shown in gray), and 2 pairs turn to the right
(shown in white.) Seen in this cross-section, the 4 strand pairs form the sides of a square.
The strands that are on opposite sides of the square will rotate in the same direction.
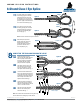
Tools RequiRed
A splicing d or marlinspike, sharp knife or scissors,
plastic or masking tape, marking pen.
Class I ropes are made from any or all of the following bers: olen, polyester, or nylon.
The eye splice is used to place a permanent loop in the end of a rope, generally for attachment
purposes to a xed point. An eye is also used to form the rope around a thimble, which is used
to protect the rope, especially when it is to be attached to a shackle, chain, or wire rope.
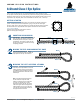
Bitter end of rope
Standing part of line
10 picks
1 Pick
GETTING STARTED
COUNTING AND MARKING
1
step
From the end of the rope, count a distance of 10
picks and apply tape securely around the rope
immediately after the 10th pick, as shown in
the illustration. This is Mark 1. Apply the tape
securely enough so that it will not move during
the splicing procedure.
Mark 1
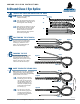
From the end of the rope; mark the rst
10-picks up to the tape at Mark 1. Continue
marking the length of the eye and at least
an additional 6 picks past Mark 2. Mark all
strands that rotate left on both sides of the
braided rope.
2
step
3
step
MAKING THE EYE AND MARKING THE ROPE
MARKING THE LEFT-ROTATING STRANDS
Form the desired size of the eye being
careful not to add twist to the rope. Mark the
rope adjacent to the tape. This is Mark 2.
Mark 2
Mark 1
Mark 2
Mark 1
Mark 2
Mark 1
Note: The strands that rotate left (gray)
can be marked for improved visual
reference. 8-strand ropes are composed
of 4 pairs of 2 strands each. 2 of the
strand pairs rotate to the left, and 2 pairs
rotate to the right. When marking the left-
rotating strands, be sure to turn the rope
over and mark the left-rotating strands on
the opposite side of the braid.
Turn rope
over