ITALIANO 400 Watt 2-Way Powered Loudspeakers ESPAÑOL DEUTSCHE FRANÇAIS ENGLISH
Safety Instructions TO PREVENT FIRE OR SHOCK HAZARD DO NOT USE THIS PLUG WITH AN EXTENSION CORD, RECEPTACLE OR OTHER OUTLET UNLESS THE BLADES CAN BE FULLY INSERTED TO PREVENT BLADE EXPOSURE. TO PREVENT FIRE OR SHOCK HAZARD. DO NOT EXPOSE THIS APPLIANCE TO RAIN OR MOISTURE. TO PREVENT ELECTRICAL SHOCK, MATCH WIDE BLADE PLUG TO WIDE SLOT AND FULLY INSERT. CAUTION: TO REDUCE THE RISK OF ELECTRIC SHOCK, DO NOT REMOVE COVER (OR BACK). NO USER-SERVICEABLE PARTS INSIDE.
Safety Instructions 1. Read these instructions. 2. Keep these instructions. 3. Heed all warnings. 4. Follow all instructions. 5. Do not use this apparatus near water. 6. Clean only with dry cloth. 7. Do not block any ventilation openings. Install in accordance with the manufacturer’s instructions. 8. Do not install near any heat sources such as radiators, heat registers, stoves, or other apparatus (including amplifiers) that produce heat. 9.
Consignes de sécurité ATTENTION: Pour éviter tout risque d’électrocution ou d’incendie, ne pas exposer cet appareil à la pluie ou à l’humidité. Pour éviter tout risque d’électrocution, ne pas ôter le couvercle ou le dos du boîtier. Cet appareil ne contient aucune pièce remplaçable par l'utilisateur. Confiez toutes les réparations à un personnel qualifié. Le signe avec un éclair dans un triangle prévient l’utilisateur de la présence d’une tension dangereuse et non isolée dans l’appareil.
Sicherheitsvorkehrungen ACHTUNG: Um die Gefahr eines Brandes oder Stromschlags zu verringern, sollten Sie dieses Gerät weder Regen noch Feuchtigkeit aussetzen.Um die Gefahr eines Stromschlags zu verringern, sollten Sie weder Deckel noch Rückwand des Geräts entfernen. Im Innern befinden sich keine Teile, die vom Anwender gewartet werden können. Überlassen Sie die Wartung qualifiziertem Fachpersonal.
Instrucciones de seguridad PRECAUCION: Para reducir el riesgo de incendios o descargas, no permita que este aparato quede expuesto a la lluvia o la humedad. Para reducir el riesgo de descarga eléctrica, nunca quite la tapa ni el chasis. Dentro del aparato no hay piezas susceptibles de ser reparadas por el usuario. Dirija cualquier reparación al servicio técnico oficial.
Istruzioni di Sicurezza ATTENZIONE: per ridurre il rischio di incendio o di scariche elettriche, non esponete questo apparecchio a pioggia o umidità. Per ridurre il pericolo di scariche elettriche evitate di rimuoverne il coperchio o il pannello posteriore. Non esistono all’interno dell’apparecchio parti la cui regolazione è a cura dell’utente. Per eventuale assistenza, fate riferimento esclusivamente a personale qualificato.
Table of Contents Introduction . . . . . . . . . . . . . . . . . . . . . . . . . . . . . . . . . . . . . . . . . . . . . . . . . . . . . . . . . 9 Auro D412/D415 Features . . . . . . . . . . . . . . . . . . . . . . . . . . . . . . . . . . . . . . . . . . . . . . . . 10 Quick Start . . . . . . . . . . . . . . . . . . . . . . . . . . . . . . . . . . . . . . . . . .
Introduction Each Auro PA system’s durable enclosure is made of high-impact polypropylene with a scuff-resistant textured finish, and include a heavy-grade steel grill, offering excellent protection against wear and tear for truly portable audio. The Auro active monitors are ideal for live music, DJ, lecture, and installed sound applications, or anywhere serious power and superior sound quality are desired.
Auro D412/D415 Features Here is a look at some the features of the Auro powered loudspeakers: • 400 watt, two-way active loudspeakers for live sound applications • 320W LF + 80W HF power amplifiers (peak) • Ultra-wide, flat frequency response • ustom-designed, heavy-duty, 12”/15” long throw low frequency drivers provide enhanced bass C response • 1.
Quick Start The following steps will help you set up your Auro D412/D415 loudspeakers. Setup 1. Turn the Level control on the rear panel fully counterclockwise. 2. Set the Bass and Treble EQ controls to the 12 o’clock position. 3. Turn the Power switch OFF. 3. Note: Always make sure that the AC outlet is configured with the correct voltage as indicated on the rear panel of the Auro loudspeaker. Operation 1. Switch the Auro’s Power switch to the ON position. 2.
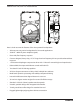
Rear Panel Layout 1. XLR Input Connector This female XLR connector accepts either a balanced microphone or line level signal. 2. 1/4” Input Connector Use this 1/4” input for connecting balanced microphone or balanced and unbalanced line level inputs. 3. Line Output Male XLR connector used to link multiple Auro cabinets. 4. Level Control This control adjusts the overall signal level at the input of the power amplifiers.
DEUTSCHE FRANÇAIS ENGLISH Connecting a Microphone Using a Microphone Be sure that the Auro D412/D415 Power switch is set to the off position. • Turn the LEVEL control fully counterclockwise to the off position. • Connect the power cable to an AC socket. • Using a standard XLR cable, plug a microphone into the Auro’s XLR INPUT. • Switch the Power switch to the ON position.
Connecting a Stereo Signal Source Using a Stereo Line Level Signal • Be sure that the Auro D412/D415 Power switch is set to the off position. • Turn the LEVEL control fully counterclockwise to the off position. • Connect the power cable to an AC socket. • Using standard XLR or 1/4” cables, connect the line level signals from a mixer or keyboard into the Auro Inputs. • Switch the Power switch to the ON position.
Linking two Auro cabinets per side: • Turn the LEVEL control fully counterclockwise to the off position. • Connect the left and right line-level outputs from a mixer to the inputs of two Auro loudspeakers. • Feed the Line Outputs to another pair of Auro loudspeaker inputs. • Now, run an audio signal from your mixer (like music from a CD) while slowly raising the Auro’s Level control until you have reached the desired level.
Positioning the Auro D412/D415 Speaker Placement Whenever possible, it is a good idea to raise the speakers above the heads of the listening audience. The Auro enclosures feature standard 1 3/8” pole mount receptacles with locking bolts, which are compatible with speaker stands from a variety of manufacturers.
Connections The Auro D412/D415 features balanced inputs and outputs, so connecting balanced and unbalanced signals is acceptable. Whenever possible, use balanced connections to other equipment to suppress interference.
Specifications D412 D415 Output Power Low Frequency RMS Power 200 W @ 8 ohms Peak Power 320 W @ 8 ohms THD High Frequency <1% RMS Power 50 W @ 8 ohms Peak Power 80 W @ 8 ohms THD <1% Transducers Low Frequency 12” bass transducer, 2.5” voice coil 15” bass transducer, 3” voice coil High Frequency 1.
Dimensions ENGLISH 13.5 in/ 342 mm 10.8 in/ 275 mm 17.75 in/ 450 mm FRANÇAIS 14 in/ 356 mm DEUTSCHE 27.5 in/ 698 mm ITALIANO ESPAÑOL 21.
Table des matières Introduction . . . . . . . . . . . . . . . . . . . . . . . . . . . . . . . . . . . . . . . . . . . . . . . . . . . . . . . . 21 Auro D412/D415 — Généralités . . . . . . . . . . . . . . . . . . . . . . . . . . . . . . . . . . . . . . . . . . . . 22 Mise en œuvre . . . . . . . . . . . . . . . . . . . . . . . . . . . . . . . . . . . . . . . . . . . .
Introduction Avec un entretien adapté et une ventilation suffisante, les enceintes Auro vous donneront satisfaction pendant de très nombreuses années. Prenez le temps de noter le numéro de série et la date d’achat ci-dessous pour toute référence ultérieure. Numéro de série : _______________________________ Date d’achat : ____________________________ Si vous devez faire réparer cet appareil, vous devez tout d’abord obtenir un numéro d’autorisation de retour auprès de nos services.
Auro D412/D415 — Généralités Voici quelques unes des fonctions des enceintes actives Auro : • Enceintes de sonorisation actives 2 voies de 400 Watts • 320 Watts pour le Woofer + 80 Watts pour le Tweeter (en crête) • Réponse en fréquence ultra-large et plate • Woofer de 12/15 pouces (31/38 cm) de construction spéciale, haute résistance, à longue élongation offrant une réponse étendue dans le bas du spectre • Tweeter à compression à membrane au titane de 34 mm avec couple acoustique de 25 mm of
Mise en œuvre Les étapes suivantes vous aident à utiliser rapidement vos enceintes Auro D412/D415. Mise en œuvre 1. Baissez le niveau Level de face arrière au minimum. 2. Réglez les boutons Bass et Treble en position centrale. 3. Placez l’interrupteur en position OFF. 1. Reliez un signal à niveau ligne en provenance de votre console de mixage (ou toute autre source), ou un micro à l’entrée Input de l’Auro D412/D415 (en face arrière). 2.
Face arrière 1. Entrée XLR Cette embase XLR femelle accepte les signaux symétriques à niveau micro ou ligne. 2. Entrée Jack 6,35 mm Utilisez cette entrée en Jack 6,35 mm un micro symétrique ou des signaux à niveau ligne symétriques ou asymétriques. 3. Sortie Ligne Cette embase XLR mâle vous permet de relier plusieurs enceintes Auro en série. 4. Bouton Level Ce bouton règle le niveau général en entrée des étages de puissance. Lorsque vous travaillez avec un signal à niveau ligne, utilisez la zone LINE.
DEUTSCHE FRANÇAIS ENGLISH Connexion d’un micro Utilisation d’un micro Placez l’interrupteur de l’Auro D412/D415 sur Off. • Baissez le niveau Level de face arrière au minimum. • Connectez le cordon d’alimentation fourni à l’embase IEC, à l’arrière de l’enceinte. Reliez la fiche secteur à une prise secteur murale. • Utilisez un câble XLR standard pour relier un micro à l’entrée XLR de l’Auro. • Placez l’interrupteur de l’Auro D412/D415 sur ON.
Connexion d’un signal stéréo Utilisation d’un signal stéréo à niveau ligne • Placez l’interrupteur de l’Auro D412/D415 sur Off. • Baissez le niveau Level de face arrière au minimum. • Connectez le cordon d’alimentation fourni à l’embase IEC, à l’arrière de l’enceinte. Reliez la fiche secteur à une prise secteur murale. • À l’aide d’un câble XLR ou Jack 6,35 mm standard, connectez les signaux à niveau ligne d’une console de mixage ou d’un clavier aux entrées des enceintes Auro.
ESPAÑOL DEUTSCHE FRANÇAIS ENGLISH Connexion de 2 enceintes par côté • Baissez le niveau Level de face arrière au minimum. • Reliez les sorties ligne gauche et droite de la console aux entrées des deux enceintes Auro. • Reliez les sorties Line Outputs à deux autres enceintes Auro comme indiqué sur l’illustration.
Positionnement des enceintes Auro D412/D415 Positionnement des enceintes Lorsque cela est possible, placez les enceintes au-dessus de la tête du public. Les enceintes Auro sont équipées de supports de pied d’enceintes à verrouillage, compatibles avec les pieds d’enceintes de nombreux fabricants.
Connexions Les enceintes Auro D412/D415 sont équipées d’entrées et de sorties symétriques, acceptant également des signaux symétriques. Lorsque cela est possible, utilisez des liaisons symétriques pour éviter toute interférence.
Caractéristiques techniques D412 D415 Puissance de sortie Basse fréquence Haute fréquence Efficace 200 W dans 8 Ohms Crête 320 W dans 8 Ohms DHT <1% Efficace 50 W dans 8 Ohms Crête 80 W dans 8 Ohms DHT <1% Haut-parleurs Basse fréquence Woofer de 31 cm, bobine de 63 mm Haute fréquence Woofer de 38 cm, bobine de, 76 mm Tweeter à compression au titane de 34 mm, bobine à fil cuivre Mesures acoustiques Réponse en fréquence (-3 dB) 58 Hz à 20 kHz 55 Hz à 20 kHz Pression sonore maximum 125
Dimensions ENGLISH 13.5 in/ 342 mm 10.8 in/ 275 mm 17.75 in/ 450 mm FRANÇAIS 14 in/ 356 mm DEUTSCHE 27.5 in/ 698 mm ITALIANO ESPAÑOL 21.
Inhalt Einleitung . . . . . . . . . . . . . . . . . . . . . . . . . . . . . . . . . . . . . . . . . . . . . . . . . . . . . . . . . . 33 Auro D412/D415 Features . . . . . . . . . . . . . . . . . . . . . . . . . . . . . . . . . . . . . . . . . . . . . . . . 34 Schnellstart . . . . . . . . . . . . . . . . . . . . . . . . . . . . . . . . . . . . . . . . . . . . .
Einleitung Auf diesen Seiten finden Sie eine detaillierte Aufstellung der Funktionen des Auro PA-Systems sowie eine Beschreibung der Vorder- und Rückseite, schrittweise Anleitungen für die Einrichtung und Anwendung plus umfassende technische Daten. Bitte vergessen Sie nicht, die beiliegende Garantiekarte ausgefüllt an uns zurückzusenden, damit Sie online technischen Support erhalten und wir Ihnen zukünftig aktuelle Informationen über dieses und andere Samson-Produkte zukommen lassen können.
Auro D412/D415 Features Die wichtigsten Features der Auro-Aktivboxen: • 2-Weg, 400-Watt Aktivboxen für die Live-Beschallung • 320 W LF + 80 W HF Endstufen (Spitzenleistung) • Ultrabreiter linearer Frequenzgang • Speziell entwickelte, hoch belastbare 12”/15” Basstreiber mit weiter Auslenkung verbessern den Bassfrequenzgang • 1,34” Kompressionstreiber mit Titanmembran und 1” Trichter für ausgewogene Höhenwiedergabe • Symmetrischer Mic/Line-Eingang mit Pegelregler und Peak LED • 2-Band LF
Schnellstart Die folgenden Schritte werden Ihnen bei der Inbetriebnahme Ihrer Auro D412/D415 Aktivboxen helfen. Einrichtung 1. Drehen Sie den rückseitigen Pegelregler ganz nach links. 2. Stellen Sie die Bass- und Treble EQ-Regler auf 12 Uhr ein. 3. Stellen Sie den Power-Schalter auf OFF ein. 2. Schließen Sie das mitgelieferte Netzkabel an den rückseitigen IEC-Eingang der Box an. Verbinden Sie das Netzkabel mit einer Netzsteckdose. 3.
Rückseite 1. XLR-Eingang Diese XLR-Buchse akzeptiert ein symmetrisches Signal mit Mikrofon- oder LinePegel. 2. 1/4” Eingang Diese 1/4”-Buchse akzeptiert symmetrische Mikrofonsignale oder symmetrische und asymmetrische Line-Pegel-Signale. 4 7 3. Line-Ausgang Über diesen XLR-Stecker lassen sich mehrere Auro-Boxen koppeln. 4. Pegelregler Damit stellen Sie den Gesamtsignalpegel am Eingang der Endstufen ein. Um ein LinePegel-Signal zu verstärken, drehen Sie den Regler von ganz links in Richtung 12 Uhr.
DEUTSCHE FRANÇAIS ENGLISH Mikrofon anschließen Achten Sie darauf, dass der Auro D412/D415 Netzschalter auf Off steht. • Drehen Sie den Pegelregler ganz nach links auf Off. • Verbinden Sie das Netzkabel mit einer Netzsteckdose. • Schließen Sie ein Mikrofon über ein standard XLR-Kabel an den XLR-Eingang der Auro an. • Stellen Sie den Netzschalter auf On. • Sprechen oder singen Sie ins Mikrofon und drehen Sie den Pegelregler langsam auf, bis die gewünschte Lautstärke erreicht ist.
Stereo-Signalquelle anschließen Stereosignal mit Line-Pegel verwenden • Achten Sie darauf, dass der Auro D412/D415 Netzschalter auf Off steht. • Drehen Sie den Pegelregler ganz nach links auf Off. • Verbinden Sie das Netzkabel mit einer Netzsteckdose. • Schließen Sie die Line-Pegel-Signale eines Mischers oder Keyboards über standard XLR- oder 1/4”-Kabel an die Auro-Eingänge an. • Stellen Sie den Netzschalter auf On. • Speisen Sie jetzt ein Audiosignal vom Mischer ein (z. B.
ESPAÑOL DEUTSCHE FRANÇAIS ENGLISH Zwei Boxen pro Seite koppeln • Drehen Sie den Pegelregler ganz nach links auf Off. • Verbinden Sie den linken und rechten Line-Pegel-Ausgang eines Mischers mit den Eingängen von zwei Auro-Boxen. • Speisen Sie die Line-Ausgänge in ein weiteres Paar von Auro-Boxeneingängen ein. • Speisen Sie jetzt ein Audiosignal vom Mischer ein (z. B. Musik von CD) und drehen Sie den AuroPegelregler langsam auf, bis die gewünschte Lautstärke erreicht ist.
Auro D412/D415 positionieren Boxenplatzierung Man sollte die Boxen möglichst immer über den Köpfen der Zuhörer platzieren. Die Auro-Gehäuse verfügen über standard 1 3/8” Ständerhalterungen mit Arretierstiften, die zu Boxenständern verschiedenster Hersteller kompatibel sind. In einem kleineren Setup, z. B.
Anschlüsse Da die Auro D412/D415 über symmetrische Ein- und Ausgänge verfügt, kann man symmetrische und asymmetrische Signale anschließen. Verwenden Sie möglichst immer symmetrische Verbindungen zu anderen Geräten, um Störungen zu unterdrücken.
Technische Daten D412 D415 Ausgangsleistung Bässe RMS 200 W @ 8 Ohm Peak 320 W @ 8 Ohm Klirrfaktor Höhen <1% RMS 50 W @ 8 Ohm Peak 80 W @ 8 Ohm Klirrfaktor <1% Wandler Bässe 12” Basswandler, 2,5” Schwingspule 15” Basswandler, 3” Schwingspule Höhen 1,34” (34 mm) Titan-Kompressionstreiber, hochkant gewickelte Kupferschwingspule Akustische Leistung Frequenzgang (-3 dB) 58 Hz bis 20 kHz 55 Hz bis 20 kHz Max.
Abmessungen ENGLISH 13,5" 342 mm 10,8" 275 mm 17,75" 450 mm FRANÇAIS 14" 356 mm DEUTSCHE 27,5" 698 mm ITALIANO ESPAÑOL 21,5" 546 mm Owner's Manual Auro D412/D415 43
Indice Introducción . . . . . . . . . . . . . . . . . . . . . . . . . . . . . . . . . . . . . . . . . . . . . . . . . . . . . . . . 45 Características de los Auro D412/D415 . . . . . . . . . . . . . . . . . . . . . . . . . . . . . . . . . . . . . . . 46 Arranque rápido . . . . . . . . . . . . . . . . . . . . . . . . . . . . . . . . . . . . . . . . . . . . . . . . .
Introducción La robusta carcasa de cada uno de estos sistemas PA Auro está fabricada con polipropileno de gran resistencia, con un acabado a toda prueba, e incluyen una robusta parrilla de acero, lo que le ofrece una excelente protección contra el desgaste y los golpes que conllevan un equipo audio totalmente portátil.
Características de los Auro D412/D415 Las características más destacadas de los altavoces autoamplificados Auro son las siguientes: • Altavoces activos de 2 vías y 400 watios para aplicaciones de sonido en directo • Etapas de potencia de 320 W LF + 80 W HF (picos) • Respuesta de frecuencia plana, ultra-amplia • Cabezales de graves de 12”/15” de diseño exclusivo, gran proyección y alto rendimiento que ofrecen una respuesta en graves ampliada • Cabezal de compresión con diafragma de titanio de
Arranque rápido Los siguientes pasos le ayudarán a configurar sus altavoces Auro D412/D415. Ajuste 1. Gire totalmente a la izquierda el control Level del panel trasero. 2. Ajuste los controles EQ Bass y Treble. 3. Coloque el interruptor Power en la posición OFF. 1. Conecte una señal de nivel de línea de su mesa de mezclas (o de cualquier otra fuente) o un micrófono a la toma Input del panel trasero del Auro D412/D415. 2.
Panel trasero 1. Conector de entrada XLR Este conector XLR hembra acepta una señal de línea o de micro balanceada. 2. Conector de entrada de 6,3 mm Utilice esta entrada de 6,3 mm para conectar entradas de nivel de línea balanceadas o no balanceadas o de micro balanceadas. 3. Line Output Este conector macho XLR le permite enlazar varios recintos acústicos Auro. 4. Control Level Ajusta el nivel global de la señal a la entrada de las etapas de potencia.
DEUTSCHE FRANÇAIS ENGLISH Conexión de un micrófono Uso de un micrófono Asegúrese de que el interruptor Power del Auro D412/D415 esté colocado en la posición off. • Gire el control LEVEL totalmente hacia la izquierda hasta la posición off. • Conecte el cable de alimentación a una salida de corriente. • Utilizando un cable standard XLR, conecte un micrófono a la toma de entrada XLR del Auro. • Coloque el interruptor Power en la posición ON.
Conexión de una fuente de señal stereo Uso de una fuente de señal de nivel de línea stereo • Asegúrese de que el interruptor Power del Auro D412/D415 esté colocado en la posición off. • Gire el control LEVEL totalmente hacia la izquierda hasta la posición off. • Conecte el cable de alimentación a una salida de corriente. • Utilizando cables standard XLR o de 6,3 mm, conecte las señales de nivel de línea procedentes de una mesa de mezclas o de un teclado a las entradas del Auro.
ESPAÑOL DEUTSCHE FRANÇAIS ENGLISH Enlace de dos altavoces por lado • Conecte las salidas izquierda y derecha de nivel de línea de una mesa de mezclas a las entradas de dos altavoces Auro. • Conecte las salidas Line a las entradas de otro par de altavoces Auro. • Ahora, haga pasar una señal audio desde su mezclador (como por ejemplo la música de un reproductor de CDs) mientras aumenta lentamente el ajuste del control Level del Auro hasta alcanzar el nivel deseado.
Colocación de los Auro D412/D415 Colocación sobre un soporte Siempre que sea posible, suele ser una buena idea elevar los altavoces por encima de la altura de las cabezas del público. Los recintos acústicos Auro disponen de casquillos standard para montaje en barra de 1 3/8” con tornillos de fijación, que son compatibles con soportes de altavoces de diversos fabricantes.
Conexiones El Auro D412/D415 dispone de entradas y salidas balanceadas, por lo que puede conectar señales balanceadas y no balanceadas. Cuando sea posible, utilice conexiones balanceadas a otros equipos para suprimir interferencias.
Especificaciones técnicas D412 D415 Potencia de salida Graves Potencia RMS 200 W @ 8 ohmios Potencia picos 320 W @ 8 ohmios THD Agudos <1% Potencia RMS 50 W @ 8 ohmios Potencia picos 80 W @ 8 ohmios THD <1% Transductores Graves transductor de graves de 12” , con bobina de voz de 2.5” transductor de graves de 15” , con bobina de voz de 3” Agudos cabezal compresión de titanio de 1.
Dimensiones ENGLISH 13.5 in/ 342 mm 10.8 in/ 275 mm 17.75 in/ 450 mm FRANÇAIS 14 in/ 356 mm DEUTSCHE 27.5 in/ 698 mm ITALIANO ESPAÑOL 21.
Introduzione Introduzione . . . . . . . . . . . . . . . . . . . . . . . . . . . . . . . . . . . . . . . . . . . . . . . . . . . . . . . . 57 Auro D412/D415 - Caratteristiche . . . . . . . . . . . . . . . . . . . . . . . . . . . . . . . . . . . . . . . . . . . 58 Uso Immediato . . . . . . . . . . . . . . . . . . . . . . . . . . . . . . . . . . . . . . . . . . . . .
Introduzione In queste pagine troverete una descrizione dettagliata delle caratteristiche dei sistemi PA Auro, la descrizione dei loro pannelli frontali e posteriori, istruzioni passo a passo per le loro configurazioni di collegamento e d’uso e le specifiche complete. Troverete anche inclusa la garanzia che vi preghiamo di compilare e inviare per posta, per permettervi di ricevere supporto tecnico in linea e informazioni aggiornate su questo e su altri futuri prodotti Samson.
Auro D412/D415 - Caratteristiche Ecco di seguito un giro d’orizzonte su alcune delle caratteristiche delle casse acustiche attive Auro. • Casse acustiche attive a due vie da 400 watt per applicazioni di amplificazione dal vivo. • Amplificatori di potenza da 320W FB e 80W FA (valori di picco). • Risposta in frequenza neutra e particolarmente estesa.
Uso Immediato Le istruzioni qui di seguito vi aiuteranno a configurare le vostre casse acustiche Auro D412/D415. Configurazione 1. Ruotate completamente in senso orario il controllo di Livello del panello posteriore. 2. Regolate i controlli di EQ su Bassi ed Acuti in posizione “a ore 12”. 3. Chiudete (OFF) l’interruttore di alimentazione. 3. Nota: accertatevi sempre che la presa in CA sia configurata per la tensione corretta, secondo quanto indicato sul pannello posteriore della cassa acustica Auro.
Il Pannello Posteriore 1. Connettore di Ingresso XLR - È un connettore XLR femmina bilanciato che accetta segnale dal un microfono o a livello di linea. 2. Connettore di Ingresso da 1/4” - Usate questo ingresso da 1/4” per il collegamento di un microfono bilanciato o di un segnale bilanciato o sbilanciato a livello di linea. 3. Uscita di Linea - Connettore XLR maschio che permette di collegare tra loro in cascata più casse Auro. 4.
L’Uso di un Microfono Accertatevi che l’Interruttore di Accensione della Auro D412/D415 sia in posizione di spegnimento (off ). • Ruotate il controllo di LIVELLO del tutto in senso antiorario, per chiuderlo. • Collegate il cavo di alimentazione ad una presa in CA. • Usando un cavo XLR standard, collegate un microfono all’INGRESSO XLR della Auro. • Portate l’Interruttore di Accensione in posizione di accensione (on).
Come Collegare una Sorgente in Stereo L’Uso di un Segnale Stereo a Livello di Linea • Accertatevi che l’Interruttore di Accensione della Auro D412/D415 sia in posizione di spegnimento (off ). • Ruotate il controllo di LIVELLO del tutto in senso antiorario, per chiuderlo. • Collegate il cavo di alimentazione ad una presa in CA. • Usando un cavo XLR o da 1/4” standard, collegate i segnali a livello di linea da un mixer o da una tastiera agli INGRESSI della Auro.
ESPAÑOL DEUTSCHE FRANÇAIS ENGLISH Come Collegare Due Casse per Canale Ecco come collegare due casse Auro per canale. Ruotatene i controlli di LIVELLO del tutto in senso antiorario, per chiuderlo. • Collegate le uscite destra e sinistra a livello di linea di un mixer agli ingressi di due casse Auro. • Collegatene le USCITE di Linea agli INGRESSI di un’altra coppia di casse Auro.
Il Posizionamento delle Auro D412/D415 Come Posizionare le Casse Quando è possibile, è sempre buona idea sollevare le casse al di sopra della testa degli ascoltatori. Le casse acustiche Auro dispongono di ricettacolo standard per il montaggio su aste da 1 3/8” con viti di fissaggio, compatibile con aste per casse di vari costruttori.
I Collegamenti Le Auro D412/D415 dispongono di ingressi ed uscite bilanciati per cui è possibile effettuare collegamenti di segnali sia bilanciati che sbilanciati. Quando è possibile, usate collegamenti bilanciati verso gli altri apparecchi, per eliminare possibili interferenze.
Specifiche D412 D415 Potenza in Uscita Basse Frequenze Potenza RMS 200 W @ 8 ohm Pot. di Picco 320 W @ 8 ohm THD Frequenze Acute <1% Potenza RMS 50 W @ 8 ohm Pot. di Picco 80 W @ 8 ohm THD <1% Trasduttori Basse Frequenze da 12” con bobina voce da 2.
Dimensioni ENGLISH 13.5 in/ 342 mm 10.8 in/ 275 mm 17.75 in/ 450 mm FRANÇAIS 14 in/ 356 mm DEUTSCHE 27.5 in/ 698 mm ITALIANO ESPAÑOL 21.
Samson Technologies Corp. 45 Gilpin Avenue Hauppauge, New York 11788-8816 Phone: 1-800-3-SAMSON (1-800-372-6766) Fax: 631-784-2201 www.samsontech.