
Operation Manual
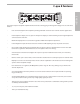


ENGLISH
6
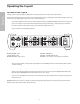
Setting up your C•que 8 Headphone Amplifier is a simple procedure, which takes only a few minutes.
Remove all packing materials (save them in case of need for future service) and plug the provided AC adapter cord in the
rear AC inlet, but don’t plug the power cable into a wall outlet just yet.
• Connect the output from the device you want monitored to the Left/Right LINE INPUT jacks on the C•que 8 rear
panel. The C•que 8 accepts both balanced and unbalanced signals. Generally, a balanced signal is preferable
because it provides better signal-to-noise ratio and reduced extraneous noise.
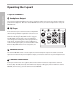
• Set the controls to the following positions:
MASTER VOLUME – Off
ST/2CH SWITCH – Out
MASTER BALANCE- Center, 12:00
CHANNEL 1 VOLUME – 0
CHANNEL 1 SHAPE SWITCH- Out
CHANNEL 2 - 4’s Controls - Set the Same as Channel 1
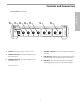
MAIN
INJECT
VOLUME BALANCE
2 CH
STEREO
SHAPE
OUT
SHAPE
OUT
CH 1
OL
0
-6
-12
-18
-24
OL
0
-6
-12
-18
-24
CH 1
CH 2
SHAPE
OUT
SHAPE
OUT
OL
0
-6
-12
-18
-24
CH 3 CH 4
4 CHANNEL
HEADPHONE AM
P
CH 2
CH 3
CH 4
VOLUME
VOLUME
VOLUME
VOLUME
0 10
0 1
0
0 1
00 10 L R
0 1
0
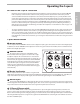
• Turn the master Volume knob and all four headphone Channel Output knobs to their minimum (fully counter-
clockwise) setting.
• Plug the C•que 8 power adapter into a wall outlet and switch the unit on by pressing the power switch.
• Apply a signal, like the output of a mixer playing a CD, to the C•que 8’s rear-panel Left/Right LINE INPUT jacks.
Raise the master VOLUME until the main meter reaches -18 to -12 dB.
• Connect a set of headphones to Channel 1 and slowly turn the channel’s Volume knob clockwise until you hear
the desired level.
WARNING:
Because the C•que 8 is capable of generating extremely high volume levels, always start with the channel
Volume knob at minimum and then slowly turn it up.