Safety Instructions/Consignes de sécurité/Sicherheitsvorkehrungen WARNING: To reduce the risk of fire or electric shock, do not expose this unit to rain or moisture. To reduce the hazard of electrical shock, do not remove cover or back. No user serviceable parts inside. Please refer all servicing to qualified personnel.
Instrucciones de seguridad / Istruzioni di Sicurezza PRECAUCION: Para reducir el riesgo de incendios o descargas, no permita que este aparato quede expuesto a la lluvia o la humedad. Para reducir el riesgo de descarga eléctrica, nunca quite la tapa ni el chasis. Dentro del aparato no hay piezas susceptibles de ser reparadas por el usuario. Dirija cualquier reparación al servicio técnico oficial.
Table of Contents Introduction. . . . . . . . . . . . . . . . . . . . . . . . . . . . . . . . . . . . . . . . . . . . . . . . . . . . . . . . . . . . . . . . . . . . . . . . 1 Live Series Features. . . . . . . . . . . . . . . . . . . . . . . . . . . . . . . . . . . . . . . . . . . . . . . . . . . . . . . . . . . . . . . . . 2 L612 and L615 Layout. . . . . . . . . . . . . . . . . . . . . . . . . . . . . . . . . . . . . . . . . . . . . . . . . . . . . . . . . . . . . . . 3 L1212 and L1215 Layout . . . . .
Introduction Congratulations on purchasing the Samson Live Series active loudspeaker! By combining super clean power, advanced active processing and the highest quality speaker and cabinet components, the Live Series provides studio quality sound for any kind of live sound reinforcement application. The Live Series product range includes five enclosures, the L612, L612M, L615, L1212 and L1215, and this manual covers the operation and specifications of each model.
Live Series Features The Samson Live Series active two-way loudspeakers are an all-in-one solution, ideal for most any live sound applications. Here are some of their main features: • Two-way active, Bi-amped professional loudspeaker enclosures. • The LIVE series enclosures feature custom designed, heavy-duty, low frequency drivers with a single 12inch in the L612 and L612M, dual 12-inch in the L1212, single 15-inch in the L615 and dual 15-inch in the L1215.
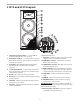
L612 and L615 Layout 1. Titanium Compression Driver – 1.75 inch (44mm), titanium diaphragm with 1 inch opening. 13. LINE LEVEL – Used to control the level of the line input. 2. Wide Dispersion Horn – 1 inch throat, 60 x 90 degree wide dispersion horn provides extensive coverage and linear off-axis response. 14. LOW FREQUENCY - Controls the low band of the Channel Equalizer, +/- 12 dB at 100Hz. 15. HIGH FREQUENCY - Controls the high band of the Channel Equalizer, +/- 12 dB at 10kHz. 3.
L1212 and L1215 Layout Amplifier Panel Rear View 1. Titanium Compression Driver – 1.75 inch (44mm), titanium diaphragm with 1 inch opening. 9. H eat sink - Convection cooling of the internal power amplifier via massive aluminum extrusion. 2. Wide Dispersion Horn – 1 inch throat, 60 x 90 degree wide dispersion horn provides extensive coverage and linear off- axis response. 10. LINE INPUT connector - XLR Input for connecting balanced line level signals. 3.
L612M Layout Amplifier Panel Rear View 9. AC Power inlet / Fuse Sled – Connect the supplied standard IEC AC power cable here. 10. VOLTAGE switch - Used to change the operating voltage from 115 to 230 volts. IMPORTANT NOTE! Bure sure to confirm and install the properly rated fuse when changing the operating voltage. (See above AC Power Inlet). 11. POWER – Switches on the L612Ms main power. 12. Heat sink - Convection cooling of the internal power amplifier via massive aluminum extrusion.
L612 and L615 Quick Set-Up In the following pages of this manual, you will find a detailed explanation of all the Live Series functions and controls, but if you just want to get started quickly with the L612 and L615 you can follow the steps below. Using a Microphone • Be sure that the Live Series Power switch is set to the off position. • Turn the LINE and MIC LEVEL controls fully counterclockwise to the off position. • Connect the power cable to an AC socket.
L1212 and L1215 Quick Set-Up In the following pages of this manual, you will find a detailed explanation of all the Live Series functions and controls, but if you just want to get started quickly with the L1212 and L1215 you can follow the steps below. Using a Line Level Signal • Be sure that the Live Series speakers’ Power switch is set to the off position. • Turn the LINE controls fully counterclockwise to the off position. • Connect the power cables to an AC socket.
Positioning the Live Series Microphone Positioning - How to Reduce Feedback Feedback is the annoying howling and squealing that is heard when the microphone gets too close to the speaker and the volume is high. You get feedback when the microphone picks up the amplified signal from the speaker, and then amplifies through the speaker again, and then picks it up again, and so on and so on. In general, it is always recommended that any live mic (a mic that’s on) is positioned behind the speaker enclosures.
Operating the Live Series Controls and Functions The following section details each part of the LIVE series INPUT section including the MIC and LINE inputs, the two-band EQ, as well as the MIC and LINE LEVEL controls. 1. MIC LEVEL (L612 and L615 only) The L612 and L615’s MIC LEVEL controls the overall level of the microphone input. Raise the MIC Level to adjust the volume of the microphone connected to the MIC input.
Operating the Live Series Controls and Functions - continued 7. OUTPUT SWITCH The Output switch is used to select the signal that is sent to the Line Output. You can have either a parallel output directly from the Line input, or a mixed signal including the Mic and line inputs plus the EQ and limiter. When the switch is in the up position, the signal on the Line Output is exactly the same as the signal on the Line Input.
Live Series System Set-ups L612 and L615 Compact Lounge PA for Two This example shows a PA system set-up that can be used for a small club, at a ceremony or in a lounge, using a single Live Series for both a microphone and vocal. A separate signal is sent from the vocal microphone to the L612 or L615’s Mic input, and from the keyboard to the Live Series’ Line input. The individual Mic and Line level controls allow you to create a mix right on the Live Series.
This example shows a typical PA system using mixer with a pair of Live Series for the main left and right mix. A separate signal from the mixer’s AUX/MONITOR bus is sent to two additional Live Series monitors. In order to increase the output of the monitor system, the use of an external graphic equalizer like one of the Samson “D Class” or “S curve” series is highly recommended.
LIVE! Series Wiring Guide Connecting The Live Series The are several ways to interface the Live Series to support a variety of applications. The Live Series features balanced inputs and outputs, so connecting balanced and unbalanced signals is possible.
Specifications L612 Inputs Microphone . . . . . . . . . . . . Balanced XLR Line . . . . . . . . . . . . . . . . . . . . Balanced XLR Outputs Extension . . . . . . . . . . . . . . . Balanced XLR Controls Mic Level . . . . . . . . . . . . . . . . Rotary Line Level . . . . . . . . . . . . . . . Rotary Low EQ . . . . . . . . . . . . . . . . . Rotary Center Detent, +/- 12dB @100Hz High-EQ . . . . . . . . . . . . . . . . Rotary Center Detent, +/- 12dB @ 10kHz Output Switch . . . . . . . . . .
Samson Technologies Corp. 45 Gilpin Avenue Hauppauge, New York 11788-8816 Phone: 1-800-3-SAMSON (1-800-372-6766) Fax: 631-784-2201 www.samsontech.