
Instruction Manual


PAGE 1 OF 4
SamsonRope.com | Email CustServ@SamsonRope.com | Tel +1.360.384.4669
Double Braid Class I Eye Splice
SAMSON SPLICING INSTRUCTIONS
Class I ropes are made from any or all of the following bers: olen, polyester, or nylon.
Note: This splice is not suitable for core-dependent double braid constructions (Double Braid Class II).
The eye splice is used to place a permanent loop in the end of a rope, generally for attachment purposes to a xed point. An eye is also used
to form the rope around a thimble, which is used to protect the rope, especially when it is to be attached to a shackle, chain or wire rope.
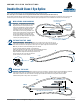
MEASURING AND MARKING
1
step
Tape end to be spliced with 1 thin layer of tape.
Then measure 1 tubular d length or 2 wire d
lengths from the end of the rope and mark.
This is Point R (Reference).From Point R form
a loop the size of the eye desired and mark.
This is Mark X where you extract the core
from inside the cover. If using a thimble, form
the loop around the thimble. Tie a tight slipknot,
or use a pin to keep the core and the cover
secure approximately 5 d lengths from Mark
X. At this point it is easier to anchor the rope to
a secure point just beyond the pin.
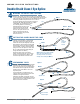
Again, slide the cover toward the slipknot to expose more core. From Mark 1, measure along the core toward Mark X a distance
equal to the short section of a tubular d (2 short sections if using a wire d) and make 2 heavy marks. This is Mark 2.
From Mark 2 measure in the same direction 1 d length plus another short section of the d (with a wire d, double
measurements) make 3 heavy marks. This is Mark 3.
2
step
3
step
EXTRACTING THE CORE
MARKING THE CORE
Bend the rope sharply at Mark X. With a pusher or any sharp tool such as an ice pick, awl, or
marlin spike, spread the cover strands to expose core. First pry, then pull the core completely out
of the cover from Mark X to the taped end of the rope. Put 1 layer of tape on the end of the core.
Note: Do your best to avoid overstretching the cover strands.
To assure correct positioning of Mark 1 do the following:
Holding the exposed core, slide cover as far back as possible toward the
tightly tied slipknot. Then, rmly smooth the cover back from the
slipknot toward the taped end. Smooth again until all cover
slack is removed. Then, mark the core where it
comes out of the cover. This is Mark 1.
To secure the cover and the core, tie a slipknot
about 5 fid lengths from Mark X
Core must be extracted from
cover at this point
Mark X
R
1 layer of tape
1 fid length
-or-
2 wire fids – up to 13" circ.
Form loop
desired size
cover
Mark 3
Mark 2 Mark 1
R
R
core
cover
Mark X
Mark X
Mark 1
1 layer of tape
Mark on fid
Short
section
of fid
1 fid length plus another short section
2 short sections with wire fid
Prying out the core
core