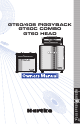
GT60/408 PIGGYBACK GT60C COMBO GT60 HEAD � � � � � � �� � � � � � � � � � � �� � � � � � �� �� � ��� � � ��� � �� �� �� � �� � ��� � � ��� �� � �� ���� �������������� ���� � � � � � � �� � � � � � � � � � � �� � � � � � �� �� � ��� � � ��� � �� �� �� � �� � ��� � � ��� � �� �� �� � �� � ��� � � ��� �� � �� � � � � � � �� � � � � �����
WARNING: To reduce the risk of fire or electric shock, do not expose this unit to rain or moisture. To reduce the hazard of electrical shock, do not remove cover or back. No user serviceable parts inside. Please refer all servicing to qualified personnel.
ATTENTION: Pour éviter tout risque d’électrocution ou d’incendie, ne pas exposer cet appareil à la pluie ou à l’humidité. Pour éviter tout risque d’électrocution, ne pas ôter le couvercle ou le dos du boîtier. Cet appareil ne contient aucune pièce remplaçable par l'utilisateur. Confiez toutes les réparations à un personnel qualifié. Le signe avec un éclair dans un triangle prévient l’utilisateur de la présence d’une tension dangereuse et non isolée dans l’appareil.
PRECAUCION: Para reducir el riesgo de incendios o descargas, no permita que este aparato quede expuesto a la lluvia o la humedad. Para reducir el riesgo de descarga eléctrica, nunca quite la tapa ni el chasis. Dentro del aparato no hay piezas susceptibles de ser reparadas por el usuario. Dirija cualquier reparación al servicio técnico oficial.
Table of Contents ENGLISH Introduction . . . . . . . . . . . . . . . . . . . . . . . . . . . . . . . . . . . . . . . . . . . . . . . . . . . . . . . . . . . . . . . . . . . 2 Hartke GT60 Guitar Amplifier Features . . . . . . . . . . . . . . . . . . . . . . . . . . . . . . . . . . . . . . . . . . 3 Guided Tour - Front Panel . . . . . . . . . . . . . . . . . . . . . . . . . . . . . . . . . . . . . . . . . . . . . . . . . . . . . . 4 Guided Tour - Rear Panel . . . . . . . . . . . . . . . . . . . . . . . . . .
ENGLISH Introduction We know you don’t like reading owners manuals, but you’ve just purchased one of the finest guitar amplifiers around, and we want to tell you about it! So, before you plug in and start strumming and shredding, we’d like to suggest you take just a few moments to scan these pages. We’ll make it as painless as possible, we promise—and, who knows, you might just pick up a tip or two.
Hartke GT60 Guitar Amplifier Features ENGLISH The Hartke GT60 Series amplifiers have been designed for modern guitar players looking for a new sound that respects the tone of a classic amp. Here are some of their main features: • The GT60 amplifier offers a roaring 60-Watts of power with a 2-channel front-end control section built around a tube pre-amp.
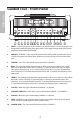
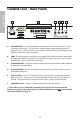
ENGLISH Guided Tour - Front Panel ���� � � � � � � � � � �� � � � � � � � � � � � �� � � � � � � � � � � �� �� ��� ��� � � �� �� �� �������������� � � � � � � � � � �� � � � � � � ��� � � � � ��� ����� ���� � � �� �� �� � � � � � � �� �� � � � � � � � �� �� ��� ��� �� � � � � � �� �� ��� ��� � � � � �� �� �� �� �� �� �� �� ��� ��� �� �� � � � � � � � � � �� �� �� �� �� 1 INPUT - Connect your guit
Guided Tour - Front Panel BASS - This control provides approximately 15 db of cut or boost at 100 Hz, with a peak (bell) curve. When the knob is at the 12 o’clock ("5") position, there is no boost or attenuation (that is, flat response). As it is turned clockwise from the "5" position, the frequency area is boosted; as it is turned counterclockwise from the "5" position, the frequency area is attenuated. 12 MID - This control provides approximately 15 db of cut or boost at 2.
ENGLISH Guided Tour - Rear Panel A B C D E F A. AC POWER INLET - Use the supplied grounded AC power cord to connect your GT Series amplifier to mains power. This cord comes supplied with the appropriate plug for your geographic area. CAUTION: Do not use an adapter to defeat the third grounding pin on this plug or severe electric shock may result! B. VENT - The Vent provides vital cooling to your Model GT60.
1. Remove all packing materials (save them in case of need for future service) and decide where the amplifier is to be physically placed. To avoid potential overheating problems, make sure that the rear panel is unobstructed and that there is good ventilation around the entire unit. 2. Before you plug-in the power cable, be sure the POWER switch is in the off (down) position. Connect the supplied power cable to the AC INLET located on the rear panel.
ENGLISH Setting Up and Using Your Hartke GT60 Guitar Amplifier 8. Adjust the CHANNEL 1 BASS and Treble equalizer controls to taste. (When you get a great setting that complement your instrument and playing style, it’s a good idea to write it down for future use.) 9. Now, press the CHANNEL SWITCH (or the footswitch) to select CHANNEL 2. 10.
Using the Footswitch Jack and Effects Loop 15. The Hartke GT60 has a footswitch jack located on the rear chassis panel. You can connect a standard footswitch terminated with a 1/4-inch phone plug, readily available at your musical instrument retailer, so that channel switching is hands-off easy. 9 ENGLISH 14.
Introduction FRANÇAIS Nous savons que vous n’aimez pas lire les modes d’emploi, mais vous venez d’acheter l’un des amplificateurs guitare les plus sophistiqués du marché, et nous tenons à vous le faire découvrir. Ainsi, avant de le connecter et de commencer à l’utiliser, nous vous suggérons de prendre quelques minutes pour parcourir ces pages. Nous essaierons de rendre cette lecture aussi agréable que possible et, qui sait, peut-être apprendrez-vous quelques astuces qui pourront vous être utiles.
Hartke GT60 - Caractéristiques • Les amplificateurs GT60 offrent une puissance impressionnante de 60 Watts et sont équipés de deux canaux, d’une section de réglage en face avant et d’un préamplificateur à lampes. • Le Stack est composé d’une tête GT60 et d’une mini-enceinte GH408 inclinée pourvue de quatre haut-parleurs Hartke GXL de 203 mm conçus spécialement (20 Watts). • Le combo GT60C est équipé d’un haut-parleur Hartke GXL12 de 305 mm (75 Watts) monté dans un baffle fermé/ouvert à l'arrière.
Présentation de la face avant ���� � � � � � � � � � �� FRANÇAIS � � � � � � � � � � � �� � � � � � � � � � � �� �� ��� ��� � � �� �� �� �������������� � � � � � � � � � �� � � � � � � ��� � � � � ��� ����� ���� � � �� �� �� � � � � � � �� �� � � � � � � � �� �� ��� ��� �� � � � � � �� �� ��� ��� � � � � �� �� �� �� �� �� �� �� ��� ��� �� �� � � � � � � � � � �� �� �� �� �� 1 ENTRÉE - Reliez votr
Présentation de la face arrière BASS - Ce réglage permet jusqu’à 15 dB d’atténuation/accentuation à 100 Hz, avec une courbe en cloche. Lorsque le bouton est placé sur la position centrale ("5"), aucune modification n’est apportée. Tournez-le à droite du repère "5" pour accentuer les fréquences ; tournez-le à gauche du repère "5" pour les atténuer. 12 MID - Ce réglage permet jusqu’à 15 dB d’atténuation/accentuation à 2,5 kHz, avec une courbe en cloche.
Présentation de la face arrière FRANÇAIS A B C D E F A. EMBASE SECTEUR - Utilisez cette embase pour connecter le cordon secteur fourni, et reliez l’autre extrémité à une prise secteur. La fiche du cordon correspond au type de prise de votre zone géographique. MISE EN GARDE : Pour éviter les risques d’électrocution, n’utilisez pas d'adaptateur qui ne transmettent pas la terre ! B. VENTILATION - Les orifices de ventilation assurent le refroidissement du GT60.
Configuration et utilisation de l’amplificateur guitare Hartke GT60 1. Sortez l’appareil de son emballage (conservez-le pour tout retour en atelier) et choisissez son emplacement. Pour éviter tout problème de surchauffe, assurez-vous que la face arrière ne soit pas obstruée et que la totalité de l’amplificateur soit suffisamment ventilée. FRANÇAIS 2. Veillez à ce que l’interrupteur POWER soit placé sur Off avant de connecter le cordon secteur.
Configuration et utilisation de l’amplificateur guitare Hartke GT60 8. Réglez les boutons d’égalisation BASS et TREBLE du canal 1 à votre convenance. Lorsque vous trouvez des réglages donnant de bons résultats avec le son de votre instrument et votre style de jeu, notez-les afin de les utiliser ultérieurement. FRANÇAIS 9. Appuyez ensuite sur la touche CHANNEL SWITCH (ou la pédale) pour sélectionner le canal 2. 10.
Utilisation d’une pédale et d’une boucle d’effets 15. La face arrière des Hartke GT60 comporte un connecteur pour pédalier. Vous pouvez y relier un pédalier standard muni d’un Jack 6,35 mm, disponibles dans n’importe quelle boutique d’instruments de musique, afin de pouvoir sélectionner les canaux pendant que vous jouez. 17 FRANÇAIS 14.
Einleitung DEUTSCHE Wir wissen, dass Sie nicht gerne Bedienungsanleitungen lesen, aber Sie haben gerade einen der besten Gitarrenverstärker gekauft und wir wollen Ihnen etwas über ihn erzählen! Bevor Sie also Ihr Instrument anschließen und losrocken, sollten Sie diesen Seiten etwas Aufmerksamkeit widmen. Wir machen es auch so schmerzlos wie möglich – und bestimmt werden Sie von dem einen oder anderen Tipp profitieren.
Features des Hartke GT60 Gitarren-Amps Die Amps der Hartke GT60 Series wurden für moderne Gitarristen entwickelt, die nach einem neuen Sound suchen, der den Klang eines klassischen Verstärkers weiterentwickelt. Zu den Haupt-Features zählen: Der GT60 Amp bietet stürmische 60 Watt Leistung und verfügt über ein 2-kanaliges vorderseitiges Bedienfeld, das auf einen Röhrenvorverstärker ausgerichtet ist.
Geführter Rundgang - Vorderseite ���� � � � � � � � � � �� � DEUTSCHE � � � � � � � � � � �� � � � � � � � � � � �� �� ��� ��� � � �� �� �� �������������� � � � � � � � � � �� � � � � � � ��� � � � � ��� ����� ���� � � �� �� �� � � � � � � �� �� � � � � � � � �� �� ��� ��� �� � � � � � �� �� ��� ��� � � � � �� �� �� �� �� �� �� �� ��� ��� �� �� � � � � � � � � � �� �� �� �� �� 1 INPUT - An diese
Geführter Rundgang - Vorderseite 11 BASS - Dieser Regler liefert etwa 15 dB Bedämpfung/Verstärkung bei 100 Hz, mit einer Peak (Glocke) Kurve. In der 12 Uhr Position ("5") erfolgt keine Bedämpfung/Verstärkung (d. h. linearer Frequenzgang). Bei einer Rechtsdrehung aus der "5" Position wird der Frequenzbereich verstärkt, bei einer Linksdrehung wird der Frequenzbereich bedämpft. 12 MID - Dieser Regler liefert etwa 15 dB Bedämpfung/Verstärkung bei 2.5 kHz, mit einer Peak (Glocke) Kurve.
Geführter Rundgang - Rückseite DEUTSCHE A B C D E F A. NETZANSCHLUSS - Schließen Sie Ihren Amp der GT Series über das mitgelieferte geerdete Netzkabel an eine Netzsteckdose an. Das Kabel wird mit dem für Ihr Land geeigneten Stecker ausgeliefert. VORSICHT: Setzen Sie den dritten Erdungsstift dieses Steckers nicht mit einem Adapter außer Kraft, da dies zu ernsthaften Stromschlägen führen kann! B. BELÜFTUNG - Über diese Lüftungsschlitze wird Ihr Model GT60 gekühlt.
Hartke GT60 Gitarren-Amp einrichten und einsetzen 1. Entfernen Sie das gesamte Verpackungsmaterial (bitte für zukünftige Wartungsarbeiten aufheben) und entscheiden Sie, wo der Amp physisch aufgestellt werden soll. Um Probleme durch Überhitzung zu vermeiden, sollte die Rückseite nicht blockiert und eine gute Belüftung um das gesamte Gerät herum sichergestellt sein. 2. Bevor Sie das Netzkabel einstecken, prüfen Sie, ob der POWER-Schalter deaktiviert ist (unten).
Hartke GT60 Gitarren-Amp einrichten und einsetzen 8. Stellen Sie den BASS- und Treble-EQ von CHANNEL 1 wunschgemäß ein. (Wenn Sie eine Einstellung finden, die gut zu Ihrem Instrument und Spielstil passt, sollten Sie sie für spätere Gelegenheiten notieren.) 9. Drücken Sie jetzt den CHANNEL-SCHALTER (oder den Fußschalter), um CHANNEL 2 zu wählen. 10.
Footswitch-Buchse und Effects Loop einsetzen 14. Um einen professionellen, externen Signalprozessor mit Line-Pegel-Eingängen und -Ausgängen anzuschließen, schalten Sie Ihren GT Series Amp vorübergehend aus und verlegen Sie ein standard Audiokabel zwischen der rückseitigen EFFECTS SEND-Buchse und dem Effektprozessor-Eingang sowie ein weiteres standard Audiokabel zwischen der EFFECTS RETURN-Buchse und dem Effektproszessor-Ausgang.
Introducción Sabemos que detesta leer manuales de instrucciones, pero acaba de adquirir uno de los mejores amplificadores de guitarra posibles, y queremos que lo tenga bien claro! Por ese motivo, antes de que lo conecte y empiece con sus riffs y acordes, nos gustaría que dedicase un momento a hojear estas páginas. Haremos que le resulte lo más agradable posible, prometido—e incluso puede que, al final, aprenda un par de cosas nuevas.
Características del amplificador de guitarra Hartke GT60 Los amplificadores Hartke GT60 Series han sido diseñados para guitarristas de hoy en día que busquen un sonido nuevo pero que respete al de los clásicos. Estas son algunas de sus características principales: El amplificador GT60 le ofrece 60 increíbles watios de potencia con una sección de control de 2 canales creada alrededor de un previo a válvulas.
Recorrido guiado - Panel frontal ���� � � � � � � � � � �� � ESPAÑOL � � � � � � � � � � �� � � � � � � � � � � �� �� ��� ��� � � �� �� �� �������������� � � � � � � � � � �� � � � � � � ��� � � � � ��� ����� ���� � � �� �� �� � � � � � � �� �� � � � � � � � � � � � �� �� ��� ��� �� � �� �� ��� ��� � � � � �� �� �� �� �� �� �� �� ��� ��� �� �� � � � � � � � � � �� �� �� �� �� 1 INPUT - Conecte su
Recorrido guiado - Panel frontal 11 BASS - Este control permite aproximadamente 15 dB de corte o realce a 100 Hz, con una curva de pico (campana). Cuando el mando esté aproximadamente en la posición de las 12 en punto ("0"), no habrá ni corte ni atenuación (es decir, tendrá respuesta plana). Conforme lo gire a la derecha desde la posición "0", esa zona de frecuencias será realzada; cuando lo gire a la izquierda desde la posición "0", la zona de frecuencias será atenuada.
Recorrido guiado - Panel trasero ESPAÑOL A B C D E F A. ENTRADA DE CORRIENTE AC - Use el cable de alimentación con toma de tierra que se incluye con esta unidad para conectar su amplificador GT Series a la corriente eléctrica. Este cable viene de fábrica con el tipo de enchufe adecuado para su país. CUIDADO: No use un adaptador para anular la toma de tierra de este enchufe, ya que el hacerlo supone un grave riesgo de sufrir descargas eléctricas! B.
Configuración y uso de su amplificador de guitarra Hartke GT60 1. Extraiga la unidad de su embalaje (pero consérvelo por si lo necesita en el futuro) y escoja el lugar en el que ubicar físicamente la unidad. Para evitar posibles problemas de recalmentamientos, asegúrese de que el panel trasero no quede tapado por nada y que haya una buena ventilación alrededor de toda la unidad. 2. Antes de conectar el cable de corriente, asegúrese de que el interruptor POWER esté en off (abajo).
Configuración y uso de su amplificador de guitarra Hartke GT60 8. Ajuste a su gusto los controles del ecualizador BASS y TREBLE del canal 1. (Cuando haya conseguido un ajuste que complemente perfectamente su estilo y gustos, resulta una buena idea apuntarlo para poder volver a usarlo en el futuro). 9. Pulse ahora el interruptor CHANNEL (o el pedal) para elegir ahora CHANNEL 2. 10.
Uso de la toma Footswitch y del bucle de efectos 14. Si está usando un procesador de efectos exterior que tenga entradas y salidas de nivel de línea, apague momentáneamente su amplificador GT Series y conecte un cable audio standard entre la toma EFFECTS SEND del panel trasero y la entrada de su procesador y otro cable audio standard entre la entrada EFFECTS RETURN y la salida de su procesador. (Si es necesario, puede conectar en cadena varias unidades de efectos, salida a entrada).
Introduzione Sappiamo che non ami leggere i manuali d'uso, ma dato che hai appena acquistato uno dei migliori amplificatori per chitarra attualmente presenti sul mercato, desideriamo parlartene descrivendone le caratteristiche! Quindi, prima di collegare la chitarra e cominciare a suonare, vorremmo che spendessi qualche momento nella lettura di queste pagine: siamo certi che le troverai meno noiose di quanto pensi—e forse troverai qualche suggerimento prezioso.
Amplificatore per chitarra Hartke GT60 Caratteristiche Gli amplificatori Hartke della Serie GT60 sono stati creati per il chitarrista moderno alla ricerca di un suono nuovo, ma rispettoso della sonorità del passato. Ecco alcune delle caratteristiche principali: L'amplificatore GT60 offre 60-Watt di potenza ruggente, con una sezione a 2-canali dotata di controlli sul pannello frontale e basata su un preamplificatore valvolare.
Tour Guidato - Pannello Frontale ���� � � � � � � � � � �� � ITALIANO � � � � � � � � � � �� � � � � � � � � � � �� �� ��� ��� � � �� �� �� �������������� � � � � � � � � � �� � � � � � � ��� � � � � ��� ����� ���� � � �� �� �� � � � � � � �� �� � � � � � � � �� �� ��� ��� �� � � � � � �� �� ��� ��� � � � � �� �� �� �� �� �� �� �� ��� ��� �� �� � � � � � � � � � �� �� �� �� �� 1 INPUT - Connettor
Tour Guidato - Pannello Frontale 11 BASS - Questo controllo permette di effettuare il taglio o l'esaltazione della frequenza 100 Hz di circa 15dB, con una curva Peak (a campana). Quando la manopola è in posizione "a ore 12" ("5"), non avverrà alcun taglio o esaltazione (la risposta sarà 'flat'). Ruotando il controllo in senso orario dalla posizione "5", l'area di frequenza verrà esaltata ("boost"); ruotando in senso anti-orario dalla posizione "0", l'area di frequenza sarà attenuata.
Tour Guidato- Pannello Posteriore ITALIANO A B C D E F A. CONNESSIONE D'ALIMENTAZIONE CA - Utilizza il cavo d'alimentazione fornito in dotazione per collegare l'amplificatore GT Series ad una presa di corrente. Questo cavo d'alimentazione è dotato della spina di corrente appropriata alla tua zona geografica. CAUTELA: per evitare eventuali scosse elettriche, non utilizzare alcun adattatore che potrebbe annullare il terzo polo della presa dedicato alla messa a terra! B.
Configurare e utilizzare l'amplificatore per chitarra Hartke GT60 1. Estrarre tutto il materiale contenuto nell'imballo (conservando quest'ultimo per eventuali necessità future di assistenza tecnica) e decidere dove collocare fisicamente l’amplificatore. Per evitare problemi potenziali di surriscaldamento, assicurarsi che il pannello posteriore non sia ostruito e che ci sia una ventilazione adeguata attorno all’unità. 2.
Configurare e utilizzare l'amplificatore per chitarra Hartke GT60 8. Procedi a regolare i controlli dell'equalizzatore del CHANNEL 1, BASS e TREBLE (dopo aver ottenuto l'equalizzazione ottimale, che si adatta al tuo stile esecutivo o ad un particolare brano musicale, ti consigliamo di annotarla su carta per utilizzi futuri). 9. Ora, premi il selettore CHANNEL (oppure, agisci sull'unità footswitch) per selezionare il CHANNEL 2. 10.
Utilizzare la connessione Footswitch e l'Effects Loop 14.
GT60 Sample Settings The GT60/408 PIGGYBACK and the GT60C combo are powerful amps with a lot of personality. The amplifiers offer guitarist a wide range of sounds and after playing just a short time; you’ll find the tone that's perfectly suited for your playing style and your sound. To get you started, try some of the samples settings below. Don't forget to add a little (or a lot) REVERB to any of the settings.
GT60 Sample Settings CH-1 - TWEEDY ���� CH-1 - BLUES ���� CH-2 - NU-METAL ���� CH-2 - BACK IN BLACK ���� CH-2 - UN-CHAINED ���� CH-2 - 80's METAL ���� 43
Setting Templates CHANNEL 1 ���� CHANNEL 1 ���� CHANNEL 1 ���� CHANNEL 2 ���� CHANNEL 2 ���� CHANNEL 2 ���� CHANNEL 2 ���� 44
Specifications/Caractéristiques techniques/Technische Daten/Especificaciones técnicas/Specifiche ENGLISH 60 w Rated Output Power 1M OHM Input Impedance 200 mW (typical) @ 600 ohms 1/4-inch Phone Jack Headphone Output Connector Fuse Rating US & Japan UK & European Weight GT60 / GH408 GT60C Dimensions GT60C GT60 GT408 1A 2A 68 lbs. (30.9 kg) 26 lbs. (21.
Specifications/Caractéristiques techniques/Technische Daten/Especificaciones técnicas/Specifiche ESPAÑOL 60 W Potencia media de salida 1 MΩ Impedancia de entrada 200 mW (típico) @ 600 ohmios Conector de 6,3 mm de auriculares Salida de auriculares Conector Amperaje del fusible EE.UU. y Japón Reino Unido y Europa Peso GT60 / GH408 GT60C Dimensiones GT60C GT60 GT408 1A 2A 68 libras (30.9 kg) 26 libras (21.
Hartke 575 Underhill Blvd. P.O. Box 9031 Syosset, NY 11791-9031 Phone: 1-800-3-SAMSON (1-800-372-6766) Fax: 516-364-3888 www.hartke.