� � � � KM60100_ownman_v1.
Caution: To reduce the hazard of electrical shock, do not remove cover or back. No user serviceable parts inside. Please refer all servicing to qualified personnel. WARNING: To reduce the risk of fire or electric shock, do not expose this unit to rain or moisture.
Table of Contents Introduction 2 Hartke KM60 and KM100 Keyboard Amplifier Features 3 Guided Tour - Front Panel 4 Guided Tour - Rear Panel 6 Setting Up and Using Your KM60 and KM100 7 Using the Footswitch Jack and Effects Loop 9 KM60 and KM100 Sample Settings 10 Specifications 13 Copyright 2005, Samson Technologies Corp. Printed November, 2005 v1.2 Samson Technologies Corp. Phone: 1-800-3-SAMSON (1-800-372-6766) Fax: 516-364-3888 KM60100_ownman_v1.
Introduction Congratulations on purchasing the Hartke KM60 or KM100 Keyboard Amplifier! The KM60 and KM100 are perfect solutions for just about any keyboard player who needs a flexible mix /monitor system to handle a sophisticated instrument rig, and who demands a high quality amplifier that faithfully reproduces the sound, nuances, and soul, of their performance.
Hartke KM60 and KM100 Keyboard Amplifier Features � � � � The Hartke KM60 and KM100 keyboard amplifiers offer all the newest concepts in Keyboard amplification. Here are some of their main features: • Four Channel Keyboard mixer amplifier with 2-way speaker system. • Microphone input, plus 3 additional mono input channels. • The KM60 features 60 Watts of clean Hartke power while the KM100 provides 100 Watts, delivered to thier 2-way internal speaker system.
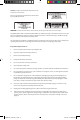
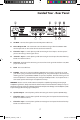
Guided Tour - Front Panel � � � � � � � � � � � 1. Channel 1 MIC IN - XLR input connector for connecting to Channel 1’s Low-noise Microphone Pre-amp. 2. AUX IN/CD - Your KM Series amplifier features a CD input which you can use with a portable CD player, cassette, mini disk or MP3 player. You can use the CD input to jam with prerecorded tracks or to learn a riff from a favorite recording. 3. Channel 1 Volume - Control knob is used to control the overall level of the Channel 1 input. 4.
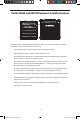
Guided Tour - Rear Panel � � �� � � � � � � � A AC INLET - Connect the supplied standard IEC power cable here. B. Direct Output XLR - This connector carries the Balanced signal from the KM60 or 100's mixer output and can be used to connect to the main PA mixer. C. Channel 3 Input - 1/4-inch phone jack for connecting line level inputs. Use this input if you are connecting a mono signal source. D.
Setting Up and Using Your Hartke KM60 and KM100 Keyboard Amplifier KM200 Basic Operation Setting up your Hartke KM60 or Km100 Keyboard amplifier is a simple procedure which takes only a few minutes: 1. Remove all packing materials (save them in case of need for future service) and decide where the amplifier is to be physically placed. To avoid potential overheating problems, be sure that the rear panel is unobstructed and that there is good ventilation around the entire unit. 2.
Setting Up and Using Your Hartke KM60 and KM100 Keyboard Amplifier 6. Set the output of your keyboard to about 3/4’s the way up and then, while playing, slowly turn the main Volume control up until the desired level is achieved. If you hear distortion even at low amplifier Master volume settings, back off the output of your Keyboard (or check for a faulty cable). 7. Next, experiment with the KM60 or KM100's graphic equalizer.
Using the KM60 and KM100's Set-ups Using the Direct Output The KM 60 and KM100 feature a Direct Out jack for connencting to the main PA systems. Use this electronically balanced XLR jack to route signal from the KM60 or KM100 to a professional mixing console or as a tap to a main PA system via a mic input on the console. The signal output from this jack is low impedance (100 ohm) with an output level of approximately -30 to -20 dB.
About Equalization The Hartke KM60 or KM100 Keyboard amplifier gives you enormous control over shaping the sound of your keyboard rig, using a process called equalization. To understand how this works, it’s important to know that every naturally occurring sound consists of a broad range of pitches, or frequencies, combined together in a unique way. This blend is what gives every sound its distinctive tonal color.
About Equalization Then, one by one, raise and lower each slider, listening carefully to the effect of each. Note that turning all EQ controls up the same amount will have virtually the same effect as simply turning up the main Volume; conversely, turning them all down the same amount will have virtually the same effect as turning down the main Volume.
Specifications Nominal Input Level Mic Input (CH1) Line Inputs ( CH1 - CH4) -50 dBu. -20 dBu. Nominal Output Level Line Out Stereo Line +4 dBu 0 dBu Rated Output Power KM60 KM100 60 watts 100 watts Total Harmonic Distortion less than .5% Equalizer Seven-Band Graphic (Main Output) ±12 dB, center @ 100 Hz, 250 Hz, 500 Hz, 1 kHz, 2.5 kHz, 5 kHz, 10 kHz Connectors Ch1-4 Input Mic Input Line Output Aux In Left and Right Headphone - St.
KM60 and KM100 Block Diagram 12 KM60100_ownman_v1.
KM60100_ownman_v1.
Hartke Phone:(1-800-372-6766) Fax: 516-364-3888 www.hartke.com KM60100_ownman_v1.