Operation Manual 8888
Safety Precautions/ Usage Precautions Safety Precautions/ Usage Precautions Safety Precautions In this manual, symbols are used to highlight warnings and cautions for you to read so that accidents can be prevented. The meanings of these symbols are as follows: This symbol indicates Warning explanations about extremely dangerous matters. If users ignore this symbol and handle the device the wrong way, serious injury or death could result. This symbol indicates Caution explanations about dangerous matters.
• Since the MRT-3 is a precision electronic device, avoid applying excessive force to the controls. Do not operate the keys or controls with your foot. • Take care that no foreign objects (coins or pins etc.) or liquids can enter the unit. • Be sure to turn the power to all equipment off before making connections. • Before moving the unit, turn the power off, and disconnect all cables and the AC adapter.
Contents Contents Safety Precautions/ Usage Precautions • • • • • • • • • • • • • • • • • • • • • • • • • 2 Introduction ••••••••••••••••••••••••••••••••••• 32 Recording Song Patterns •••••••••••••••• 33 •••••••••••••••••••••••••••••• 6 6 Changing the Song Volume ••••••••••••••••••••••••••••••••••• 6 Selecting a Dedicated Song Kit Getting Connected ••••••••••••••••••••••••• 7 Connection Example 1 •••••••••••••••••••• 7 Connection Example 2 •••••••••••••••••••• 7 Preparations •••••••••
Introduction Thank you for purchasing the ZOOM Micro RhythmTrak MRT-3 (subsequently referred to as "the MRT-3"). Introduction The MRT-3 offers the following attractive features. ● Sophisticated rhythm machine incorporates 199 super-realistic drum and percussion sounds in an amazingly compact body. A full 396 preset patterns contain a wide variety of preprogrammed rhythms. 99 additional patterns can be programmed and stored by the user. ● Create a backing sequence (song) with up to 99 patterns.
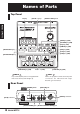
Names of Parts Top Panel [VALUE +/-] keys Display [OUTPUT LEVEL] knob Names of Parts 8888 [SONG] key (LED) [PATTERN] key (LED) [KIT] key (LED) [TEMPO] key (LED) [INSERT/COPY] key [REC] key (LED) [PLAY] key (LED) [STOP] key (LED) [DELETE/ERASE] key [PAD BANK] key (LED) Pads 1 – 7 (LEDs) N OTE [FUNCTION] key (LED) H INT Keys marked (LED) have an integrated LED that causes the key itself to light up.
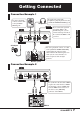
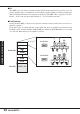
Getting Connected Connection Example 1 For mono playback, connect a mono cable to the [OUTPUT MONO] jack. To monitor the sound with headphones, plug the phones into the [OUTPUT STEREO/PHONES] jack. Headphones FS01 Getting Connected If you connect the optional foot switch FS01 to the [FOOT SW] jack, you can control start/stop and switch the sound of the MRT-3 with your foot.
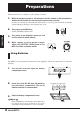
Preparations When connections are complete, set the volume as follows. Preparations 1. While the playback system is still turned off and the volume is fully turned down, double-check whether all connections have been made correctly. If cables are connected or disconnected while power is on, or if power is turned on with the volume turned up, damage to the speakers may occur. 2. Turn power to the MRT-3 on. Set the [POWER] switch to ON. 3.
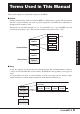
Terms Used in This Manual This section explains some important concepts of the MRT-3. ■ Pattern Playing a rhythm using sounds stored in the MRT-3 is called playing a pattern. The information stored in a pattern includes data such as pattern length, beat, and which kit (combination of drum/percussion sounds) is used. The patterns are organized in banks (A – D, U) and numbers (01 – 99). The MRT-3 has 396 read-only preset patterns (A01 – D99) and 99 read/write user patterns (U01 – U99).
■ Kit The MRT-3 lets you select 14 sounds from the built-in drum and percussion sources to use for playing with the pads. A combination of such sounds, together with pad sensitivity information and level/tuning information for each pad is called a kit. The MRT-3 has a capacity for 70 kits. Kits 01 – 50 are read-only preset kits and kits 51 – 70 are read/write user kits. ■ Pad/Pad Bank Each pad on the MRT-3 can be used to play the currently selected sound, and to record it as a phrase in a pattern.
Listening to the Demo Song The MRT-3 comes with a demo song already built in. Listen to this song to hear for yourself what the MRT-3 can do. 1. Press the [FUNCTION] key. The [FUNCTION] key flashes. 2. Press the [SONG] key. The indication "dEMo" appears on the display and the demo song starts. The display indication changes and the pads light up in sync with the song. The demo song is played repeatedly until you stop it. 3. To stop the demo song, press the [PATTERN] key or the [SONG] key.
Playing the Pads (Manual Play) The pads on the top panel of the MRT-3 each produce a different sound when hit. The sound depends on the currently selected kit and pad bank. Try hitting the pads to hear the realistic sounds of the MRT-3. 1. Press the [PATTERN] key. The [PATTERN] key lights up and the MRT-3 goes into pattern mode (in which rhythm pattern playback and recording can be carried out). 2. Hit any pad.
5. Use the [VALUE +/-] keys to select a kit number. The kit numbers are switched in the order 01P – 50P, 51U – 70U. Try hitting the pads and switching the pad bank to check out which sounds are available in the newly selected kit. 6. When you have found the desired kit, press the [PATTERN] key to return to the pattern mode.
Using Patterns (Pattern Mode) This section shows how to play and record patterns of the MRT-3 in pattern mode. Playing a Pattern The MRT-3 has 396 read-only preset patterns (A01 – D99) and 99 read/write user patterns (U01 – U99). To select and play a pattern, proceed as follows. N OTE In the factory default condition, all user patterns are empty. 1. Press the [PATTERN] key. The [PATTERN] key lights up and the MRT-3 goes into pattern mode.
4. Press the [PLAY] key. The [PLAY] key lights up and the pattern is played repeatedly. During playback, the [TEMPO] key flashes in sync with the tempo. The display shows the current position in the pattern (measure/beat). Measure Beat 01-3 H INT • While a pattern is playing, you can also manually play the pads. • While a pattern is playing, you can also switch to a different bank and pattern number. The new pattern will begin playing as soon as you switch to it. 5.
3. When the tempo is as desired, release the [TEMPO] key. 4. To specify the tempo manually, tap the [TEMPO] key twice or more in the desired tempo (tap input function). Tap twice If you tap the [TEMPO] key twice or more often while a pattern is playing or stopped, the tapping interval of the last two taps is taken as the quarter note tempo. This allows you to simply set the tempo in sync with a song. N OTE The tempo set in pattern mode applies to all patterns.
want to use for the pattern, recording can be carried out while automatically maintaining precise timing. 3. Use the [VALUE +/-] keys to set the quantize value (shortest note to be recorded). The following settings are available.
6. Adjust the tempo if necessary. The pattern tempo can be changed at any time. For recording a difficult phrase, it might be helpful to temporarily reduce the tempo. 7. Tap the pads in accordance with the metronome sound. The sound of the respective pad is heard, and it is recorded for the duration set with the quantize value. You can verify the current position in the pattern by checking the display.
Pattern Step Recording This section describes step recording, which allows you to enter and record each sound separately, step by step, while the MRT-3 is in the stop condition. Even without mastering how to play the pads in real time, you can easily create complex drum and bass patterns. And you don't need to stop there, because you can even create patterns that would be impossible to play in real time.
5. Press the [REC] key. The [REC] key and [START] key light up, indicating that the MRT-3 is ready for recording. 6. To enter a note, hit the pad corresponding to the desired sound. For example, tapping pad 1 will enter a bass drum note (pad 1 lights up). The tapping intensity will also be recorded. When you press the [REC] key, the current position advances by the minimum unit. You can verify the current position (measure/beat) in the pattern by checking the display. 7.
Changing User Pattern Resolution After Recording The resolution that is recorded together with the play information of a user pattern can be changed later. For example, when a user pattern was recorded without quantization, it can be later set to a sixteenth note for dynamic matching. 1. In pattern mode, select the user pattern for which you want to change the resolution. 2. Press the [FUNCTION] key and then pad 3 (QUANTIZE). The current quantize setting appears on the display. 3.
2 3. Use the [VALUE +/-] keys to set the new bar length. The bar length (number of measures) can be set in the range from 1 – 99. 4. Press the [FUNCTION] key. The pattern length is changed. When a recorded pattern was made shorter, the excess measures at the end of the pattern will be cut off. When a recorded pattern was made longer, blank measures will be added at the end of the pattern.
4. Press the [FUNCTION] key. The pattern beat is changed. Copying a Pattern The currently selected pattern (user pattern or preset pattern) can be copied to any other user pattern number. This is useful for example when wishing to change only a part of a pattern, or to add a fill-in phrase. 1. In pattern mode, select the pattern to be used as copy source.
N OTE • When the copy is executed, the existing contents of the user pattern selected as copy target will be erased. Make sure that the pattern you have selected is one that you don't mind erasing. • When the copy source is a user pattern, the same pattern is first selected after step 2. However, it is not possible to copy a pattern onto itself. 4. To execute the copy process, press the [INSERT/COPY] key. To cancel the process, press the [STOP] key.
3. To execute the erase process, press the [DELETE/ERASE] key. To cancel the process, press the [STOP] key. When erasing is completed, the unit returns to the pattern mode with the empty user pattern being selected. @05E If erasing was canceled, the unit returns to the pattern mode with the original user pattern being selected. Deleting All User Patterns If desired, you can erase all user patterns in one operation. N OTE Once you have deleted the user patterns, you will not be able to restore them.
Creating Your Own Kit (Kit Mode) This section describes how you can edit a user kit and copy any preset kit or user kit into another user kit. Editing a User Kit In kit mode, you can select a user kit and change parameters such as sound, level, and pitch assigned to each pad. 1. Press the [KIT] key. The [KIT] key lights up and the MRT-3 goes into kit mode. In this mode, you can select kits to use for patterns and songs, and you can create your own user kits.
■ Items for individual pads (instrument sound) • Pad 1 (PAD INST): • • • • • • • Select instrument sound for each pad • Pad 3 (INST TUNE): • • • • • Adjust instrument sound pitch • Pad 5 (INST PAN): • • • • • • • Adjust instrument sound panning (left/right stereo position) • Pad 7 (INST LEVEL): • • • • Adjust instrument sound level ■ Items common to entire kit • Pad 4 (KIT LEVEL): • • • • • • Overall kit level • Pad 6 (PAD SENS): • • • • • • Pad sensitivity (response to hitting intensity) for overall kit H
Kit Items This section describes the items that make up a kit, as well as their setting range. Pad 1: PAD INST Selects the instrument sound to be used for each pad. When this item is selected, a number for the general sound category and a number for each instrument sound is shown. Category number Pad number Instrument number 1212 Each push of the [VALUE +/-] keys moves the instrument number one increment up or down.
Pad 7: INST LEVEL Allows adjusting the level of an instrument sound assigned to a pad. Adjustment is possible over a range of 1 – 15. Pad number INST LEVEL value 1 10 Pad 4: KIT LEVEL Allows adjusting the level of the entire kit. This adjustment is relative to the INST LEVEL setting. Adjustment is possible over a range of 1 – 15. KIT LEVEL value 10 Pad 6: PAD SENS Allows adjusting the pad sensitivity for the entire kit. The following 7 settings are available.
Copying a Kit A kit of the MRT-3 (preset kit or user kit) can be copied to any other user kit number (51 – 70). This is useful for example when wishing to change only a part of a kit. 1. In kit mode, select the kit to be used as copy source. The copy source can be either a user kit or a preset kit. Copy source kit number 05P 2. Press the [INSERT/COPY] key. The [INSERT/COPY] key flashes and the current kit is selected as copy source.
4. To execute the copy process, press the [INSERT/COPY] key. When wishing to cancel the process, press the [STOP] key. When copying is completed, the unit returns to the kit mode with the copy target kit being selected. If copying was canceled, the unit returns to the kit mode with the copy source kit being selected.
Creating Songs (Song Mode) This section describes how to line up user patterns in a desired order to create an entire song. This mode of operation is called the song mode. What Is a Song? A song is a programmed sequence of preset patterns or user patterns that are played automatically. A song consists of multiple slots (called "steps"), each of which contains one pattern. The maximum length of a song is 99 steps. The maximum number of songs that can be stored in the MRT-3 is 99.
Recording Song Patterns This section describes how you can collect a number of patterns into a song. 1. Press the [SONG] key. The MRT-3 goes into song mode, and the [SONG] key lights up. The display shows the currently selected song number. Song number 01 2. Use the [VALUE +/-] keys to select an empty song number. When you select an empty song, the indication "E" appears on the right side of the display. 02 3. E Press the [REC] key.
5. To proceed to the next step, press the [REC] key. The last two digits of the display now show the second step number, and the first two digits show "EE" which indicates the end of the song. In this condition, you can select the pattern for the second step. Indicates the last step of the song EE02 H INT • By holding down the [SONG] key while pressing the [VALUE +/-] keys, you can move back and forth among steps.
Delete 10. Pattern A Pattern B Pattern C Pattern A Pattern B Pattern D Pattern D When one song is completed, press the [STOP] key. The [REC] key LED goes out, and song recording stops. The song position returns to step 1. 11. To listen to the song, press the [PLAY] key. The [PLAY] key lights up and the song is played back. The [TEMPO] key flashes according to the tempo of the song.
• Also during playback of a song, you can use the pads for manual play. 13. To start playback from a point within a song, hold down the [SONG] key while pressing the [VALUE +/-] keys. When you press the [VALUE +] key, the step number shown on the display advances by 1, and when you press the [VALUE -] key, the step number goes backwards by 1. By pressing the [PLAY] key you can start playback from the selected step. 14.
4. Hold down the [TEMPO] key. While the [TEMPO] key is being pressed, the tempo change information for that step is shown on the display. If no tempo change information is stored for that step, the indication is "---". --5. While holding down the [TEMPO] key, use the [VALUE +/-] keys to set the tempo value (40 – 250). 122 6. If desired, set the tempo for other song steps as well by repeating steps 3 – 5. 7. When you have completed the tempo change input, press the [STOP] key.
4. Hold down the [FUNCTION] key. While the [FUNCTION] key is being pressed, the volume change information for that step is shown on the display. If no volume information is stored for that step, the indication is "---". --5. While holding down the [FUNCTION] key, use the [VALUE +/-] keys to set the volume value (0 – 63). 60 6. If desired, set the volume for other song steps as well by repeating steps 3 – 5. 7. When you have completed the volume change input, press the [STOP] key.
The kit for that song is stored, and the unit returns to the song mode. Checking the Amount of Remaining Memory for Songs You can call up a display that shows the remaining free memory for songs as a percentage. Proceed as follows. 1. In song mode, press the [FUNCTION] key, and then the [PATTERN] key. The amount of free memory is shown in percent on the display. This indication is for information only and cannot be changed. 78 2. Press the [FUNCTION] key again. The unit returns to the song mode.
3. Use the [VALUE +/-] keys to select a song number as copy target. N OTE When the copy is executed, the existing contents of the song selected as copy target will be erased. Make sure that the song you have selected is one that you don't mind erasing. 4. To execute the copy process, press the [INSERT/COPY] key. When wishing to cancel the process, press the [STOP] key. When copying is completed, the unit returns to the song mode with the copy target song being selected.
When deleting is completed, the unit returns to the song mode with an empty song being selected. If deleting was canceled, the unit returns to the song mode with the original song pattern being selected. Once deleted, a song cannot be restored. Proceed with care to prevent inadvertently deleting a song. H INT You can also reset the unit to the factory default condition, with all songs, user patterns, and user kits returned to the original state.
Other Functions This section describes other convenient functions of the MRT-3 and how to return the unit to the factory default condition. Controlling the MRT-3 With a Foot Switch The separately available foot switch FS01 can be used to control various functions of the MRT-3. 1. Connect the FS01 to the [FOOT SW] jack on the rear panel. 2. In pattern mode, press the [FUNCTION] key and then pad 4 (FOOT SW). The currently selected foot switch function is shown on the display. STRT 3.
Second pad First pad A7A5 The sound of the first pad can now be toggled with the foot switch. While the foot switch is pressed, the sound of the first pad is produced. When the foot switch is released, the sound of the second pad is produced. Also without hitting the pad, pressing the foot switch produces the sound of the first pad. • Use FS01 to set the tempo The foot switch can be made to function in the same way as the [TEMPO] key.
Synchronizing Playback With an External Device You can synchronize operation of the MRT-3 to an external device with MIDI OUT, such as a MIDI sequencer or recorder. The MRT-3 then performs pattern or song playback using the tempo supplied by the external device. 1. Connect the MIDI OUT jack of the MIDI sequencer/recorder to the [MIDI IN] connector of the MRT-3, using a MIDI cable. The illustration shows an example for connecting the Multitrak Recording Studio ZOOM MRS-4 to the MRT-3.
The clock source and supported MIDI messages with the various settings are shown below. Int rMt Internal clock MIDI clock Internal clock Start/Stop/Continue supported No Yes Yes Song Position Pointer supported No Yes No Clock source 3. Midi Use the [VALUE +/-] keys to select the "Midi" or "rMt" setting. MIDI When wishing to control the tempo, transport operations, and locate operations all from the external device, select "Midi".
Playing MRT-3 Sounds From an Exter nal MIDI Component Using an external MIDI sequencer or MIDI keyboard, you can play the sound sources of the MRT-3. To do this, the MIDI receive channel setting of the MRT-3 must match the MIDI send channel of the external device. 1. Connect the MIDI OUT jack of the MIDI sequencer or similar to the [MIDI IN] connector of the MRT-3, using a MIDI cable. MIDI OUT MIDI sequencer 2. MIDI IN MRT-3 In pattern mode, press the [FUNCTION] key and then pad 6 (MIDI).
6. Play the external MIDI sequencer or keyboard. The MRT-3 produces drum/percussion sound according to the note numbers received via the [MIDI IN] connector. For information on note number assignments, please refer to the "Reference" section at the end of this manual. It is also possible to send a program change message to the MRT-3 to switch the kit. For information on program change number assignments, please refer to the "Reference" section at the end of this manual.
Setting the Precount for Real-Time Recording The MRT-3 can perform a countdown before the start of real-time recording. The number of precount measures can be changed, and precount can also be turned off. This setting affects all patterns. 1. In pattern mode, press the [FUNCTION] key and then pad 2 (PRE COUNT). The current precount setting is shown on the display (default setting: 1). 1 2. Use the [VALUE +/-] keys to select one of the following settings.
Returning the MRT-3 to the Factory Default Condition You can return all stored data and settings of the MRT-3 to the factory default condition. This is called initialization. N OTE Use this function with care. Initialization will clear all user pattern data, user kit data, and song data that you have created. 1. Hold down the [REC] key while turning power to the MRT-3 on. The display shows "Init". IN 2. T To carry out the initialization process, press the [REC] key once more.
Troubleshooting Check the following items first if there seems to be a problem with the MRT-3. Troubleshooting No sound or very low volume. Song cannot be recorded. • Is the [POWER] switch set to ON? Turn power on, as described in the section "Preparations" (page 8). • Is [OUTPUT] jack connected correctly to the playback system? Make connections as described in "Getting Connected" (page 7). • Is there a problem with the shielded cable? Try using another cable.
Specifications Sampling frequency: D/A Converter: Maximum polyphony: Resolution: Tempo: Maximum notes/events: Instrument sounds: Drum kits: Rhythm patterns: Songs: Pads: 47.
Reference Kit List Reference 52 KIT# KIT NAME MIDI PC# KIT# 01 02 03 04 05 06 07 08 09 10 11 12 13 14 15 16 17 18 19 20 21 22 23 24 25 26 27 28 29 30 31 32 33 34 35 36 37 38 39 40 41 42 43 44 45 46 47 48 49 50 Live Rock Studio Standard Funk Trap Epic Rock Ballad Modern Rap/HipHop Techno Beat General Drum Live Rock variation 1 Live Rock variation 2 Live Rock variation 3 Studio variation 1 Studio variation 2 Studio variation 3 Standard variation 1 Standard variation 2 Standard variation 3 Funk Trap va
MIDI Note Number Chart Note # 24 25 26 27 28 29 30 31 32 33 34 35 36 37 38 39 40 41 42 43 44 45 46 47 48 49 50 51 52 53 54 55 56 57 58 59 INST NAME PAD # * MIDDLE C High Q Slap Scratch Push Scratch Pull Sticks Square Click Metronome Click Metronome Bell KICK 2 KICK 1 EXTRA1(Side Stick) SNARE 1 EXTRA2(Hand Clap) SNARE 2 (TOM 3) CLOSED HAT TOM 3 Pedal HiHat (TOM 2) OPEN HAT TOM 2 (TOM 1) CRASH TOM 1 RIDE Chinese Cymbal CUP Tambourine Splash Cymbal Cowbell Crash Cymbal 2 Vibraslap Ride Cymbal 2 PAD B-1 PA
Instrument List Category Inst # 1: KICK 2: SNARE Reference 54 1 2 3 4 5 6 7 8 9 10 11 12 13 14 15 16 17 18 19 20 21 22 1 2 3 4 5 6 7 8 9 10 11 12 13 14 15 16 17 18 19 20 21 22 23 24 25 26 27 28 ZOOM MRT-3 Name Live Kick 1 Live Kick 2 Studio Booth Kick Small Booth Kick Middle Booth Kick Muted Kick Tight Shell Kick Huge Kick Deep Hard beater Kick Ambient Kick Stage Ambient Kick 1 Stage Ambient Kick 2 Dry Kick Resonated Kick Deep Shell Kick Deep Muffed Kick Analog Kick Short Analog Kick DIGI-ANA Kick L
Category 4: HI HATS 5: CYMBAL 6: EXTRA 7: GLOBAL Inst # Name DIGI-ANA Open-Hat Acoustic Foot-Hat Acoustic Short Foot Analog Foot-Hat Bend Down Close-Hat Bend Down Open-Hat Bend Down Foot-Hat Crash 1 Crash 2 Analog Crash Thin Crash Splash 1 Splash 2 Bend Down Crash China 1 China 2 Ride 1 Ride 2 Ride 3 Bend Down Ride Cup SFX Cup Live Rim Live Long Rim Dry Rim Velocity Bend Down Rim Cowbell 1 Analog Cowbell Velocity Bend Down Cowbell Live Tambourine Velocity Bend Down Tambourine Clap Filtered Clap Veloci
Pattern List Display Reference A01 A02 A03 A04 A05 A06 A07 A08 A09 A10 A11 A12 A13 A14 A15 A16 A17 A18 A19 A20 A21 A22 A23 A24 A25 A26 A27 A28 A29 A30 A31 A32 A33 A34 A35 A36 A37 A38 A39 A40 A41 A42 A43 A44 A45 A46 A47 A48 A49 A50 56 ZOOM MRT-3 Pattern name 08Beat01 08Beat02 08Beat03 08Beat04 08Beat05 08Beat06 08Beat07 08Beat08 08Beat09 08Beat10 08Beat11 08Beat12 16Beat01 16Beat02 16Beat03 16Beat04 16Beat05 16Beat06 16Beat07 16Beat08 16FUS01 16FUS02 JAZZ01 JAZZ02 JAZZ03 JAZZ04 BOSSA CNTRY 68BLUS DANCE
Display Pattern name POP01 POP02 POP03 POP04 POP05 POP06 POP07 POP08 POP09 POP10(shuffle) POP11(shuffle) POP12 POP13 POP14 POP15 POP16 POP17 POP18 POP19T RnB01 RnB02 RnB03 RnB04 RnB05 RnB06 RnB07 RnB08 RnB09(shuffle) RnB10 RnB11 RnB12 RnB13 RnB14 FUNK01 FUNK02 FUNK03 FUNK04 FUNK05 FUNK06 FUNK07 FUNK08 FUNK09 FUNK10 FUNK11 FUNK12 FUNK13 FUNK14 FUNK15 16ROCK01 16ROCK02 KIT Display 3 3 18 18 3 17 17 17 17 4 22 32 33 22 40 2 35 20 26 20 4 6 2 4 27 10 11 15 1 4 22 8 35 22 4 14 14 13 21 4 4 4 19 3 19 6 22 2 2
Display Reference C01 C02 C03 C04 C05 C06 C07 C08 C09 C10 C11 C12 C13 C14 C15 C16 C17 C18 C19 C20 C21 C22 C23 C24 C25 C26 C27 C28 C29 C30 C31 C32 C33 C34 C35 C36 C37 C38 C39 C40 C41 C42 C43 C44 C45 C46 C47 C48 C49 C50 58 ZOOM MRT-3 Pattern name HIP01 HIP02 HIP03 HIP04 HIP05 HIP06 HIP07 HIP08 HIP09 HIP10 HIP11 HIP12 HIP13 HIP14 HIP15 HIP16 HIP17 HIP18 HIP19 HIP20 HIP21 HIP22 HIP23 HIP24 HIP25 HIP26 HIP27 HIP28 HIP29 HIP30 HIP31 HIP32 DANC01 DANC02 DANC03 DANC04 DANC05 DANC06 DANC07 HOUS01 HOUS02 HOUS03
Pattern name KIT Display D01 D02 D03 D04 D05 D06 D07 D08 D09 D10 D11 D12 D13 D14 D15 D16 D17 D18 D19 D20 D21 D22 D23 D24 D25 D26 D27 D28 D29 D30 D31 D32 D33 D34 D35 D36 D37 D38 D39 D40 D41 D42 D43 D44 D45 D46 D47 D48 D49 D50 INTRO01 INTRO02 INTRO03 INTRO04 INTRO05 INTRO06 INTRO07 INTRO08 INTRO09(shuffle) INTRO10 INTRO11 INTRO12 INTRO13 INTRO14 INTRO15 INTRO16 INTRO17 INTRO18 INTRO19 ROCK-FILL01 ROCK-FILL02 ROCK-FILL03 ROCK-FILL04 ROCK-FILL05 ROCK-FILL06 ROCK-FILL07 ROCK-FILL08 ROCK-FILL09 HARDROCK-FILL0
MIDI Implementation 1.
MIDI Implementation Chart [DRUM MACHINE Model MRT-3 ] MIDI Implementation Chart Transmitted Date : Recognized 20.Feb.,2002 Version :1.00 Remarks Function ...
Index ■ Display ■ ■A■ ALL (ALL) COPY (COPY) DEL (DEL) DEMO (DEMO) FULL (FULL) INIT (INIT) INT (INT) MIDI (MIDI) NORM (NORM) PAT (PAT) READY (READY) STRT (STRT) •••••••••••••••••••••••• ••••••••••••• 25, 41 23, 30, 39 •••••••••••••••••••••••• 24, 40 •••••••••••••••••••••• •••••••••••••• 11 18, 20, 34 ••••••••••••••••••••••••• 49 ••••••••••••••••••••••••••••• 46 •••••••••••••••••••••••• 45 •••••••••••••••••••••• 29 ••••••••••••••••••••••••••••• 38 ••••••••••••••••• 48 ••••••••••••••••
Synchronizing • • • • • • • • • • • • • • • • • • • • • • • • MIDI implementation chart • • • • • • • • • • • • • MIDI implementation • • • • • • • • • • • • • • • • • • • • MIDI note number chart • • • • • • • • • • • • • • • • 44 61 60 53 ■P■ Volume change • • • • • • • • • • • • • • • • • • • • • • Step recording • • • • • • • • • • • • • • • • • • • • • • • • • • • • • Swing • • • • • • • • • • • • • • • • • • • • • • • • • • • • • • • • • • • • • • • Synchronized playback • • • • • • • • • • • • • •
ZOOM CORPORATION NOAH Bldg., 2-10-2, Miyanishi-cho, Fuchu-shi, Tokyo 183-0022, Japan PHONE: +81-42-369-7116 FAX: +81-42-369-7115 Web Site: http://www.zoom.co.