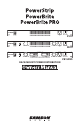
PS15 PB15 PB15PRO RACK-MOUNT POWER DISTRIBUTION
Caution: To reduce the hazard of electrical shock, do not remove cover or back. No user serviceable parts inside. Please refer all servicing to qualified personnel. WARNING: To reduce the risk of fire or electric shock, do not expose this unit to rain or moisture.
Table of Contents Introduction. . . . . . . . . . . . . . . . . . . . . . . . . . . . . . . . . . . . . . . . . . . . . . . . . . . . . . . . . . . 2 PowerBrite Features. . . . . . . . . . . . . . . . . . . . . . . . . . . . . . . . . . . . . . . . . . . . . . . . . . . . 3 PS15 Guided Tour - Front Panel. . . . . . . . . . . . . . . . . . . . . . . . . . . . . . . . . . . . . . . . . 4 PS15 Guided Tour - Rear Panel. . . . . . . . . . . . . . . . . . . . . . . . . . . . . . . . . . . . . . . . . .
Introduction Congratulations on purchasing your Samson PowerStrip, PowerBrite, or PowerBrite Pro! This manual covers three products: the PowerStrip PS15; the PowerBrite PB15; and the PowerBrite PB15Pro. All three of these single-space rack units provide multiple outlets for reliable power distribution with 3-point surge and spike protection, plus RF (Radio Frequency) filtering.
PowerStrip & PowerBrite Features The Samson PowerStrip PS15, PowerBrite PB15, and PowerBrite PB15Pro all utilize state-of-the-art technology in power distribution and are engineered to the finest detail. Here are some of their main features: • Eight switched, rear panel, AC outlets that allow you to power an entire rack’s worth of gear from one source.
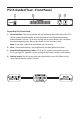
PS15 Guided Tour - Front Panel PowerStrip PS15 Front Panel 1: Circuit breaker- This circuit breaker will trip whenever the total load on the PS15 (all rear panel switched outlets plus the front panel unswitched convenience outlet) exceeds 15 amps. To reset it, unplug one or more devices so as to reduce the load and gently press the circuit breaker in until you hear it click. Note: It may take a minute to cool before you can reset it. 2.
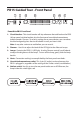
PS15 Guided Tour - Rear Panel PowerStrip PS15 Rear Panel 1. Power cord - Heavy Duty, 14 gauge mains power cord. 2: Switched AC outlets (horizontal mount)- Connect external equipment to these standard 3-pin AC outlets, which are turned on and off from the front panel Outlets switch (see #2 on the previous page). 3: Switched AC outlets (vertical mount)- Similar to the AC outlets described in #2 above, these are mounted vertically so as to accommodate external transformer AC power adapters.
PB15 Guided Tour - Front Panel PowerBrite PB15 Front Panel 1: Circuit breaker- This circuit breaker will trip whenever the total load on the PB15 (all rear panel switched outlets plus the front panel unswitched convenience outlet) exceeds 15 amps. To reset it, unplug one or more devices so as to reduce the load and gently press the circuit breaker in until you hear it click. Note: It may take a minute to cool before you can reset it.
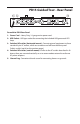
PB15 Guided Tour - Rear Panel 1 2 3 4 5 PowerBrite PB15 Rear Panel 1: Power Cord - Heavy Duty, 14 gauge mains power cord. 2: USB Socket - USB type socket for connecting the included USB gooseneck LED lamp. 3: Switched AC outlets (horizontal mount)- Connect external equipment to these standard 3-pin AC outlets, which are turned on and off from the front panel Outlets switch (see #6 on the previous page).
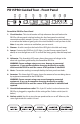
PB15PRO Guided Tour - Front Panel PowerBrite PB15Pro Front Panel 1: Circuit breaker- This circuit breaker will trip whenever the total load on the PB15Pro (all rear panel switched outlets plus the front-panel unswitched convenience outlet) exceeds 15 amps. To reset it, unplug one or more devices so as to reduce the load and gently press the circuit breaker in until you hear it click. Note: It may take a minute to cool before you can reset it.
PB15PRO Guided Tour - Rear Panel PowerBrite PB15Pro Rear Panel 1: Power Cord - Heavy Duty, 14 gauge mains power cord. 2: USB Socket - USB type socket for connecting the included USB gooseneck LED lamp. 3: Switched AC outlets (horizontal mount)- Connect external equipment to these standard 3-pin AC outlets, which are turned on and off from the front panel Outlets switch (see #8 on the previous page).
Setting Up and Using Your PowerStrip or PowerBrite Setting up your PS15, PB15, or PB15Pro is a simple procedure which takes only a few minutes: 1. Remove all packing materials (save them in case of need for future service) and install the unit in a standard 19” rack. We recommend that the PB15 and PB15Pro be placed in the top slot so that its slide-out LED lamps can be used to illuminate the entire rack of equipment below. 2. Connect the PS15, PB15, or PB15Pro to any standard grounded AC outlet.
Appendix A: LED Or Incandescent? There are numerous advantages to using the kind of LED (light emitting diode) lighting provided by the PowerBrite PB15 and PowerBrite PB15Pro over the incandescent lighting provided by competing rack light products. Here are the main points to consider when making your purchase: • LED lights generate almost no heat at all; incandescent bulbs can generate large amounts of heat.
Specifications Electrical: Number of Outlets PS15, PB15, PB15Pro 8 switched, 1 unswitched Max. Current Input Voltage (RMS) Spike Protection Mode Max. Clamping Voltage (@ 50 A) Response Time Max. Surge Current Max. Spike Energy Noise Attenuation Power Cord 15 Amp (circuit breaker protected) 0 to 130 Vac continuous Hot to Neutral, Hot to Ground, and Neutral to Ground 340 Vac 1 nanosecond 6,000 Amps (8 x 20 _s pulse) 70 Joules per leg >20 dB, 1.
Samson Technologies Corp. 45 Gilpin Avenue Hauppauge, New York 11788-8816 Phone: 1-800-3-SAMSON (1-800-372-6766) Fax: 631-784-2201 www.samsontech.