
User's Manual


4
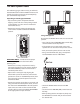
Using a Microphone
Be sure that the XP308i’s Power switch is set to the off
position.
• Turn all of the channel VOLUME (VOL) controls fully
counterclockwise to the “0” position.
• If the speakers are not connected, connect the
speaker’s wire as described in the previous section.
• Next, connect the power cable to an AC socket.
• Using a standard XLR cable, plug a microphone
into the XP308i’s Channel 1 MIC INPUT.
• Switch the XP308i’s Power switch to the ON
position.
• Set the Channel 1 VOLUME (VOL) control to about
half way.
• While speaking into the microphone, slowly raise
the MASTER level control until you have reached
the desired level.
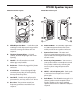
XP308i Quick Start
In the following pages of this manual, you will find a
detailed eXPanation of all the XP308i’s functions and
controls, but if you just want to get started quickly
you can follow the steps below.
Unpacking and Setting Up the XP308i
• Unpack all the system components fromthe
shipping carton and save all the packing material
in (the unlikely) case your unit ever needs to be
returned for service.
• Remove the mixer by turning the quarter turn
screw counter clockwise towards the RELEASE
position.
IMPORTANT NOTE! – In order to ensure proper
ventilation, always remove the mixer before
powering it on.
• Remove the accessory compartment cover by
turning the quarter turn screw counter clockwise
towards the RELEASE position and remove the
included speaker cables.
• Replace the accessory panel by aligning the
bottom of the panel into the slots, make sure the
quarter turn screw is in the RELEASE position, then
close the panel and turn the quarter turn screw
clockwise to LOCK.
• Position the speakers on the floor or on stands and
using one of the included speaker cables, connect
the mixer’s LEFT SPEAKER OUT to the left speaker’s
input connector. Next use the second included
speaker cable to connect the RIGHT SPEAKER OUT
to the right speaker’s input connector.